I love simple projects that produce a little delight for kids and adults alike. These DIY butterfly snack bags are exactly that: quick to assemble, cute to look at, and practical for packed lunches, class parties, or an easy after-school nibble. They take minutes to make and require almost no prep, but they look thoughtful and keep snacks nicely separated.
The idea is straightforward — two different snack halves inside a single sealed bag, divided visually and physically by a cheese stick wrapped with a pipe cleaner to form the butterfly body and antennae. It’s hands-on enough to be a fun activity with kids and tidy enough to slide into a lunchbox without a mess. There’s no tricky technique; just follow a few clear steps and you’re done.
I’ll walk you through what goes in each bag, the exact step-by-step method I use, ways to swap ingredients for dietary needs, and common mistakes to avoid. If you want a dependable, repeatable plan to make a dozen or two in one sitting, this guide will save you time and keep things consistent.
What Goes In
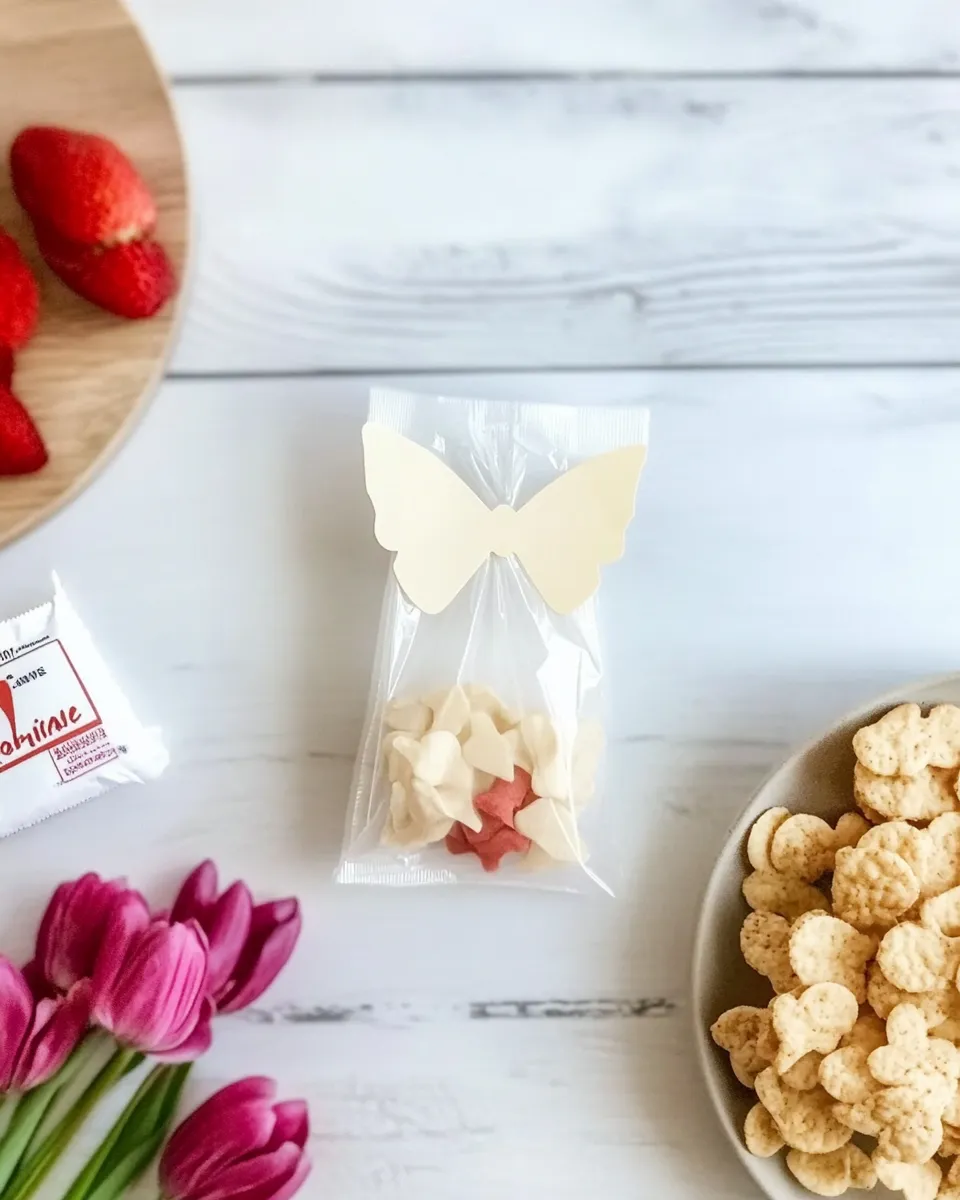
- 1 ziploc bag — holds the snacks and makes the butterfly body; use a bag that seals fully.
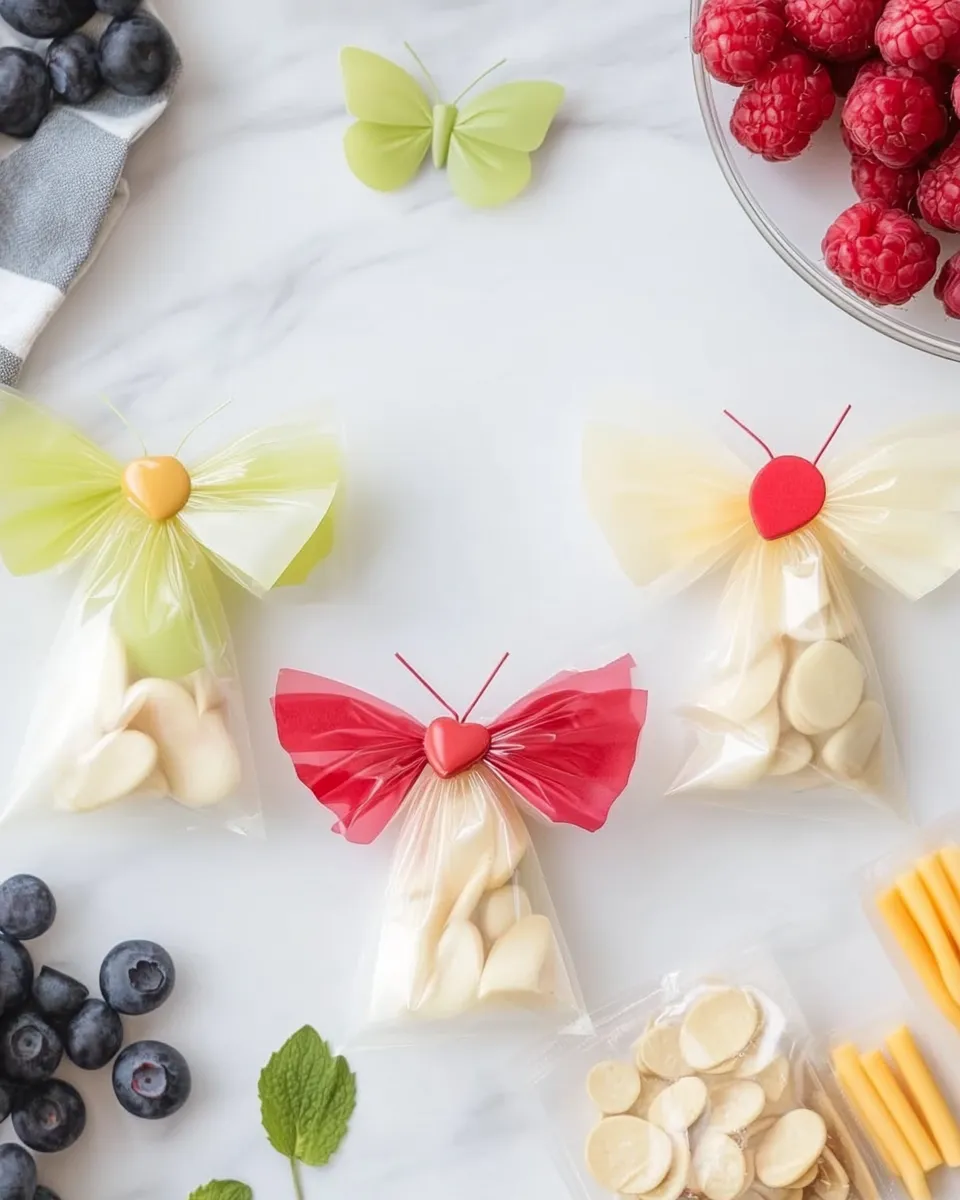
- 1 pipe cleaner — wraps around the bag and cheese stick to secure the divider and create antennae.
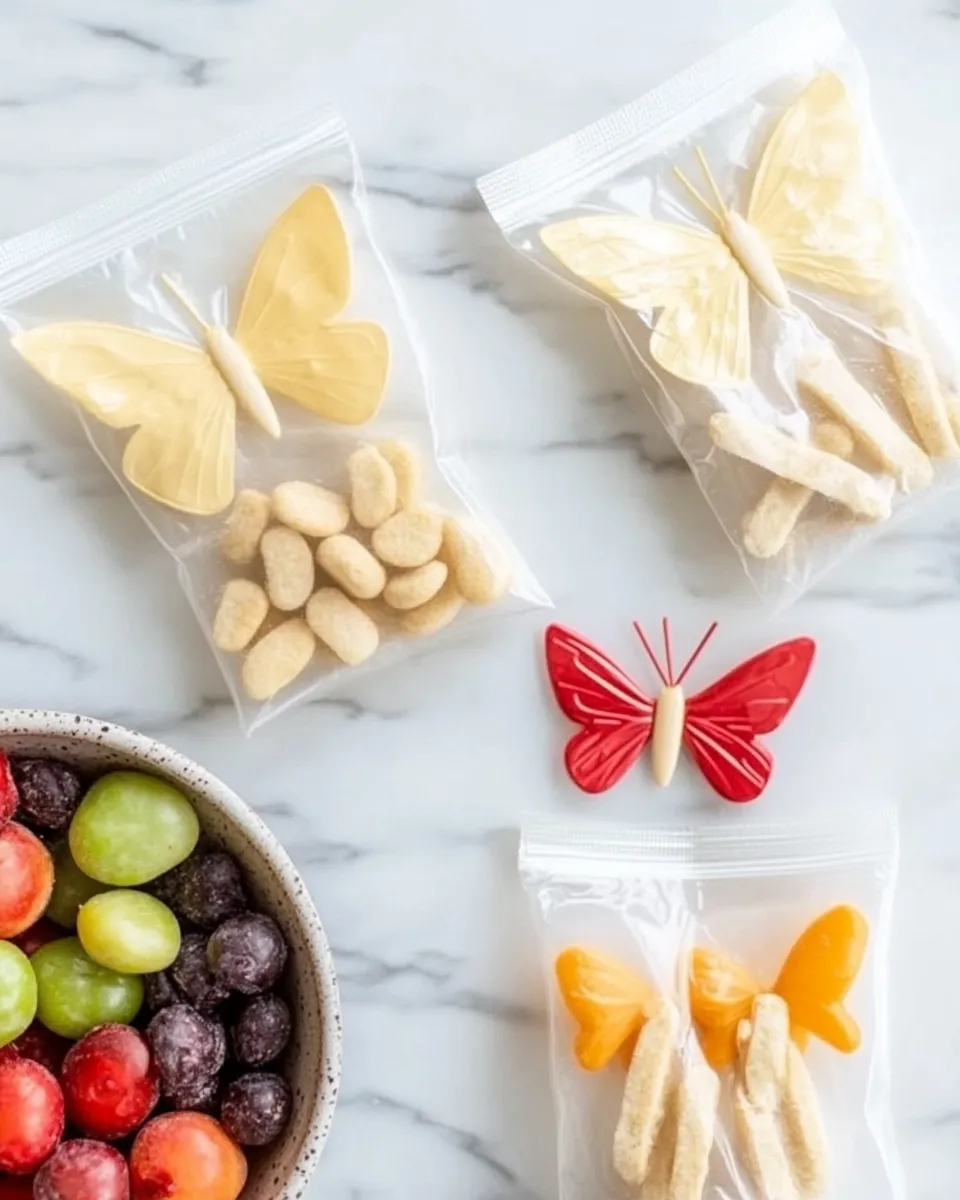
- 1 cheese stick — forms the butterfly’s body and acts as a physical barrier between snack halves.
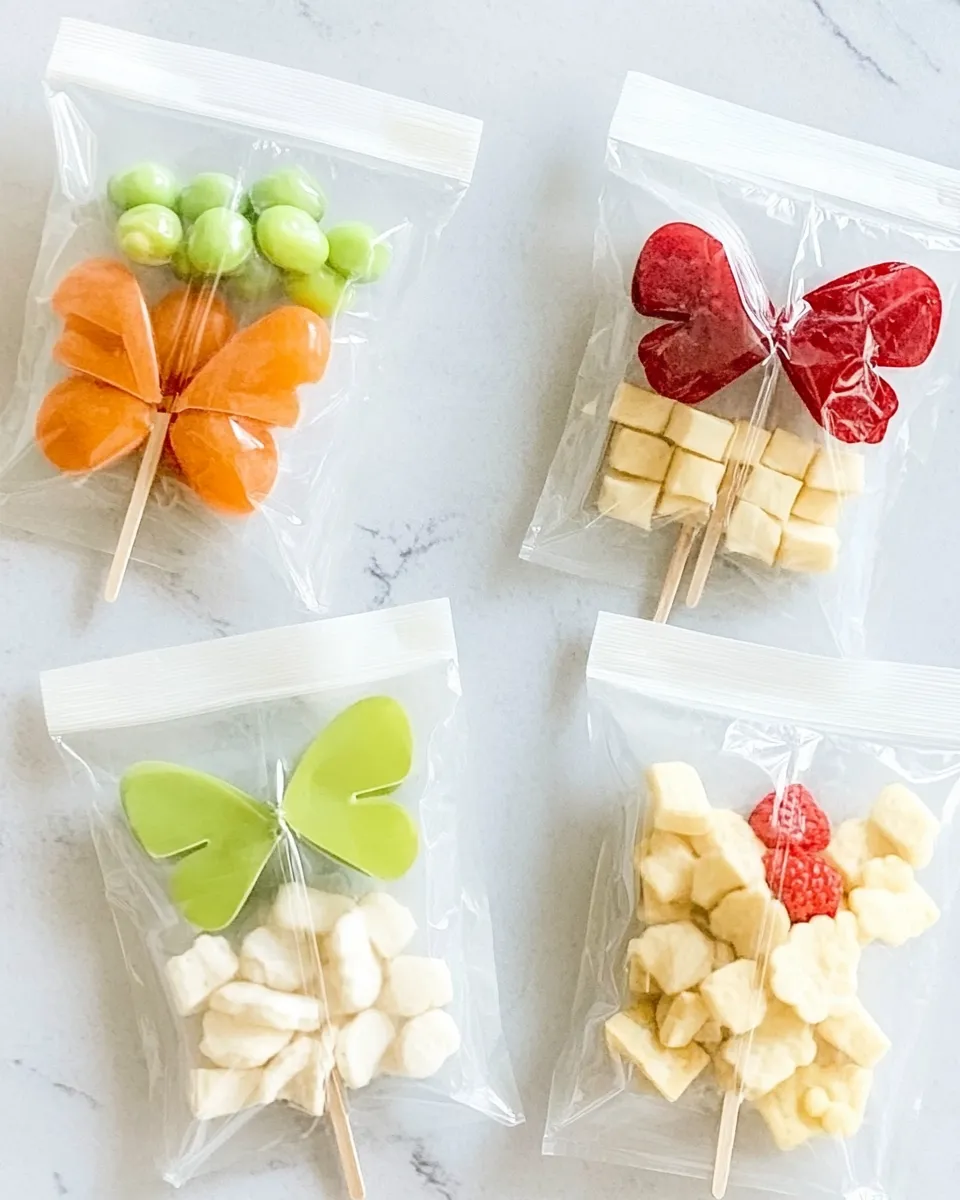
- ¼ cup fresh fruit — fills one wing; small, bite-sized pieces work best to keep the bag neat.
- ¼ cup mini sandwich crackers — fills the other wing for crunch; choose a size that fits comfortably in the bag.
Stepwise Method: DIY Butterfly Snack Bags
- Open the 1 ziploc bag and lay it flat.
- Put 1/4 cup fresh fruit into one side of the open bag and 1/4 cup mini sandwich crackers into the other side; push the fruit and crackers to opposite halves so they stay separated.
- Squeeze out excess air and seal the bag completely.
- Place the 1 cheese stick on the front of the sealed bag centered over where the two food halves meet.
- Wrap the 1 pipe cleaner once around the middle of the sealed bag and around the cheese stick, then twist the pipe cleaner ends together to secure the cheese stick and form a divider between the two compartments.
- Bend the twisted pipe cleaner ends upward to make antennae and tuck or bend any sharp ends inward so they do not poke.
- Check that the bag is sealed, the compartments are separated, and the cheese stick is held securely; tighten or reposition the pipe cleaner if needed.
Quick assembly tips
Work on a clean, flat surface and line up your components so you can assemble several bags in a row. Use pre-portioned measuring cups for the fruit and crackers to keep each butterfly consistent. If the cheese stick is longer than the bag is tall, place it horizontally centered so it presses gently against the seal without splitting it.
Why Cooks Rave About It
There’s a lot to like about this project beyond the obvious cuteness. It’s fast — you can make a whole batch while the kettle boils. It’s portion-controlled: each bag uses precise amounts so you avoid overpacking snacks. The assembly uses items most people already have in the kitchen or classroom supply drawer. And the design keeps a wet snack (fruit) separate from a dry, crunchy snack (crackers), which preserves texture and prevents sogginess.
For parents and caregivers, the biggest win is practicality. These bags are economical: one pipe cleaner and one bag per butterfly, with modest amounts of fruit and crackers. They teach kids about portioning and create a little excitement around snack time without sugar-heavy treats. For classroom events, they’re easy to scale up and transport.
Healthier Substitutions
Small swaps can make these butterflies healthier without changing the method. Try lower-sodium mini crackers or whole-grain versions in place of standard mini sandwich crackers. Choose fresh fruit that’s low in added sugars and water content that won’t leak — berries, grapes halved if needed, or chopped apples (tossed with a little lemon juice to prevent browning).
If you prefer, swap the standard cheese stick for a reduced-fat string cheese or a plant-based cheese stick if that fits your household needs. The important thing is keeping the size and shape similar so it functions as the divider and “body.”
Equipment & Tools
- Flat work surface — for laying out bags and filling them comfortably.
- Measuring cup (¼ cup) — for consistent portioning of fruit and crackers.
- Disposable or washable gloves (optional) — helpful if you’re making many for others or prefer extra sanitary handling.
- Container or tray — to hold finished butterflies upright while you finish a batch.
Errors to Dodge
Seal failure is the most common problem. Make sure you squeeze out excess air and run your fingers along the zipper seal to confirm it’s fully closed. If the bag isn’t fully sealed, the pipe cleaner can push against the opening and cause a tear.
Overfilling either side makes the divider less effective and can pop the seal. Stick to the ¼ cup measurements. Also, be careful with pipe cleaner ends — twist and then tuck sharp tips inward so they don’t poke the bag or little hands.
A final check for leaks is worth the 10 seconds: gently press each compartment to make sure nothing seeps out. If fruit releases juice, transfer it to a small airtight container before adding it to the bag to protect the crackers.
Tailor It to Your Diet
These butterflies adapt easily to dietary restrictions.
- Nut-free: The base recipe is already nut-free — keep it that way by avoiding nut-based crackers or spreads.
- Gluten-free: Use gluten-free mini crackers and confirm the cheese stick is labeled gluten-free.
- Dairy-free: Swap the cheese stick for a firm plant-based alternative with similar size and firmness, or use a small rolled-up fruit leather or dense carrot stick as the body (ensure it’s about the same shape so the pipe cleaner can secure it).
- Vegan: Use vegan cheese sticks or other firm vegan alternatives and check crackers for animal-derived ingredients.
What I Learned Testing
When I first tried these, I underestimated how much a slightly overripe fruit would dampen the crackers. Lesson learned: firmer, less juicy fruit works best unless you isolate the fruit in a tiny sealed container inside the bag. Second, pipe cleaners come in different gauges and flexibility. Thinner pipe cleaners twist easily and tuck neatly; thicker ones hold shape better but can be harder to bend into antennae without trimming ends carefully.
I also discovered that placing the cheese stick on the outside front of the sealed bag gives the nicest “butterfly body” look and keeps the bird’s wings visible. Kids love choosing their fruit and cracker combos when you set up a mini assembly line with small cups of each filling.
Make-Ahead & Storage
These are best eaten the same day for optimal texture and freshness. If you need to make them ahead, keep them refrigerated in a shallow container so the cheese stick remains cool. Make-up to one day in advance is reasonable; beyond that, crackers will soften and fresh fruit will lose its crispness.
If transporting, place the butterflies upright in a shallow box or lunch tote so they stay flat and the pipe cleaner attachments don’t get crushed. For single-serve, place a cool pack next to them when you’re carrying them to keep the cheese stick firm and safe.
Frequently Asked Questions
Can I use a different divider instead of a cheese stick?
Yes. The divider just needs to be firm and roughly the same size to press against the seal. A short piece of cucumber or a carrot stick can work in a pinch, but be aware that moist vegetables may transfer water to the bag.
Are these safe for school lunches?
Yes, as long as you follow school allergy policies. The base recipe is nut-free, but always verify cracker ingredients and follow any specific class restrictions. Keep them chilled if the school requires refrigerated lunches for dairy items.
How do I stop the antennae from poking through the bag?
After twisting the pipe cleaner, bend the ends upward and then tuck or curl the very tips toward the center so there are no sharp points. You can also wrap a small bit of tape around the exposed ends for extra safety.
Can I scale this up for a party?
Yes. Line up your fillings and bags, and have one person fill bags while another seals and another adds the cheese stick and pipe cleaner. You can assemble dozens in under an hour with a small team.
Before You Go
These DIY butterfly snack bags are one of those small projects that deliver big smiles for minimal effort. They’re practical, customizable, and teachable — perfect for busy mornings or making snack time feel a little special. Keep a small supply of pipe cleaners and a stack of sandwich bags on hand, and you’ll be surprised how often this little trick saves the day.
If you try a variation that works especially well — a favorite fruit-cracker pairing or a clever way to secure antennae — I’d love to hear about it. Leave a note, and I’ll add it to the next update so other readers can benefit from your tweak.

DIY Butterfly Snack Bags
Ingredients
Ingredients
- 1 ziploc bag
- 1 pipe cleaner
- 1 cheese stick
- 1/4 cupfresh fruit
- 1/4 cupmini sandwich crackers
Instructions
Instructions
- Open the 1 ziploc bag and lay it flat.
- Put 1/4 cup fresh fruit into one side of the open bag and 1/4 cup mini sandwich crackers into the other side; push the fruit and crackers to opposite halves so they stay separated.
- Squeeze out excess air and seal the bag completely.
- Place the 1 cheese stick on the front of the sealed bag centered over where the two food halves meet.
- Wrap the 1 pipe cleaner once around the middle of the sealed bag and around the cheese stick, then twist the pipe cleaner ends together to secure the cheese stick and form a divider between the two compartments.
- Bend the twisted pipe cleaner ends upward to make antennae and tuck or bend any sharp ends inward so they do not poke.
- Check that the bag is sealed, the compartments are separated, and the cheese stick is held securely; tighten or reposition the pipe cleaner if needed.
Notes
Cheese or Peanut Butter Snack Crackers are great options for a Butterfly Bag suitable for lunch.
Pretzels, trail mix, or cheese crackers are great options for a Butterfly Snack Bag.
These Butterfly Bags will keep for 3-5 days in the fridge, depending on the fruit you choose to use.