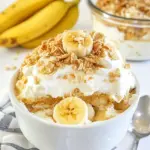
I make this banana pudding more than I should admit. It’s one of those recipes that arrives at parties, potlucks, and quiet Sunday dinners with the same quiet confidence: it’s familiar, comforting, and disappears faster than you expect. No fuss, just a few pantry staples and a straightforward assembly that yields a silky, crowd-pleasing dessert.
What I love about this version is that it relies on instant pudding and sweetened condensed milk for richness, sour cream for a slight tang, and Cool Whip for lightness. The vanilla wafers and bananas give structure and that nostalgic crunch-slice-cream rhythm we all reach for. It’s approachable and forgiving, which is exactly what you want for a dessert that needs to travel or sit in the fridge before serving.
Below you’ll find ingredient notes, the exact step-by-step cooking guide, troubleshooting tips, and a few swaps to fit dietary needs. I wrote this so you can make it confidently the first time and keep coming back to it as your go-to banana pudding.
Ingredient Notes

Each ingredient plays a clear role and the combination is what makes this pudding so reliable:
- Vanilla wafers (1 (15-oz) box) — classic structure and crunch; reserve a few to crush for a finishing crumb on top.
- Instant vanilla pudding (1 (5.1-oz) box) — gives immediate vanilla flavor and thickening without cooking.
- Milk (2 cups) — hydrates the pudding mix; whole milk gives a richer texture but 2% will work if that’s what you have.
- Sour cream (½ cup) — adds tang and creaminess so the pudding isn’t too sweet or one-dimensional.
- Sweetened condensed milk (1 (14-oz) can) — deep, caramel-like sweetness and body; it’s a shortcut to fudge-like richness without cooking sugar.
- Vanilla extract (2 tsp) — amplifies the vanilla notes and rounds out the dairy sweetness.
- Cool Whip, thawed (1 (12-oz) container) — lightens the pudding and makes it scoopable; fold gently to keep airy texture.
- Bananas (6), sliced — the star; use ripe but still firm bananas (yellow with a few brown flecks) to avoid mushy layers after chilling.
Ingredients
- 1(15-oz)box vanilla wafers,(reserve a few to crush on the top) — base and crunchy topping, saves you from making a separate cookie crumb.
- 1(5.1-oz)box instant vanilla pudding — quick-thickening vanilla flavor, no cooking required.
- 2cupsmilk — hydrates the pudding mix; whole milk gives best mouthfeel.
- ½cupsour cream — provides tang and balances the sweetness.
- 1(14-oz)can sweetened condensed milk — adds lush sweetness and creamy body.
- 2tspvanilla extract — deepens the vanilla profile.
- 1(12-oz)container Cool Whip,,thawed — keeps the pudding light and airy when folded in.
- 6bananas,,sliced — the fresh fruit layer; slice evenly so the texture is consistent throughout.
The Ultimate Banana Pudding Cooking Guide
- Lightly spray a 9×13-inch baking dish with cooking spray.
- Remove a few vanilla wafers from the 15-oz box and set them aside to crush later for the topping. Use the remaining vanilla wafers for the layers.
- Slice the 6 bananas and set them aside.
- In a medium bowl, whisk the 5.1-oz box instant vanilla pudding mix with 2 cups milk until smooth and beginning to thicken.
- Add 1/2 cup sour cream, the 14-oz can sweetened condensed milk, and 2 tsp vanilla extract to the pudding mixture; whisk until smooth and fully combined.
- Gently fold the thawed 12-oz container of Cool Whip into the pudding mixture with a rubber spatula until evenly incorporated, being careful not to overmix.
- Assemble the pudding in the prepared dish: arrange half of the remaining vanilla wafers in a single layer on the bottom (break wafers as needed to fit). Top the wafers with half of the sliced bananas, then spread half of the pudding mixture evenly over the bananas.
- Repeat the layers: place the remaining vanilla wafers, then the remaining sliced bananas, and finish by spreading the remaining pudding mixture over the top.
- Crush the reserved vanilla wafers and sprinkle the crumbs evenly over the top layer.
- Cover the dish and refrigerate at least 4 hours before serving.
Why It Works Every Time

This recipe balances creaminess, sweetness, and texture in a way that’s hard to mess up. Instant pudding gives you a stable base that sets without baking or starch-thickening. Sweetened condensed milk deepens the flavor and adds a silky mouthfeel that lasts even after chilling. Sour cream cuts through the sweetness with a touch of acidity, preventing the pudding from tasting cloying.
Cool Whip is the practical choice for an airy lift; folding it in preserves volume and creates a light, mousse-like layer that contrasts with the dense wafer and soft banana. The vanilla wafers are sturdy enough to hold a layer yet soft enough to become tender as they absorb moisture. Chilling for at least four hours allows flavors to marry and the texture to firm up into that classic, sliceable pudding you remember from potlucks.
Flavor-Forward Alternatives

If you want to elevate or twist the flavor, try one of these options. Each keeps the original structure but nudges profile and complexity.
- Salted caramel finish: Drizzle a thin ribbon of salted caramel over the top just before serving for a salty-sweet contrast.
- Espresso boost: Dissolve 1–2 tsp instant espresso powder in the milk before whisking it into the pudding mix for a subtle mocha note.
- Banana-rum shimmer: Add 1–2 tablespoons of dark rum or rum extract to the pudding mix for adult-friendly depth.
- Citrus brightness: Fold in 1–2 teaspoons of fresh lemon or orange zest with the vanilla extract to brighten the overall flavor.
- Nutty crunch: Sprinkle chopped toasted pecans or sliced almonds between the layers for an extra textural dimension.
What’s in the Gear List
- 9×13-inch baking dish — the standard size for even layers and crowd servings.
- Medium mixing bowl — for whisking the pudding and dairy components.
- Rubber spatula — gentle folding keeps Cool Whip airy.
- Measuring cups and spoons — the pudding mix and milk ratio matters for set.
- Whisk — for dissolving the pudding powder smoothly.
- Knife and cutting board — for evenly slicing the bananas.
- Plastic wrap or lid — to cover the dish while it chills in the fridge.
Avoid These Mistakes
Overmixing the Cool Whip
Folding preserves air. If you stir vigorously you’ll lose volume and end up with a dense, heavy pudding. Use a gentle fold-and-turn motion with a spatula until the streaks disappear.
Using Overripe Bananas
Mushy or very brown bananas will bleed and make the layers soggy. Aim for bananas that are ripe, fragrant, and just starting to show a few brown specks. They’ll be sweet without collapsing.
Skipping the Chill Time
This is a set-and-serve recipe. The pudding needs at least four hours to firm and for the wafers to take on the right tender-but-not-mushy texture. Don’t rush it; overnight is even better.
Putting Soggy Wafers on the Bottom
If your wafers are already soft, press them gently to form a stable layer but don’t pile on moisture immediately. A thin, even layer holds better than a thick, broken-up mass.
Allergy-Friendly Swaps
Here are swaps that keep the spirit of the recipe while addressing common allergies:
- Dairy-free: Use a non-dairy instant vanilla pudding mix (check labels), replace the milk with a full-fat plant milk (like oat or coconut) and swap Cool Whip for a dairy-free whipped topping. Replace sour cream with a dairy-free cultured cream alternative.
- Egg/dairy-safe for those avoiding sweetened condensed milk: Use a commercial non-dairy condensed milk alternative or make a reduced, thickened coconut milk sweetener if you have experience with stovetop reductions (note: that’s a separate process and will alter texture).
- Gluten-free: Substitute gluten-free vanilla sandwich cookies or gf vanilla wafers for the vanilla wafers. Ensure pudding mix is labeled gluten-free.
- Nut-free: The base recipe is nut-free; avoid any additional nut toppings and verify any substitutes are processed in nut-free facilities if there’s a severe allergy.
Behind the Recipe
This is the banana pudding I reach for when I want something that reads classic but is fast enough for last-minute hosting. It’s based on that southern-staple blueprint—layers of cookies, sliced bananas, and a creamy filling—but simplified with instant pudding and canned condensed milk so you can get to the good part: the assembly and the chilling.
I started making this because I wanted a dessert that could be prepped in under 30 minutes and survive a car ride. The Cool Whip shortcut keeps the filling stable after refrigeration, and the sour cream was my culinary tweak to prevent it from tasting like a single-note sugar bomb. Over the years friends told me they loved the texture contrast and that it reminded them of family potlucks. If you stick to the order and the chilling time in the cooking guide, you’ll reproduce that nostalgic crowd-pleaser every time.
How to Store & Reheat
Store: Cover the dish tightly with plastic wrap or a lid and keep in the refrigerator for up to 3 days. After that the banana slices will begin to darken and the wafers will continue to soften.
Travel: If you need to transport the pudding, keep the top layer intact and chill thoroughly before moving. Use a cooler with ice packs to maintain temperature during transit.
Reheat: This pudding is meant to be served cold. Do not reheat; if you want a warm dessert, consider serving warm caramel sauce on the side and spoon over chilled servings just before eating.
Quick Q&A
Can I make this ahead? Yes. Make it the day before and refrigerate—it actually improves as the flavors meld. Just save the crushed vanilla wafer topping until right before serving if you want maximum crunch.
Can I use homemade whipped cream instead of Cool Whip? You can, but homemade whipped cream will deflate faster and may lead to a slightly looser texture after chilling. If using whipped cream, stabilize it with a little powdered sugar or gelatin for best results.
Will the bananas brown? They may darken slightly after 24 hours. If presentation matters, add a thin layer of pudding over the topmost bananas or add the final banana layer closer to serving time.
Can I double the recipe? Yes. Use a larger pan or two 9×13 dishes. Keep assembly proportions the same.
Ready, Set, Cook
Prep your dish and line up the ingredients. Follow the Cooking Guide steps exactly—measure, whisk, fold, and layer. Chill at least four hours, then sprinkle the reserved crushed wafers and serve. It’s simple, forgiving, and reliably delicious. Bring it to your next gathering; it’s the kind of dessert that starts conversations and ends with an empty dish.
The Ultimate Banana Pudding
Ingredients
Ingredients
- 1 15-ozbox vanilla wafers, (reserve a few to crush on the top)
- 1 5.1-ozbox instant vanilla pudding
- 2 cupsmilk
- 1/2 cupsour cream
- 1 14-ozcan sweetened condensed milk
- 2 tspvanilla extract
- 1 12-ozcontainer Cool Whip, ,thawed
- 6 bananas ,sliced
Instructions
Instructions
- Lightly spray a 9×13-inch baking dish with cooking spray.
- Remove a few vanilla wafers from the 15-oz box and set them aside to crush later for the topping. Use the remaining vanilla wafers for the layers.
- Slice the 6 bananas and set them aside.
- In a medium bowl, whisk the 5.1-oz box instant vanilla pudding mix with 2 cups milk until smooth and beginning to thicken.
- Add 1/2 cup sour cream, the 14-oz can sweetened condensed milk, and 2 tsp vanilla extract to the pudding mixture; whisk until smooth and fully combined.
- Gently fold the thawed 12-oz container of Cool Whip into the pudding mixture with a rubber spatula until evenly incorporated, being careful not to overmix.
- Assemble the pudding in the prepared dish: arrange half of the remaining vanilla wafers in a single layer on the bottom (break wafers as needed to fit). Top the wafers with half of the sliced bananas, then spread half of the pudding mixture evenly over the bananas.
- Repeat the layers: place the remaining vanilla wafers, then the remaining sliced bananas, and finish by spreading the remaining pudding mixture over the top.
- Crush the reserved vanilla wafers and sprinkle the crumbs evenly over the top layer.
- Cover the dish and refrigerate at least 4 hours before serving.
Equipment
- 9x13 inch Baking Dish
Notes
Can Banana Pudding be made in advance? Yes! I prefer to make this dessert the day before serving. It is better on the second day.
Use any many or as few bananas as you prefer.
If you don’t like bananas you can leave them out. The pudding and cookies are to-die-for!
I used a Family Size box of Nilla Wafers so I had plenty of extra cookies to crush on top of the dessert. You can use a regular 11-oz size box if you can’t find the larger box.
Store the pudding covered in the refrigerator. It will keep up to 4 days.