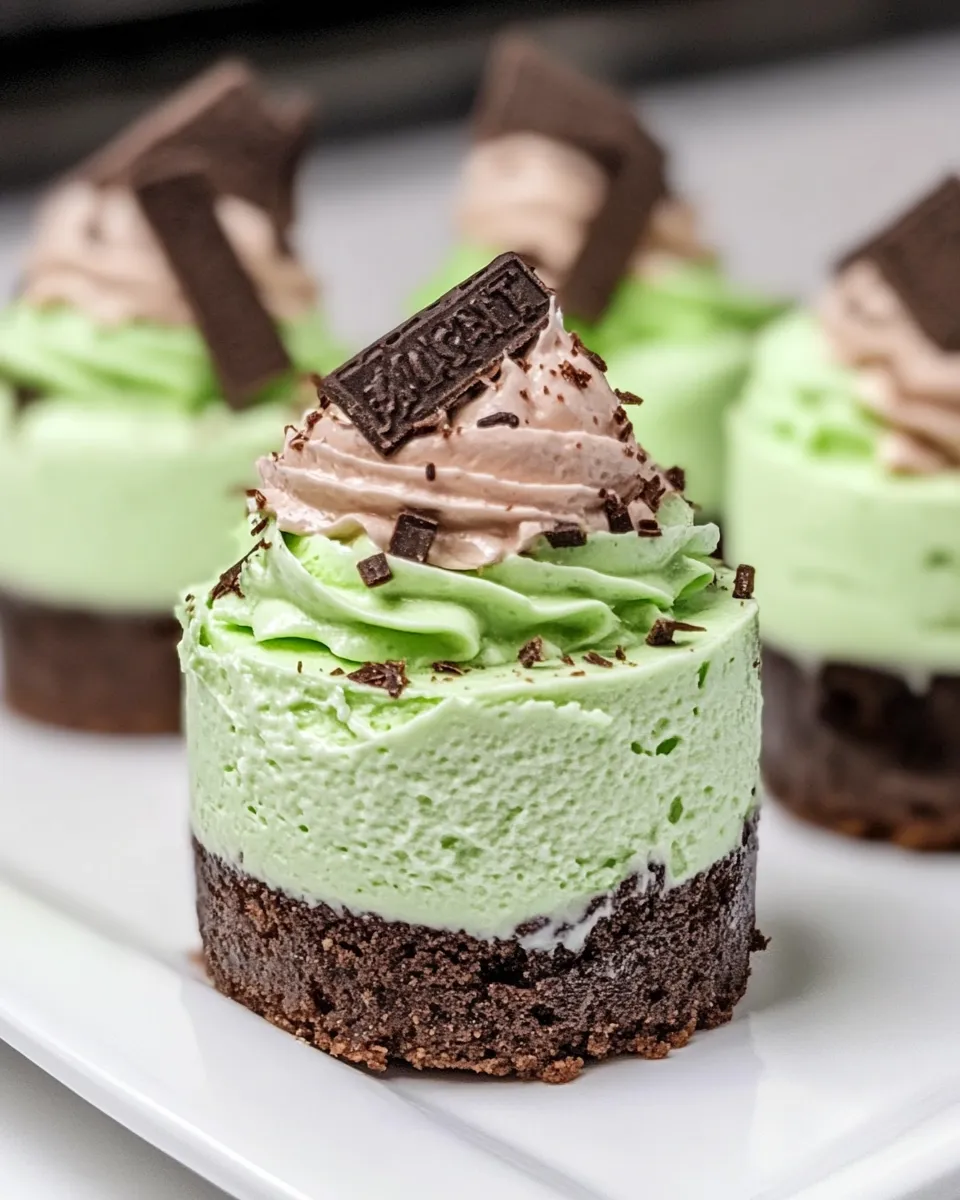
I fell in love with these little cheesecakes the first time I tasted one: bright peppermint, creamy white chocolate, and a mint‑Oreo crust that snaps. They’re small, so you get a perfect portion every time — no guilt, no cutting, just pure, minty pleasure. I share this version because it’s reliable, quick to assemble, and makes a beautiful dessert for a party or a quiet night in.
The method is straightforward: a pressed cookie crust, a silky white chocolate‑flecked filling, a short chill, and a cloud of chocolate whipped cream on top. The recipe uses mint Oreos in two ways — as a crust and folded into the filling — which gives an honest, layered mint flavor and a pleasant texture contrast.
Below you’ll find the ingredients used exactly as written, step‑by‑step baking directions, tips for equipment and timing, and thoughtful variations to make the recipe your own. Read the steps through once before you begin. These mini cheesecakes are forgiving, but a little organization makes them come out perfectly every time.
The Ingredient Lineup

Ingredients
- 1½ cups mint Oreo cookie crumbles (about 20 cookies) — the base for the crust; finely crushed gives a compact, even crust.
- ⅜ cup granulated sugar — sweetens the crust and helps it bind when combined with butter.
- 3 tablespoons salted butter (melted) — holds the crumbs together and adds a touch of salt to balance mint.
- 1 cup white chocolate chips (melted and cooled) — folded into the filling for creaminess and subtle sweetness.
- 16 ounces cream cheese (softened) — the primary structure of the filling; bring to room temperature for a lump‑free batter.
- ⅔ cup granulated sugar — sweetens the filling; measure carefully for texture.
- 1 teaspoon peppermint extract — delivers the mint flavor; use a light hand if your extract is strong.
- 1 teaspoon vanilla extract — balances the peppermint and rounds the flavor.
- ½ cup sour cream — keeps the filling tender and adds slight tang.
- 2 eggs — bind the filling and help it set; add one at a time as instructed.
- 1 to 2 drops gel-based green food coloring — optional for color; start with one drop and add another if needed.
- 6 mint Oreo cookies (finely chopped) — folded into the batter for texture and pockets of cookie.
- 2 cups heavy whipping cream — whipped to make the chocolate whipped cream topping.
- 4 tablespoons cocoa powder — mixed into the cream for a chocolatey topping.
- 6 tablespoons powdered sugar — sweetens and stabilizes the whipped cream.
- 18 Andes mints (for decorating) — small, peppermint chocolates used as a finishing touch on each mini cheesecake.
Cook Mini Mint Cheesecake Like This
- Preheat the oven to 325°F. Line muffin tins with cupcake liners.
- Melt 1 cup white chocolate chips in a microwave-safe bowl in 30‑second increments, stirring between each interval, until smooth. Set the melted white chocolate aside to cool to room temperature.
- In a bowl, stir together 1½ cups mint Oreo cookie crumbles, 3/8 cup granulated sugar, and 3 tablespoons melted salted butter until evenly moistened.
- Divide the crumb mixture among the lined muffin cups (about 1 tablespoon per cup). Press the crumbs firmly into the bottom of each cup to form a crust.
- In a large bowl, beat 16 ounces softened cream cheese until smooth and fluffy.
- Add 2/3 cup granulated sugar, 1 teaspoon peppermint extract, and 1 teaspoon vanilla extract to the cream cheese and beat until combined.
- Beat in the cooled melted white chocolate and 1/2 cup sour cream until the filling is smooth.
- Add the 2 eggs one at a time, mixing by hand or on low speed after each egg until just combined.
- Add 1 to 2 drops gel-based green food coloring (start with 1 drop) and mix until the color is uniform.
- Fold in 6 finely chopped mint Oreo cookies.
- Spoon the cheesecake mixture over the packed crusts, filling each liner almost to the top.
- Bake at 325°F for 20 minutes, until the cheesecakes are set and the tops are dry to the touch.
- Cool the cheesecakes in the pan to room temperature (about 30 minutes), then refrigerate for 1 to 2 hours to chill completely.
- To make the chocolate whipped cream, whip 2 cups heavy whipping cream with 4 tablespoons cocoa powder and 6 tablespoons powdered sugar until stiff peaks form.
- Pipe or spoon the chocolate whipped cream onto each chilled mini cheesecake and top each one with an Andes mint for decorating.
Why You’ll Keep Making It

Mini Mint Cheesecake hits a lot of sweet spots: it’s quick to assemble, portion-controlled, and presents beautifully. The mint flavor is refreshing without being overpowering, and the white chocolate keeps the filling rich but not cloying. Because these are baked in a muffin tin, they bake and chill fast — you don’t need to commit to a whole large cheesecake or watch an extended water bath.
The recipe scales well: double it for a crowd or halve it for a smaller batch. They travel well in a shallow container, and the toppings can be piped on the day you serve to keep the presentation fresh. For holiday gatherings, they make excellent individual desserts so guests can grab one and go.
Flavor-Forward Alternatives

- Swap white chocolate chips for high-quality white couverture if you prefer a deeper, creamier note. (Melt and cool exactly as directed.)
- Use peppermint candy pieces instead of chopped Oreos folded into the filling for a crunchier texture; add them last to preserve texture.
- Substitute a dark chocolate whipped cream by increasing cocoa powder slightly for a bolder contrast.
- For less mint intensity, cut the peppermint extract to 3/4 teaspoon and boost vanilla to 1½ teaspoons.
- If you want a sharper bite, switch sour cream for plain Greek yogurt in the same amount; it will be tangier and slightly denser.
Gear Up: What to Grab
- Standard 12‑cup muffin tin — this recipe fits one tin; use liners for easy removal.
- Mixer — a handheld or stand mixer makes the cream cheese silky, though you can mix by hand with patience.
- Microwave-safe bowl or double boiler — for melting white chocolate chips safely.
- Spoons and measuring cups — accurate sugar and flour measurements matter for texture.
- Piping bag or spoon — for finishing with chocolate whipped cream.
Steer Clear of These
Do not overbeat the cream cheese once the eggs are added. Overmixing can whip in too much air and lead to cracks or a grainy texture. Mix eggs in slowly and stop as soon as the batter is combined.
Avoid using liquid food coloring; it can thin the filling. The recipe specifies gel-based coloring — it tints without affecting the batter’s consistency.
Don’t skip cooling time. Chill the minis thoroughly before topping to ensure the whipped cream holds shape and the slices remain clean.
Warm & Cool Weather Spins
In warm weather, keep everything chilled until assembly. Chill the mixing bowl for the whipped cream and keep the cheesecakes refrigerated until just before serving. The whipped cream will be firmer and more stable when cold.
In cold weather, you can make the cheesecakes ahead and keep them at refrigerator temperature. Bring them to cool room temperature (not warm) for about 10 minutes before serving if you want a softer bite — but keep toppings chilled until service. For outdoor serving, place the tray over a shallow pan of ice to maintain structure and prevent melting.
Cook’s Notes
Timing & Texture
Room temperature cream cheese beats easier. If your cream cheese is too cold, you’ll end up with small lumps — beat it first until smooth. The white chocolate needs to be fully cooled before it joins the batter; otherwise, it can melt the cream cheese and thin the filling.
Crust Tips
Press crumbs firmly and evenly into each liner so the crust holds together when you bite into it. About a tablespoon per cup is the right amount; don’t overpack or you’ll have an overly dense base.
Whipped Cream Stability
For extra stability in warm environments, chill the mixing bowl and beaters, and add a tablespoon of instant vanilla pudding powder or a stabilizer if you expect the cheesecakes to sit out for more than an hour. Powdered sugar already helps, but extra measures keep peaks firm.
Meal Prep & Storage Notes
Make ahead: You can bake the cheesecakes and store them covered in the refrigerator for up to 48 hours before adding the whipped cream and Andes mints. If you need to freeze them, freeze un-topped cheesecakes on a tray until solid, then transfer to an airtight container for up to 1 month. Thaw in the refrigerator overnight, then finish with whipped cream before serving.
Storage: Keep finished mini cheesecakes refrigerated and consume within 3 days for best texture and flavor. The whipped cream topping will hold its shape for a day; after that, it may settle and should be refreshed if presentation matters.
Mini Mint Cheesecake FAQs
Q: Can I use regular Oreos instead of mint Oreos?
A: Yes. The mint profile will change, of course. If you use regular Oreos, add a little peppermint extract to the filling or fold in finely chopped Andes mints to keep a mint note.
Q: Can I make these dairy‑free?
A: This recipe relies heavily on dairy (cream cheese, sour cream, white chocolate, heavy cream). You can experiment with dairy‑free cream cheese and coconut cream, but texture and flavor will differ significantly. I haven’t tested a full swap for this exact method.
Q: Why did my cheesecakes crack?
A: Mini cheesecakes rarely crack, but it can happen from overmixing or baking too long. Mix eggs in gently and bake just until the tops are dry to the touch. Avoid rapid temperature changes while cooling.
Q: Can I make a larger cheesecake from this recipe?
A: You can scale the recipe and bake in a springform pan, but timing and pan size will change. The method here is tailored to mini portions for quick baking and cooling.
Q: My filling looks curdled after adding melted chocolate. What went wrong?
A: The melted white chocolate was likely too hot. Let it cool to room temperature before adding. If the batter appears slightly separated, gentle mixing often brings it back together.
In Closing
Mini Mint Cheesecake is one of those desserts that looks fancy but is totally approachable. The mint Oreos do most of the flavor work, the white chocolate adds richness, and the chocolate whipped cream makes each bite feel indulgent. Follow the steps, keep the chilled timing, and you’ll have a tray of polished, crowd‑pleasing minis in under two hours.
Make them for a holiday party, a casual dinner, or because you deserve a pretty little dessert to brighten the day. Once you try this method, it becomes a go‑to whenever you want something that’s compact, minty, and reliably delicious.

Mini Mint Cheesecake
Ingredients
Ingredients
- 1 1/2 cupsmint Oreo cookie crumbles about 20 cookies
- 3/8 cupgranulated sugar
- 3 tablespoonssalted butter melted
- 1 cupwhite chocolate chips melted and cooled
- 16 ouncescream cheese softened
- 2/3 cupsgranulated sugar
- 1 teaspoonpeppermint extract
- 1 teaspoonvanilla extract
- 1/2 cupsour cream
- 2 eggs
- 1 to 2 drops gel-based green food coloring
- 6 mint Oreo cookies finely chopped
- 2 cupsheavy whipping cream
- 4 tablespoonscocoa powder
- 6 tablespoonspowdered sugar
- 18 Andes mints for decorating
Instructions
Instructions
- Preheat the oven to 325°F. Line muffin tins with cupcake liners.
- Melt 1 cup white chocolate chips in a microwave-safe bowl in 30‑second increments, stirring between each interval, until smooth. Set the melted white chocolate aside to cool to room temperature.
- In a bowl, stir together 1½ cups mint Oreo cookie crumbles, 3/8 cup granulated sugar, and 3 tablespoons melted salted butter until evenly moistened.
- Divide the crumb mixture among the lined muffin cups (about 1 tablespoon per cup). Press the crumbs firmly into the bottom of each cup to form a crust.
- In a large bowl, beat 16 ounces softened cream cheese until smooth and fluffy.
- Add 2/3 cup granulated sugar, 1 teaspoon peppermint extract, and 1 teaspoon vanilla extract to the cream cheese and beat until combined.
- Beat in the cooled melted white chocolate and 1/2 cup sour cream until the filling is smooth.
- Add the 2 eggs one at a time, mixing by hand or on low speed after each egg until just combined.
- Add 1 to 2 drops gel-based green food coloring (start with 1 drop) and mix until the color is uniform.
- Fold in 6 finely chopped mint Oreo cookies.
- Spoon the cheesecake mixture over the packed crusts, filling each liner almost to the top.
- Bake at 325°F for 20 minutes, until the cheesecakes are set and the tops are dry to the touch.
- Cool the cheesecakes in the pan to room temperature (about 30 minutes), then refrigerate for 1 to 2 hours to chill completely.
- To make the chocolate whipped cream, whip 2 cups heavy whipping cream with 4 tablespoons cocoa powder and 6 tablespoons powdered sugar until stiff peaks form.
- Pipe or spoon the chocolate whipped cream onto each chilled mini cheesecake and top each one with an Andes mint for decorating.
Equipment
- Muffin Tin
- Cupcake liners
- Microwave-safe Bowl
- Mixing bowls
- Electric Mixer
- Spatula
- Measuring Cups
- Measuring Spoons