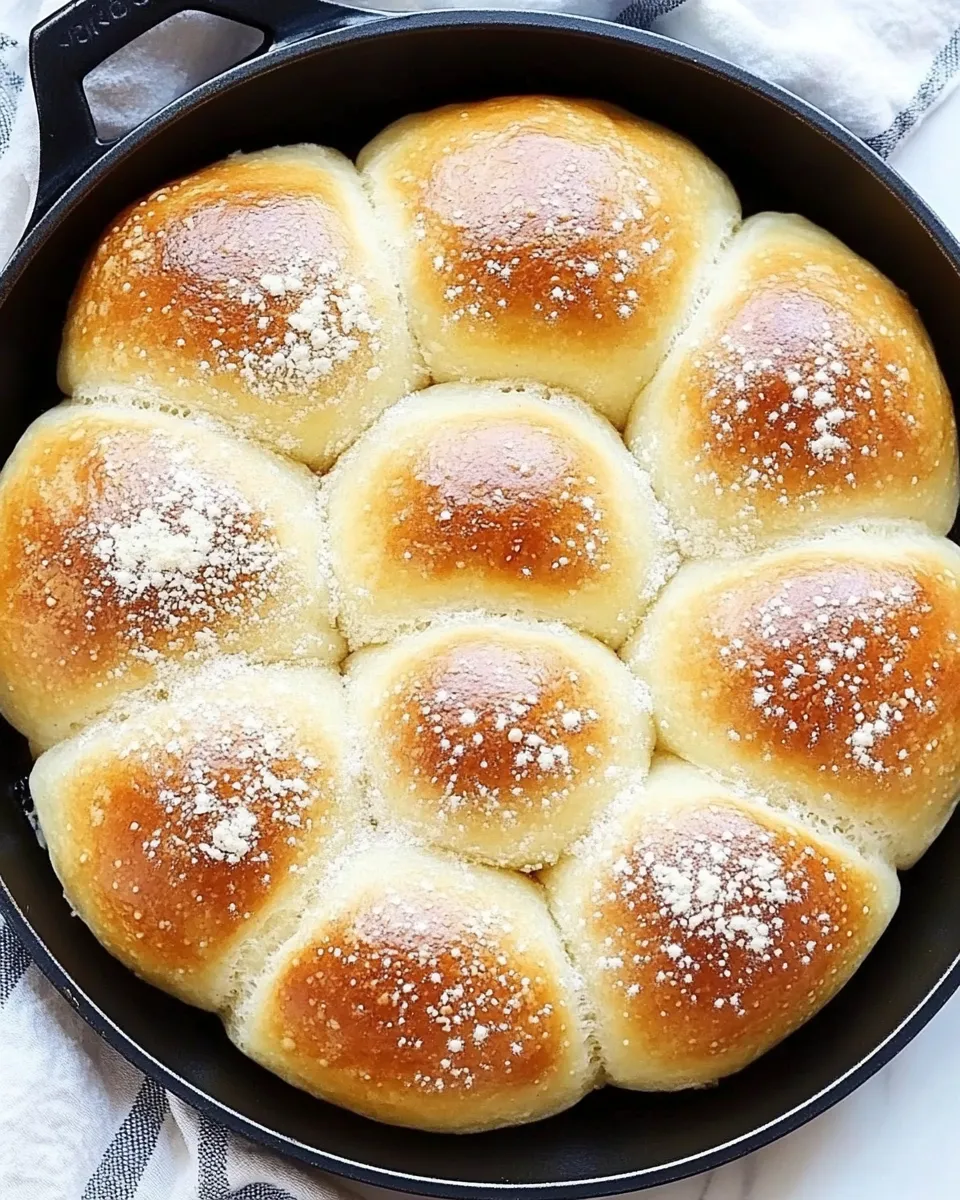
These skillet dinner rolls are the kind of bread that disappears faster than you can butter them. They bake up golden, pull-apart soft, and take less active hands-on time than you’d expect for such bakery-style results. I rely on a 10-inch cast-iron skillet for even browning and the snug arrangement of dough balls for those tender, connected sides.
The technique is straightforward: proof the yeast, warm the milk with butter and sugar, mix, rest, knead, portion, rise in the skillet, and bake. Follow the order and the simple timing cues and you’ll get consistent rolls every time. No complicated shaping, no proofing in multiple stages—just good structure and an easy finish with melted butter.
Below you’ll find the exact ingredient set and the step-by-step method used as the source of truth, plus practical notes on equipment, common mistakes, and freezing. Keep the recipe’s amounts as written and pay attention to temperature cues for the best texture.
The Essentials

Yield: 18 rolls. Oven temperature: 375°F (190°C). The recipe depends on active dry yeast, a brief resting window before kneading, and a snug rise in a 10-inch cast-iron skillet so the rolls bake into one pull-apart batch. Read through the method before starting so you have everything measured and at the right temperatures.
Ingredients
- 2 packets active dry yeast, total 1/2 oz or 14 g + 1 tablespoon sugar — activates and feeds the yeast; the sugar jump-starts fermentation.
- 1/4 cup warm water — dissolves the yeast; should be warm, not hot, to proof properly.
- 1 1/4 cups milk — provides moisture and tenderness; warm with butter in step 3.
- 5 tablespoons sugar — sweetens the dough and helps browning.
- 3/4 teaspoon salt — balances flavor and controls yeast activity.
- 1/4 cup unsalted butter — heated with milk to enrich the dough; unsalted so you control the salt level.
- 4 1/2 cups all-purpose flour, sifted — the structure of the rolls; sifted helps with consistent mixing.
- 1 large egg — beaten and added to the yeast mixture for richness and structure.
- baking spray — prevents sticking in the cast-iron skillet.
- 1 teaspoon kosher salt — sprinkled over the arranged rolls for a bright finishing bite.
- 3 tablespoons unsalted butter, melted — brushed on immediately after baking for shine and flavor.
Stepwise Method: Skillet Dinner Rolls
- Preheat the oven to 375°F (190°C).
- In a small bowl, dissolve 2 packets (total 1/2 oz or 14 g) active dry yeast and 1 tablespoon sugar in 1/4 cup warm water. Stir and let sit until foamy, about 5–10 minutes.
- In a small saucepan, heat 1 1/4 cups milk with 5 tablespoons sugar, 3/4 teaspoon salt, and 1/4 cup unsalted butter just until the butter melts and the mixture is lukewarm. Remove from heat and let cool if it feels hot.
- Lightly beat 1 large egg and stir it into the foamed yeast mixture.
- In the bowl of a stand mixer fitted with the dough hook, add the sifted 4 1/2 cups all-purpose flour. Pour in the milk mixture and then the yeast/egg mixture. Mix on low until a shaggy dough forms, then increase to medium-low and mix until the dough comes together.
- Cover the dough and let it rest for 15 minutes.
- After resting, knead the dough in the stand mixer with the dough hook for 5 minutes, until smooth and elastic. (If kneading by hand, turn onto a lightly floured surface and knead about 7–10 minutes.)
- On a lightly floured surface, divide the dough into 18 equal pieces. Roll each piece into a smooth ball about the size of a small tennis ball.
- Spray a 10-inch cast-iron skillet with baking spray. Arrange the 18 dough balls in the skillet (fit them snugly so they touch). Cover and let rise in a warm place until puffy, about 25 minutes.
- Sprinkle 1 teaspoon kosher salt evenly over the surface of the arranged rolls.
- Bake in the preheated oven for 10–12 minutes, or until the rolls are golden brown on top.
- Remove the skillet from the oven and immediately brush the rolls with 3 tablespoons unsalted butter, melted. Serve warm.
Why You’ll Love This Recipe
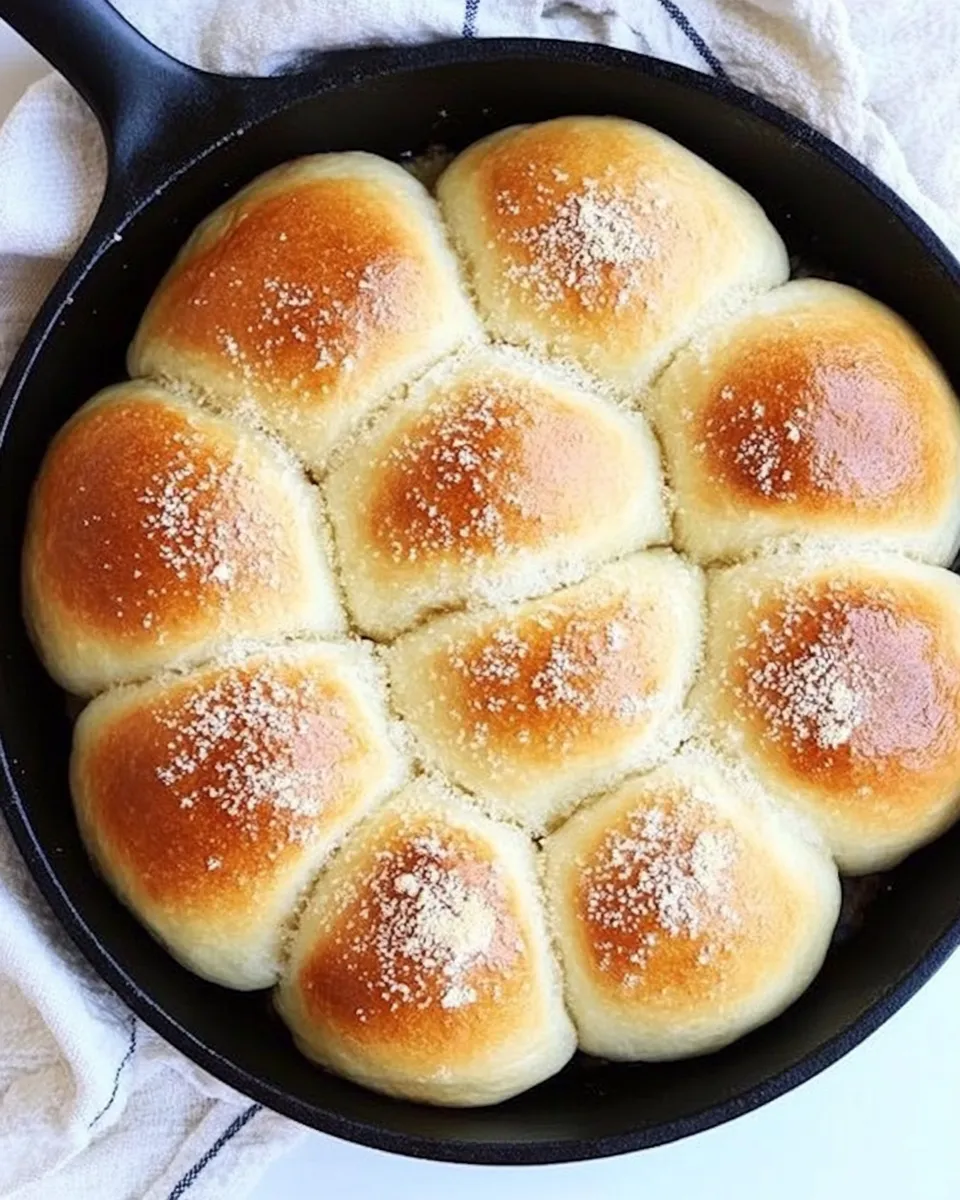
These rolls are reliable. The dough is enriched without being heavy, so you get a tender crumb that still holds together as pull-apart rolls. Baking in a cast-iron skillet gives you a crisp, lightly caramelized bottom and edges while the insides stay pillowy.
They’re fast compared with multi-rise dinner roll recipes. From start to finish it’s mostly passive time: a short proof of the yeast, a 15-minute dough rest, a 25-minute rise in the skillet, then a brief bake. The melt-and-brush butter finish makes them irresistibly glossy and flavorful.
Texture-Safe Substitutions
If you need to tweak the texture without changing ingredient quantities, adjust technique instead of swapping new items. For softer, more tender rolls, minimize handling after the initial portioning; rolling the balls smoothly and avoiding excess flour will keep the crumb light. For a chewier interior, give the dough the full kneading time and ensure it develops elasticity.
Want a slightly richer bite but don’t want to alter quantities? Be sure the butter in the milk mixture is fully incorporated and don’t skimp on the final brush of melted butter—those steps add richness without changing the formula.
Equipment at a Glance
- 10-inch cast-iron skillet — preferred for even heat and the snug fit that creates pull-apart rolls.
- Stand mixer with dough hook — makes kneading effortless; you can knead by hand if needed.
- Small saucepan — to warm milk, sugar, salt, and butter together.
- Small bowl — to bloom the yeast.
- Baking spray — for easy release from the skillet.
- Measuring cups and spoons — for accurate ingredient amounts.
Mistakes That Ruin Skillet Dinner Rolls
Skip these common errors so your rolls come out as intended.
- Using water that’s too hot to proof the yeast — kills the yeast or produces uneven proofing. Use warm water for the yeast and lukewarm milk mixture in step 3.
- Skipping the 15-minute dough rest — this rest gives the flour a chance to hydrate and relax; skipping it makes the dough tougher and harder to knead.
- Over-flouring during shaping — adding too much flour while rolling balls yields dry, heavy rolls. Keep the surface lightly floured only.
- Underproofing in the skillet — the rolls should be puffy before baking. If they’re dense when baked they were likely not given enough time to rise.
- Overbaking — the interior can dry out quickly. Watch the 10–12 minute window and remove when golden on top.
- Skipping the melted butter finish — that final brush is essential for flavor, shine, and soft crust.
Tailor It to Your Diet
If you need small tweaks for dietary constraints, focus on technique and timing instead of changing the recipe amounts. For a lower-sodium finish, reduce or omit the 1 teaspoon kosher salt sprinkled on top; the dough’s 3/4 teaspoon salt still provides structure and flavor. For dairy sensitivity, substituting non-dairy alternatives may work in principle, but test carefully as fat and protein differences will change texture.
If you’re avoiding added sugar in the finish, omit the 1 teaspoon sprinkled salt? (note: do not change the recipe amounts here—follow the list above for baking). The important point: when modifying for diet, be aware small changes can affect rise and crumb; proceed with small tests before scaling.
Method to the Madness
There’s a reason this method is straightforward. Blooming the yeast separately and warming the milk mixture ensures both yeast activity and proper dough temperature when the wet ingredients meet the flour. The short rest before kneading lets the flour fully absorb liquids, which reduces required kneading time and improves extensibility. Kneading then develops gluten for structure. Dividing into 18 pieces yields evenly sized rolls that bake evenly in the skillet.
Arranging them snug in the skillet means the sides stay soft where they touch, while exposed tops brown. The 25-minute rise in the skillet is a short final proof—enough to get puffiness without over-proofing into collapse. Finish with melted butter right out of the oven; heat helps it soak into the crust for immediate flavor and shine.
Freezer-Friendly Notes
These rolls freeze well at two stages: fully baked or par-baked. For the best texture after freezing, cool completely before freezing.
- Freezing baked rolls — cool to room temperature, wrap the skillet tightly with plastic wrap and foil or remove rolls and place in a freezer bag, squeezing out air. Freeze up to 2 months. To reheat, thaw overnight in the fridge, then warm in a 325°F oven until heated through, 10–15 minutes.
- Freezing before the final bake — arrange the shaped rolls in the skillet, cover securely, and freeze until solid. Transfer to a bag for longer storage. When ready to bake, thaw the skillet in the refrigerator overnight, let come to room temperature and puff as needed, then bake per the recipe time.
Quick Q&A
- Can I use instant yeast? If you do, reduce the proof time since instant yeast can be mixed straight in; however, follow the recipe’s sequence if you want the exact result. (The recipe calls for active dry yeast.)
- My rolls browned on top but were pale underneath — why? Cast iron usually browns the bottom well. If it’s pale, check oven calibration and placement; bake on the middle rack for even heat.
- Can I make smaller or larger rolls? Yes. The recipe yields 18 small tennis-ball-sized rolls. Divide differently for more or fewer rolls, but adjust the rise and bake time as needed—smaller rolls will bake faster.
- Why is the milk heated with butter? Heating briefly melts the butter and dissolves the sugar. The mixture should be lukewarm so it doesn’t kill the yeast when combined.
The Last Word
Follow the sequence, mind the temperatures, and resist the urge to over-handle the dough once portioned. These skillet dinner rolls are forgiving, quick, and give you that warm, pull-apart bread you want at the table. Serve them straight from the skillet with an extra pat of butter and watch them disappear.
Skillet Dinner Rolls
Ingredients
Ingredients
- 2 packetsactive dry yeast total 1/2 oz or 14 g + 1 tablespoon sugar
- 1/4 cupwarm water
- 1 1/4 cupsmilk
- 5 tablespoonssugar
- 3/4 teaspoonsalt
- 1/4 cupunsalted butter
- 4 1/2 cupsall-purpose flour sifted
- 1 large egg
- baking spray
- 1 teaspoonkosher salt
- 3 tablespoonsunsalted butter melted
Instructions
Instructions
- Preheat the oven to 375°F (190°C).
- In a small bowl, dissolve 2 packets (total 1/2 oz or 14 g) active dry yeast and 1 tablespoon sugar in 1/4 cup warm water. Stir and let sit until foamy, about 5–10 minutes.
- In a small saucepan, heat 1 1/4 cups milk with 5 tablespoons sugar, 3/4 teaspoon salt, and 1/4 cup unsalted butter just until the butter melts and the mixture is lukewarm. Remove from heat and let cool if it feels hot.
- Lightly beat 1 large egg and stir it into the foamed yeast mixture.
- In the bowl of a stand mixer fitted with the dough hook, add the sifted 4 1/2 cups all-purpose flour. Pour in the milk mixture and then the yeast/egg mixture. Mix on low until a shaggy dough forms, then increase to medium-low and mix until the dough comes together.
- Cover the dough and let it rest for 15 minutes.
- After resting, knead the dough in the stand mixer with the dough hook for 5 minutes, until smooth and elastic. (If kneading by hand, turn onto a lightly floured surface and knead about 7–10 minutes.)
- On a lightly floured surface, divide the dough into 18 equal pieces. Roll each piece into a smooth ball about the size of a small tennis ball.
- Spray a 10-inch cast-iron skillet with baking spray. Arrange the 18 dough balls in the skillet (fit them snugly so they touch). Cover and let rise in a warm place until puffy, about 25 minutes.
- Sprinkle 1 teaspoon kosher salt evenly over the surface of the arranged rolls.
- Bake in the preheated oven for 10–12 minutes, or until the rolls are golden brown on top.
- Remove the skillet from the oven and immediately brush the rolls with 3 tablespoons unsalted butter, melted. Serve warm.
Equipment
- Oven
- Small Bowl
- Small Saucepan
- Stand Mixer with Dough Hook
- 10-inch cast-iron skillet
- Measuring cups and spoons
Notes
For this recipe, you will need about 2 pounds of the dough. You can freeze the remaining 1 pound of dough in the freezer, thaw and use it later, or you can use a bigger skillet and use up all the dough. If the sides of the dinner rolls are turning dark faster than the middle, cover te rolls on the side with aluminum foil and expose the middle part of the dinner rolls. This will help to even it out.