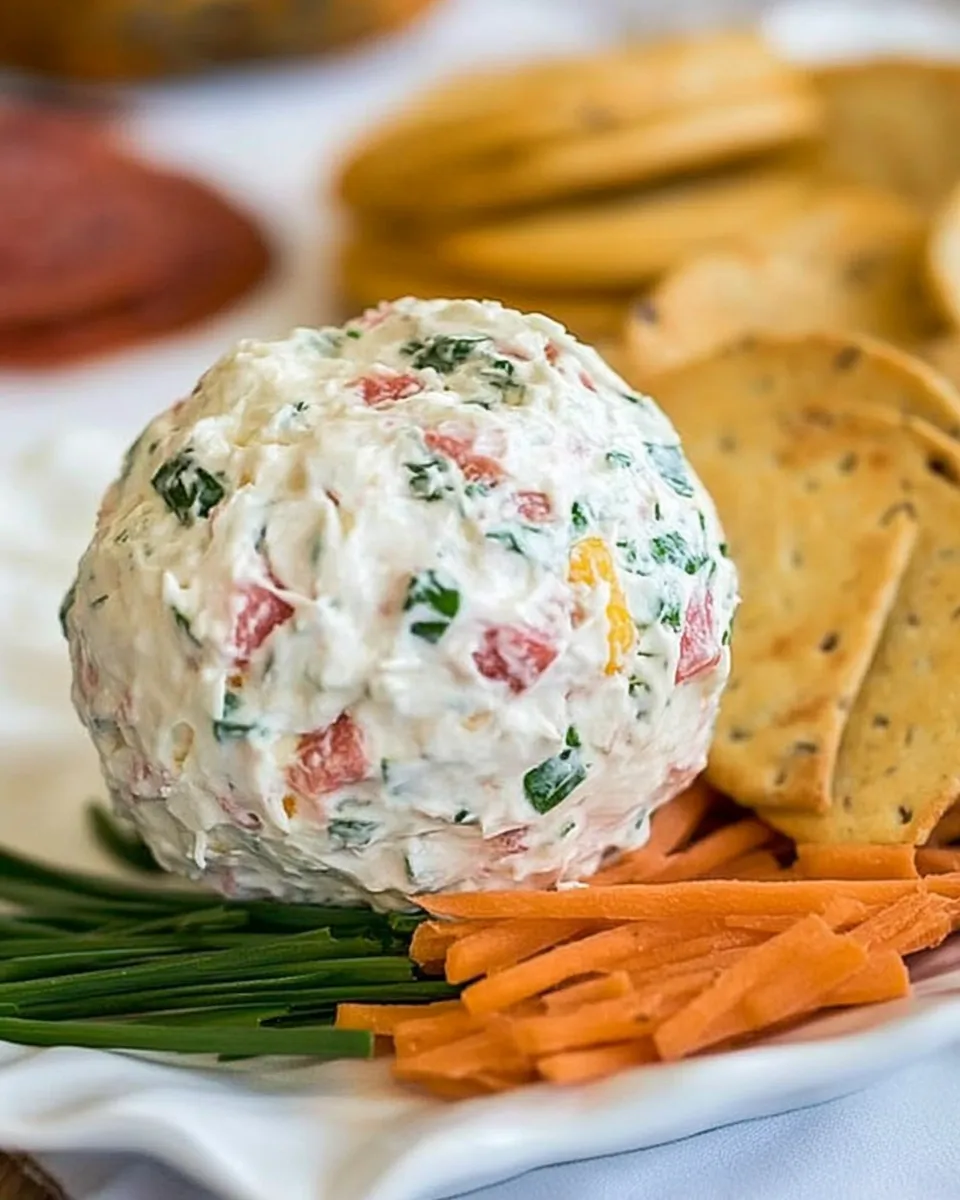
This is one of those no-fuss party bites that always disappears first. It’s creamy, savory, and has a little bit of chew from the salami — exactly the kind of snack I pull out when friends pop by or when I want an easy appetizer that feels special. It comes together quickly and travels well, which makes it a favorite for potlucks and holiday gatherings.
Below you’ll find a straightforward ingredient list and step-by-step directions that follow the exact order I use every time. I’ll also share practical tips for shaping, storing, and tweaking the recipe to suit what you have on hand. No fluff — just reliable instructions and small tricks that save time.
Ingredient List
- 28oz packages cream cheese, softened — the base and binder; softening makes mixing smooth and shapes easily.
- 1bunch of green onions,chopped — fresh onion bite and color; chop fine so it distributes through the ball.
- 1/4lb- 1/3 lb. hard salami,I use Cervelat from the deli, cut into small pieces — provides savory texture and flavor; small pieces mix and bite well.
- 3tbspmayo — adds silkiness and helps the spread hold together; don’t skip if you want a smoother mouthfeel.
- 1cupshredded cheddar cheese — sharpness and body; shredded cheese folds in easily and adds structure.
- 1/4tspsalt — seasoning; adjust if your salami or cheese is particularly salty.
- 1/8tspblack pepper — a touch of heat; freshly cracked is best but pre-ground works.
Salami Cream Cheese Ball — Do This Next
- If the 28oz packages cream cheese are not already softened, leave them at room temperature until soft enough to stir (about 30–60 minutes).
- Chop the 1 bunch of green onions and cut the 1/4lb–1/3 lb. hard salami into small pieces if not already cut.
- Fit a stand mixer with the paddle attachment. Add the softened cream cheese, 3 tbsp mayo, 1/4 tsp salt, and 1/8 tsp black pepper to the mixer bowl.
- Mix on low to medium speed until the cream cheese mixture is smooth and mostly uniform, stopping once or twice to scrape down the bowl.
- Add 1 cup shredded cheddar cheese, the chopped green onions, and the salami pieces to the bowl. Mix on low just until these ingredients are evenly distributed throughout the cream cheese (do not overmix).
- Lay a large sheet of plastic wrap on your work surface. Spoon the cheese mixture onto the center of the plastic wrap. Place a second sheet of plastic wrap on top if desired.
- Gather the plastic wrap around the mixture and shape it into a ball (or another shape), smoothing the surface by pressing and rotating the wrapped mixture.
- Refrigerate the wrapped cheese ball for 20 to 30 minutes to firm.
- Unwrap and serve.
The Upside of Salami Cream Cheese Ball
There are plenty of reasons this recipe lives in my regular rotation. It’s fast to assemble and doesn’t require cooking, so it’s perfect when time is tight. The texture contrast — soft cream cheese contrasted with shredded cheddar and chewy salami — makes every bite interesting. It’s also versatile: you can shape it into a traditional ball, a log, or press it into a ring for an elegant platter.
Because it doesn’t rely on seasonal produce, you can make it year-round. It travels well for potlucks and can be made ahead, which frees you up to focus on other parts of the menu. And because the ingredients are straightforward, it’s easy to scale up for a crowd without much extra work.
Ingredient Flex Options

Simple swaps that keep the spirit
- Cream cheese — full-fat provides the best texture; for a lighter version use part-skim but expect a slightly less rich mouthfeel.
- Green onions — substitute chives for a more delicate onion flavor or finely diced red onion if you want more bite (use less to avoid overpowering).
- Hard salami — other cured sausages like soppressata or pepperoni can work; keep the pieces small so they mix evenly.
- Cheddar — swap for Colby, Monterey Jack, or a sharper aged cheddar depending on your taste; shredded cheese integrates easiest.
Gear Up: What to Grab

This recipe needs very little equipment, which is part of its appeal. Here’s what I use every time:
- Stand mixer with paddle attachment — for the creamiest, most even texture; a hand mixer works in a pinch.
- Mixing bowl — if you’re using a hand mixer, use a medium bowl that lets you scrape down the sides easily.
- Plastic wrap — two sheets for shaping and smoothing the ball.
- Sharp knife and cutting board — for chopping green onions and salami into small, even pieces.
- Spatula — to transfer the mixture and scrape the bowl clean.
Watch Outs & How to Fix
Common hiccups and quick fixes
- Too firm cream cheese: If the cream cheese is cold and resists mixing, let it sit at room temperature longer (another 15–30 minutes) or pulse carefully with a mixer on low until softer. Work in short bursts to avoid overheating.
- Mixture too loose: If it feels overly soft after mixing, chill it wrapped for a little longer than 30 minutes. The cheese firms up as it cools and becomes easier to shape.
- Overmixed fillings: Mixing the shredded cheese, onions, and salami too long will break down the texture and make the mixture gummy. Mix only until evenly distributed.
- Too salty: Taste a small pinch of the mix before chilling if you’re unsure. If it’s too salty because of the salami or cheese, add a little more cream cheese to mellow the salt and adjust texture.
Dietary Customizations
If you need to adjust this recipe for dietary preferences, here are practical ideas that keep the core experience intact.
- Lower fat: Use reduced-fat cream cheese and a lower-fat shredded cheese, but expect a milder taste and slightly different texture.
- Gluten-free: The spread itself is gluten-free; just pair with gluten-free crackers or sliced vegetables for serving.
- Vegetarian: Replace the salami with a smoked, savory vegetarian deli meat or a mix of roasted, finely diced vegetables (keep quantities similar).
Pro Tips & Notes
Little things that make this better
- Softening cream cheese: Plan ahead and let it sit at room temperature. If you forget, you can cut the blocks into smaller pieces to speed warming, then mix on low.
- Texture control: Shred the cheddar fresh if possible. Pre-shredded cheese often has anti-caking agents that can affect texture slightly.
- Shaping: Use two layers of plastic wrap and form the ball by pulling the wrap tight as you rotate the mixture — this yields a smoother surface.
- Make ahead: You can make the ball a day ahead. Keep it wrapped and refrigerated; bring to the table still slightly chilled for easiest slicing or scooping.
- Presentation: For a quick finish, roll the chilled ball in chopped parsley, toasted nuts, or extra shredded cheddar for color and texture contrast.
Save It for Later
Leftovers keep well in the fridge. Re-wrap tightly in plastic wrap or place in an airtight container. The cheese ball will be best within 3–4 days. If it dries on the surface, a quick stir (or letting it sit at room temperature for 15 minutes) refreshes the texture.
Freezing is possible but not ideal for texture. If you must freeze, wrap very tightly and use within a month. Thaw overnight in the refrigerator and stir gently to bring the texture back together before serving.
Top Questions & Answers
- Can I make this without a stand mixer? Yes. Use a hand mixer or stir vigorously by hand with a sturdy spatula. It will take a little more elbow grease but works fine.
- How long will the ball hold shape after unwrapping? If kept chilled, it will hold shape for the length of a party. On a warm day, set it on a chilled platter or keep it on ice to prevent softening.
- Can I add other mix-ins? Yes, but keep additions small and dry or finely chopped so they distribute evenly. Avoid adding wet ingredients that will loosen the mixture.
- Is the amount of salami fixed? The recipe lists 1/4 lb to 1/3 lb; use the amount you prefer for more or less meaty flavor.
Serve & Enjoy
Unwrap the chilled cheese ball and place it on a platter. Serve with a variety of crackers, toasted bread slices, or fresh vegetables like bell pepper strips and cucumber. A small bowl of mustard or tangy jam on the side works surprisingly well for those who like a sweet-and-savory contrast.
This is a recipe meant to be shared. Portion it with small spoons or a cheese knife and set napkins nearby — it’s addictively good and a lovely crowd-pleaser. Enjoy the simple success of something easy that still tastes like you spent a little extra love on it.

Salami Cream Cheese Ball
Ingredients
Ingredients
- 28 oz packages cream cheese softened
- 1 bunch of green onions chopped
- 1/4 lb- 1/3 lb. hard salami I use Cervelat from the deli, cut into small pieces
- 3 tbspmayo
- 1 cupshredded cheddar cheese
- 1/4 tspsalt
- 1/8 tspblack pepper
Instructions
Instructions
- If the 28oz packages cream cheese are not already softened, leave them at room temperature until soft enough to stir (about 30–60 minutes).
- Chop the 1 bunch of green onions and cut the 1/4lb–1/3 lb. hard salami into small pieces if not already cut.
- Fit a stand mixer with the paddle attachment. Add the softened cream cheese, 3 tbsp mayo, 1/4 tsp salt, and 1/8 tsp black pepper to the mixer bowl.
- Mix on low to medium speed until the cream cheese mixture is smooth and mostly uniform, stopping once or twice to scrape down the bowl.
- Add 1 cup shredded cheddar cheese, the chopped green onions, and the salami pieces to the bowl. Mix on low just until these ingredients are evenly distributed throughout the cream cheese (do not overmix).
- Lay a large sheet of plastic wrap on your work surface. Spoon the cheese mixture onto the center of the plastic wrap. Place a second sheet of plastic wrap on top if desired.
- Gather the plastic wrap around the mixture and shape it into a ball (or another shape), smoothing the surface by pressing and rotating the wrapped mixture.
- Refrigerate the wrapped cheese ball for 20 to 30 minutes to firm.
- Unwrap and serve.
Equipment
- Stand mixer
- paddle attachment
- mixer bowl
- Plastic Wrap
Notes
*to soften cream cheese quickly, unwrap the cream cheese and place on a microwave safe dish. Microwave each brick of cream cheese separately for just 20 seconds.