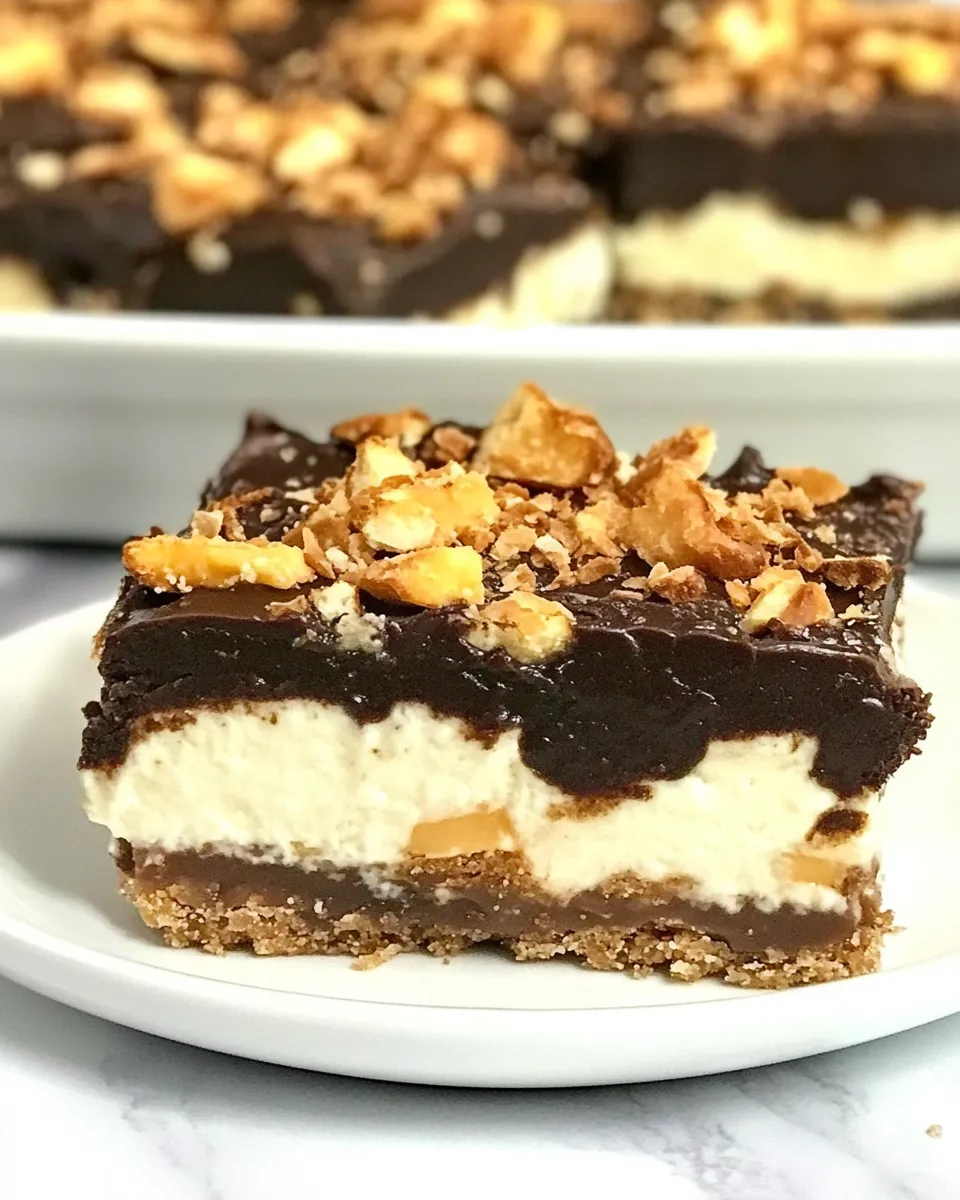
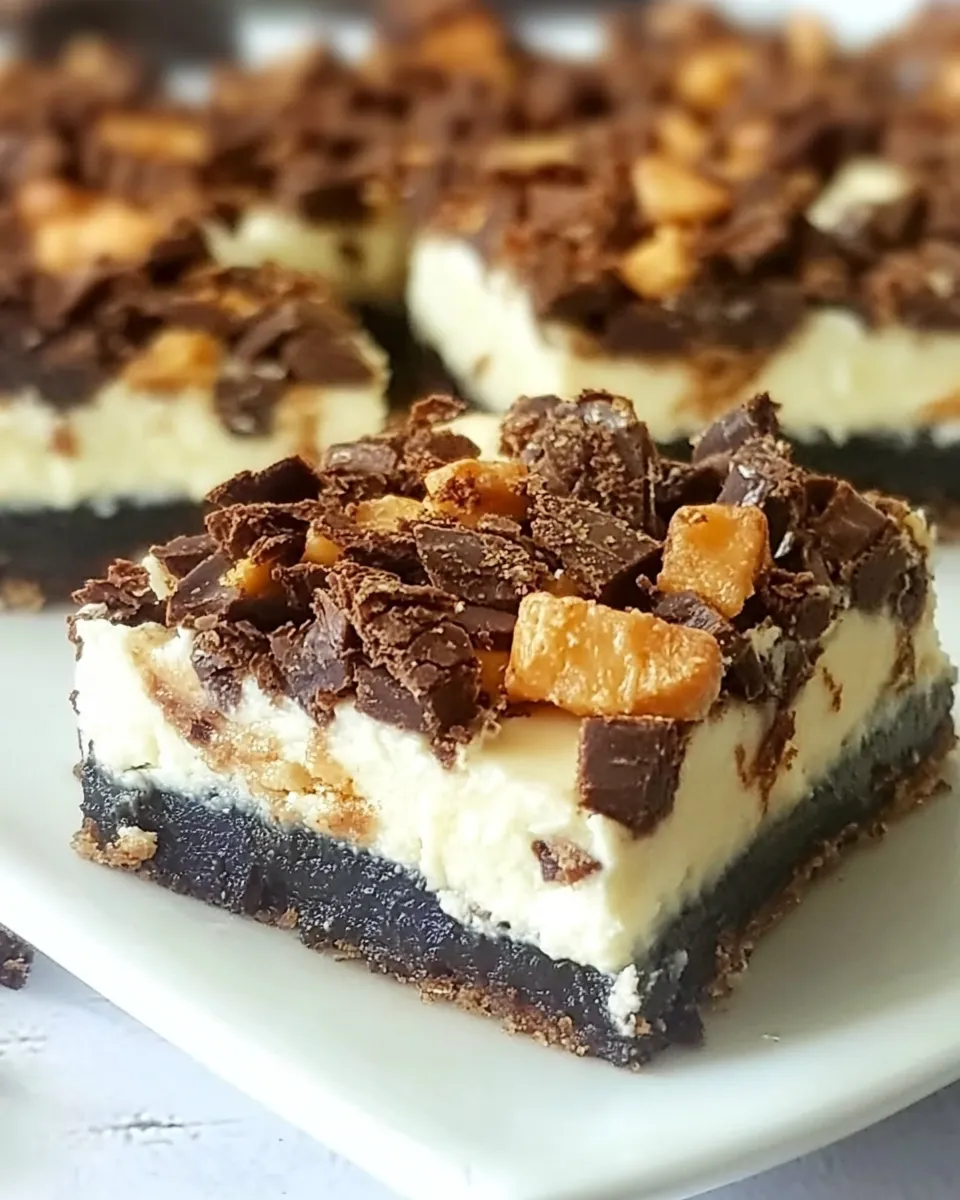
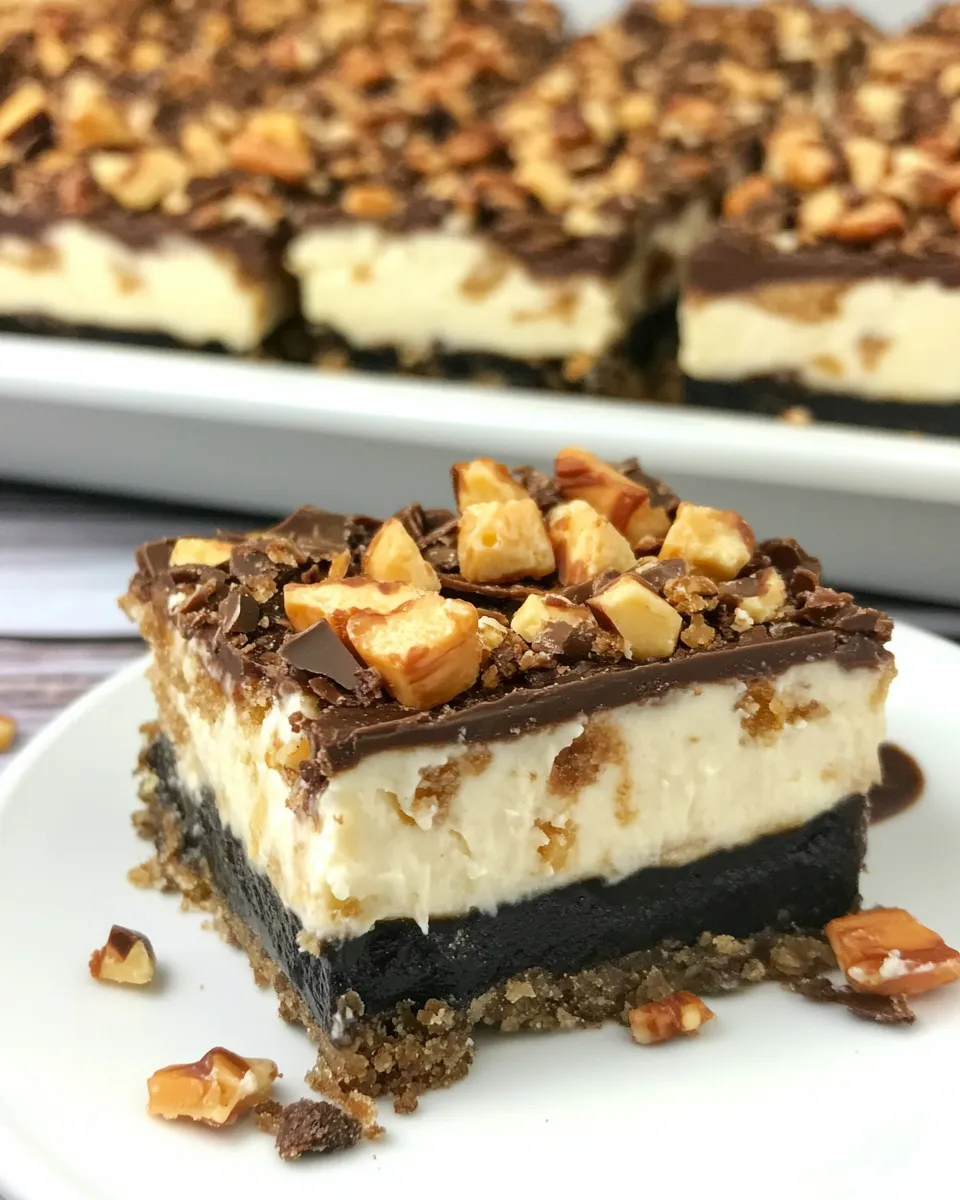
These bars are my go-to when I want something that feels indulgent but comes together without drama. Think of a brownie-cake hybrid crust topped with a creamy, tangy cheesecake layer and then finished with crunchy Butterfinger bits and chips. It’s a texture party: crisp, creamy, and snappy all at once.
I make these whenever I need an easy dessert that travels well—potlucks, birthdays, or a simple weekend treat. The recipe leans on a boxed cake mix and instant pudding to keep things foolproof, while the cream cheese filling keeps the flavor anchored and familiar.
No fuss, no fancy techniques. You’ll press a crumbly mix into a pan, bake briefly, whisk a silky filling, and bake again just until set. The final quick bake that melts chips over the top is my favorite shortcut to a glossy, slightly melted finish.
Ingredient Rundown
Ingredients
- 1 Chocolate Cake Mix — provides the base structure and chocolate flavor for the crust and topping.
- 1.4oz butterscotch instant pudding mix — adds butterscotch flavor and helps bind the crumbly crust.
- 1 egg — used in the crust mixture to help bind the dry mix and create a pressable crust.
- 3 tbsp peanut butter — lends richness and chew to the crust; a little goes a long way.
- 3 tbsp canola oil — moistens the crust mix and keeps it tender; neutral-flavored oil is best.
- 8oz cream cheese, softened — the base of the cheesecake filling; room temperature ensures a smooth texture.
- 1/3 cup sugar — sweetens the filling; balances the tang of the cream cheese and sour cream.
- 2 tbsp sour cream — adds creaminess and a touch of tang to the filling.
- 1 egg — incorporated into the filling to set it while keeping it tender.
- 1/2 tsp vanilla extract — rounds and lifts the filling’s flavor.
- 1 Butterfinger bar, chopped — folded into the filling for crunchy candy pockets.
- 1/4 cup chocolate chips — sprinkled on top to melt slightly and add chocolate contrast.
- 1/4 cup butterscotch chips — a complementary sweetness that echoes the pudding flavor.
- 1/2 Butterfinger candy bar, crushed — scattered on top for extra crunch and visual appeal.
From Start to Finish: Butterfinger Cheesecake Bars
- Preheat oven to 350 degrees F.
- In a large bowl, combine 1 Chocolate Cake Mix, 1.4oz butterscotch instant pudding mix, 3 tbsp peanut butter, 1 egg, and 3 tbsp canola oil. Mix until the mixture is crumbly.
- Measure and set aside 1 cup of the crumbly mixture for the topping. Press the remaining mixture evenly into an ungreased 9×13″ baking pan to form the crust.
- Bake the crust for 10 minutes. Remove from oven and cool completely on a wire rack.
- While the crust cools, make the filling: In a medium bowl, beat 8oz cream cheese (softened), 1/3 cup sugar, and 2 tbsp sour cream until smooth. Use an electric mixer or a sturdy whisk.
- Add 1 egg and 1/2 tsp vanilla extract to the cream cheese mixture and beat on low speed just until combined.
- Fold 1 Butterfinger bar, chopped, into the filling.
- Spread the filling evenly over the cooled crust. Sprinkle the reserved 1 cup crumb mixture evenly over the filling.
- Bake for 15–20 minutes, or until the filling is set.
- Remove from the oven and immediately sprinkle 1/4 cup butterscotch chips, 1/4 cup chocolate chips, and 1/2 Butterfinger candy bar, crushed, evenly over the top. Return to the oven and bake 1 minute more.
- Cool the pan on a wire rack for 1 hour. Then refrigerate for 2 hours or until cold.
- Cut into bars and serve.
Why It’s Crowd-Pleasing
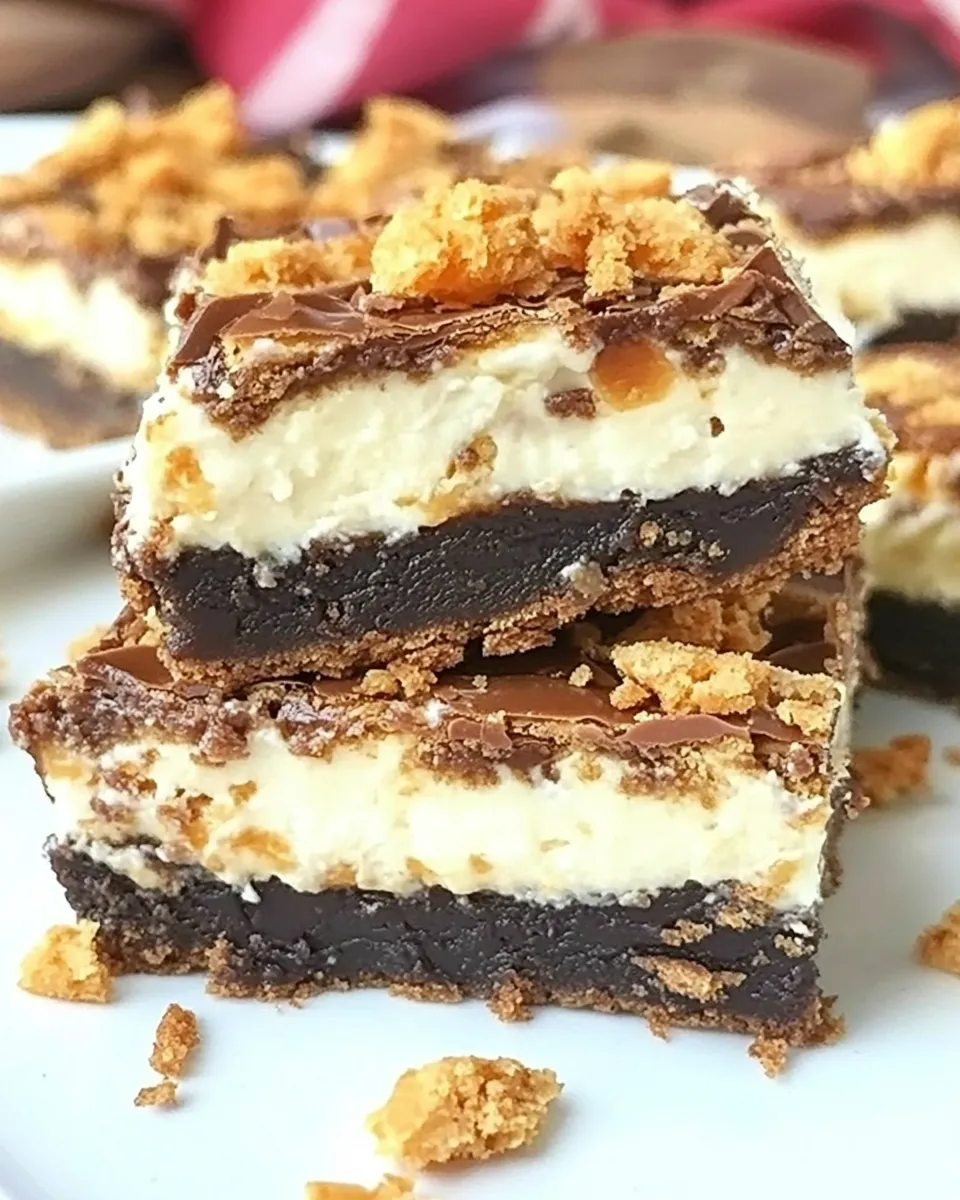
This recipe hits a lot of the reasons people come back for seconds. There’s nostalgic candy involved, which is always a win, and the texture contrast keeps every bite interesting. The crust is cakey and slightly crisp, the filling is creamy and tangy, and the candy pieces give you that unmistakable Butterfinger crunch.
It’s also a low-risk dessert for hosts—the prep is straightforward, and it transports well. Make it ahead, chill it, and you’re set. Visually, the chopped candy on top gives a homemade-but-special look that’s perfect for gatherings.
Substitutions by Category
Base & Mix-Ins
- Chocolate Cake Mix — swap for Devil’s Food or another chocolate boxed mix; darker mixes will give a richer chocolate base. Avoid swaps that change liquid ratios drastically.
- 1.4oz butterscotch instant pudding mix — if unavailable, a vanilla instant pudding can work, but you’ll lose a bit of the butterscotch note.
Fats & Binders
- 3 tbsp peanut butter — you can use almond butter or sunflower seed butter for a nut-free option; texture will be similar but flavor will shift.
- 3 tbsp canola oil — any neutral vegetable oil (grapeseed, light olive oil) is fine; for a slightly nuttier note use melted butter.
Dairy & Filling
- 8oz cream cheese — reduced-fat cream cheese will work but the filling will be less rich and slightly softer.
- 2 tbsp sour cream — plain Greek yogurt is a good substitute and adds protein, but expect a tangier filling.
Toppings & Candy
- Butterfinger bars — any crisp peanut butter candy (e.g., chopped peanut butter cups without filling, or crushed crisped candy) can replace Butterfinger if needed.
- Chocolate chips / butterscotch chips — swap with chopped chocolate, toffee bits, or white chocolate chips depending on taste.
Appliances & Accessories
Must-haves
- 9×13″ baking pan — the recipe is calibrated to this size for cook time and portions.
- Oven — steady heat at 350°F.
- Mixing bowls — one large for the crust, one medium for the filling.
- Wire rack — cool the crust and final pan evenly.
Nice-to-haves
- Electric mixer — speeds up smoothing the cream cheese but a sturdy whisk works fine if your cream cheese is softened.
- Rubber spatula — for scraping and spreading the filling cleanly.
- Food processor or plastic bag and rolling pin — for crushing the half Butterfinger bar finely.
Frequent Missteps to Avoid
Use room-temperature cream cheese. If it’s too cold you’ll get lumps no matter how long you whisk. Give it at least 30 minutes out of the fridge.
Don’t skip cooling the crust completely before adding the filling. A warm crust can cause the filling to slide or become greasy.
Watch baking time carefully. The cheesecake layer should be set but still slightly jiggly in the center—overbaking will make it dry and crumbly.
Reserve the topping crumb. If you use all of the crumbly mixture for the crust, you’ll miss the crunchy contrast on top that balances the creamy filling.
Nutrition-Minded Tweaks
If you want to lighten these bars, try a few swaps: use reduced-fat cream cheese and plain Greek yogurt instead of sour cream to cut fat while keeping creaminess. Reduce the sugar slightly—this filling tolerates a 2–3 tablespoon reduction without becoming bland.
Smaller portions go a long way here because the candy pieces add concentrated sugar and fat. Instead of 9×13 bars, cut into 24 smaller squares rather than 12 larger ones to keep servings modest.
For nut-free households, replace the peanut butter with a seed butter; for lower-calorie chips, try a smaller sprinkle of chopped dark chocolate rather than full cups of chips.
Cook’s Commentary
I love how forgiving this recipe is. The crust doesn’t need perfect pressing—aim for even coverage and you’ll be fine. I usually set aside the crumb topping while I whisk the filling; it’s a small step that makes the final presentation look intentional.
When folding chopped Butterfinger into the filling, use a gentle hand. You want pockets of candy, not dust. And when I sprinkle the chips and crushed candy on top, I press them lightly into the filling before the final one-minute bake so they adhere and get that glossy, slightly melted look.
If you’re serving at a gathering, I recommend cutting the bars after they’re fully chilled. Warm bars will be messy—cold bars slice cleanly and hold their shape.
Storage & Reheat Guide
Refrigerate leftover bars covered tightly for up to 4 days. The candy on top will soften slightly over time but the flavor holds well. For longer storage, freeze individual bars between layers of parchment in a freezer-safe container for up to 1 month.
To thaw, move bars from the freezer to the refrigerator overnight. If you prefer them slightly less cold, pull them from the fridge 20–30 minutes before serving.
A quick tip: chilling the pan uncovered on the counter for the first hour (as the recipe instructs) prevents condensation in the container when you wrap it for the fridge.
Quick Q&A
- Can I use a different cake mix? Yes. Chocolate or devil’s food are ideal. Lighter chocolate mixes will work but change the intensity.
- Can I freeze these? Yes. Freeze wrapped bars for up to 1 month; thaw in the fridge overnight before serving.
- What if my filling cracks? Slight top cracks are cosmetic. Don’t overbake—remove once set but slightly jiggly.
- Can I make these ahead? Absolutely. They actually benefit from chilling a few hours, or make a day ahead for best slicing.
- How do I get clean slices? Chill fully, then use a knife warmed under hot water and wiped dry between cuts.
Bring It Home
Butterfinger Cheesecake Bars are one of those desserts that feel like more work than they are. With a few pantry staples and a short baking timeline, you get a crowd-pleasing treat that travels, stores, and slices well. Try making them a day ahead for the cleanest cuts and best flavor melding.
If you make them, tell me how you adapted the toppings or whether you swapped the pudding mix for vanilla. I always read the comments and love hearing tips from people who try a tweak that works.
Butterfinger Cheesecake Bars
Ingredients
Ingredients
- 1 Chocolate Cake Mix
- 1.4 ozbutterscotch instant pudding mix
- 1 egg
- 3 tbsppeanut butter
- 3 tbspcanola oil
- 8 ozcream cheese softened
- 1/3 cupsugar
- 2 tbspsour cream
- 1 egg
- 1/2 tspvanilla extract
- 1 butterfinger bar chopped
- 1/4 cupchocolate chips
- 1/4 cupbutterscotch chips
- 1/2 Butterfinger candy bar crushed
Instructions
Instructions
- Preheat oven to 350 degrees F.
- In a large bowl, combine 1 Chocolate Cake Mix, 1.4oz butterscotch instant pudding mix, 3 tbsp peanut butter, 1 egg, and 3 tbsp canola oil. Mix until the mixture is crumbly.
- Measure and set aside 1 cup of the crumbly mixture for the topping. Press the remaining mixture evenly into an ungreased 9x13" baking pan to form the crust.
- Bake the crust for 10 minutes. Remove from oven and cool completely on a wire rack.
- While the crust cools, make the filling: In a medium bowl, beat 8oz cream cheese (softened), 1/3 cup sugar, and 2 tbsp sour cream until smooth. Use an electric mixer or a sturdy whisk.
- Add 1 egg and 1/2 tsp vanilla extract to the cream cheese mixture and beat on low speed just until combined.
- Fold 1 butterfinger bar, chopped, into the filling.
- Spread the filling evenly over the cooled crust. Sprinkle the reserved 1 cup crumb mixture evenly over the filling.
- Bake for 15–20 minutes, or until the filling is set.
- Remove from the oven and immediately sprinkle 1/4 cup butterscotch chips, 1/4 cup chocolate chips, and 1/2 Butterfinger candy bar, crushed, evenly over the top. Return to the oven and bake 1 minute more.
- Cool the pan on a wire rack for 1 hour. Then refrigerate for 2 hours or until cold.
- Cut into bars and serve.
Equipment
- Large Bowl
- Medium Bowl
- Electric mixer or whisk
- 9×13 Baking Pan
- Wire Rack
- Oven