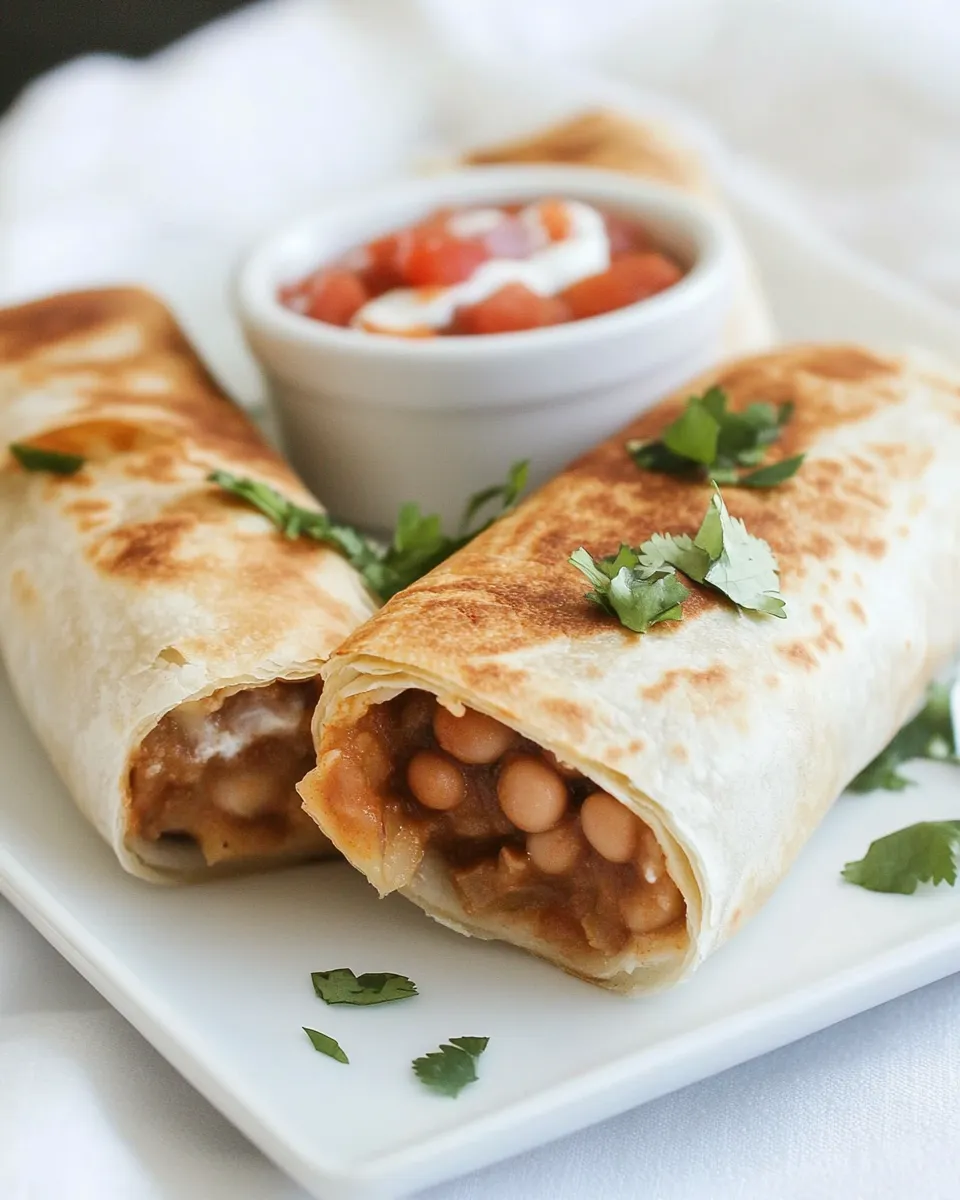
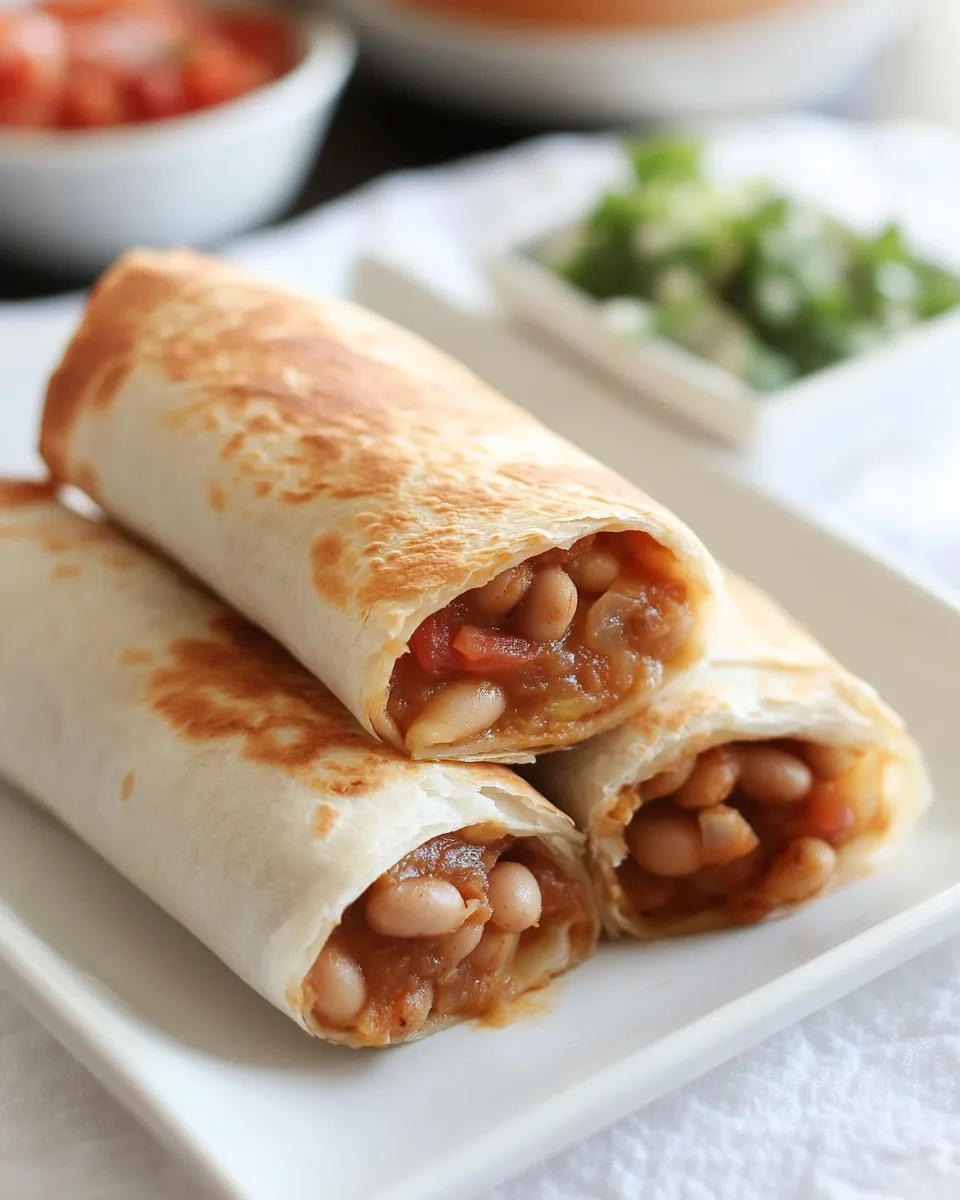
These bean chimichangas are the sort of practical comfort food I reach for when I want something that feels special but doesn’t demand a boutique grocery run. The filling is creamy, cheesy, and reliably kid-friendly thanks to Velveeta and refried beans, while a quick fry plus a short oven bake gives you that irresistible crisp exterior. They come together fast and scale easily if company shows up.
I keep this version in rotation because it balances speed and texture. You get a creamy, seasoned center and a crunchy shell without deep-frying for long. Small techniques—warming tortillas, sealing with egg white, and finishing in the oven—make a noticeable difference in results.
Follow the steps below exactly as written for consistent results. I’ll also share tools, common mistakes to avoid, and sensible swaps so you can adapt these to what’s in your pantry while keeping the outcome satisfying.
What You’ll Gather
Ingredients
- 12 tortillas — use flour tortillas for best folding and crisping.
- 2 egg whites — beaten lightly to act as a glue for sealing the tortillas.
- 1 can refried beans — the creamy base of the filling; no need to thin.
- 8 oz Velveeta® — melts smoothly to make a silky cheese-bean mixture.
- 1/2 can RO*TEL® Diced Tomatoes & Chiles — adds brightness and mild heat; drain slightly if very watery.
- 2 tbsp Vegetable OIl — for shallow frying; enough to brown without deep-frying.
- Monterrey Jack Cheese — sprinkled over the filling for melty stretch and flavor.
Bean Chimichangas: Step-by-Step Guide
- In a medium pot combine 1 can refried beans, 8 oz Velveeta, and 1/2 can RO*TEL. Heat over low–medium, stirring frequently, until the cheese is fully melted and the mixture is smooth. Remove from heat.
- Warm the 12 tortillas so they are pliable (for example, microwave a stack wrapped in a damp cloth for 20–30 seconds or warm each briefly in a dry skillet).
- In a small bowl whisk the 2 egg whites until slightly frothy.
- Divide the bean-and-cheese filling evenly among the 12 warmed tortillas. Place the filling on the lower third of each tortilla.
- Sprinkle Monterrey Jack cheese over the filling on each tortilla.
- Brush or dab a thin edge of each tortilla with egg white to help seal. Fold each tortilla by folding the bottom edge up over the filling, folding both sides inward, then rolling tightly away from you so the seam ends up on the bottom. Use a little more egg white on the final seam if needed to seal.
- Preheat the oven to 350°F.
- Heat the 2 tbsp vegetable oil in a large skillet over medium heat until shimmering.
- Working in batches so you do not crowd the pan, place chimichangas seam-side down in the hot oil and cook until golden, about 1 minute per side, turning as needed to brown all sides.
- Transfer the fried chimichangas seam-side down to a baking sheet or ovenproof pan.
- Bake in the preheated 350°F oven for 12–15 minutes, until heated through and crisp.
- Remove from the oven and let rest briefly before serving.
Why This Recipe Belongs in Your Rotation
It’s fast. The filling is essentially hands-off once everything is in the pot, and the assembly can be an easy family activity. You get melty, comforting flavors with minimal prep. It’s also forgiving—if your tortillas tear a bit, the egg-white seal and oven finish hide imperfections.
It’s flexible. Serve these for weeknight dinners, casual weekend gatherings, or pack them for a lunch that reheats well. The texture contrast—creamy inside, crisp outside—feels decidedly more elevated than a simple bean burrito.
Finally, it’s crowd-pleasing. The mild spice from RO*TEL® and the familiar cheese-and-bean combo appeal to kids and adults alike. If you want more kick, add salsa or hot sauce at the table.
If You’re Out Of…
Short on an ingredient? Here are practical swaps and notes.
- If you don’t have Velveeta® — use a combination of a mild processed cheese and a bit of cream cheese to mimic the melt, or use a melting cheddar if you don’t mind a firmer texture.
- No RO*TEL® — canned diced tomatoes plus a pinch of cayenne or a few diced pickled jalapeños will give you acidity and heat.
- Out of refried beans — mash a cup or two of cooked pinto or black beans with a splash of broth and a little olive oil until smooth.
- Can’t use vegetable oil — another neutral oil with a high smoke point (like canola) works fine. For a lighter finish, skip the pan-fry and brush tortillas with oil and bake until crisp, though the texture will be slightly different.
Tools of the Trade
These are the small things that make the process smooth.
- Medium pot — for melting the filling evenly without scorching.
- Small bowl and whisk — to beat the egg whites for sealing.
- Large skillet — for shallow frying; cast iron or stainless steel works best for even browning.
- Baking sheet or ovenproof pan — you’ll transfer chimichangas here to finish in the oven.
- Tongs or a spatula — for turning chimichangas safely while frying.
Learn from These Mistakes
Common pitfalls and how to fix them.
- Overcrowding the pan — this drops the oil temperature and leads to soggy chimichangas. Fry in batches so each has room to crisp.
- Not warming tortillas — cold tortillas crack when folded. Warm until just pliable; don’t overheat or they’ll get gummy.
- Using too much filling — putting too much in each tortilla prevents a tight roll and makes sealing hard. Keep the filling to the lower third as instructed.
- Skipping the oven finish — frying gives color but finishing in the oven sets the shape and ensures the interior is heated through without burning the exterior.
In-Season Swaps
Seasonal produce can lift this straightforward dish.
- Summer — add a spoonful of fresh corn salsa or charred corn kernels inside before rolling for sweetness and texture.
- Fall — fold in roasted poblano strips or caramelized onions with the filling for a deeper, smoky flavor.
- Winter — a spoonful of roasted butternut squash purée tucked into the filling adds creaminess and subtle sweetness.
- Spring — thinly sliced radishes and fresh cilantro on top after baking brighten the plate.
Pro Perspective
Little pro tips that make a difference.
- Control moisture: If your RO*TEL® is watery, spoon off some of the liquid before combining with the beans and cheese to avoid a runny filling.
- Seal smart: Egg white is an easy, neutral glue. If you accidentally tear a tortilla, patch it with a thin scrap and egg white—then fry seam-side down to lock the patch.
- Browning: Heat the skillet until the oil shimmers but isn’t smoking. That quick seal minimizes oil absorption so your chimichangas stay crisp, not greasy.
- Cheese layering: A little Monterrey Jack directly on top of the filling—before rolling—ensures every bite has melty cheese. If you prefer extra crust, sprinkle a touch more on before the final bake.
Store, Freeze & Reheat
Refrigerator
Store cooled chimichangas in an airtight container for up to 3 days. Keep any toppings or salsa separate to preserve texture.
Freezer
Cool completely, then freeze on a tray until firm. Transfer to a freezer bag and store for up to 2 months. Freeze before baking if you want longer storage and simpler reheating.
Reheat
To reheat from refrigerated: place on a baking sheet and warm in a 350°F oven for 10–12 minutes until heated through and crisp. From frozen: bake at 375°F for about 20–25 minutes, flipping once, until hot in the center. Avoid the microwave unless you’re short on time—microwaving makes the shell soggy.
Frequently Asked Questions
Answers to the questions I get most often when people try this recipe.
- Can I make these vegetarian? Yes—this recipe as written is already vegetarian if you use cheese made without animal rennet. No meat is required.
- How spicy are they? Mild, thanks to the RO*TEL®. If you want less heat, drain the RO*TEL® and use less; for more heat, add chopped canned green chiles or hot sauce to the filling.
- Can I bake instead of frying? Yes. Brush each rolled tortilla lightly with oil and bake at 400°F for 12–15 minutes, turning once, until crisp. Frying first gives a deeper color and quick crisp, but baking is cleaner and still tasty.
- Why use egg white? Egg white is a neutral binder that helps keep the seam sealed during frying. Whole egg will work but can add a bit more color and richness.
Next Steps
Make these once exactly as written. You’ll notice small things to tweak for your household—maybe more heat, more cheese, or a particular salsa you love. After that, try the in-season swaps or fold in leftovers to make the recipe your own.
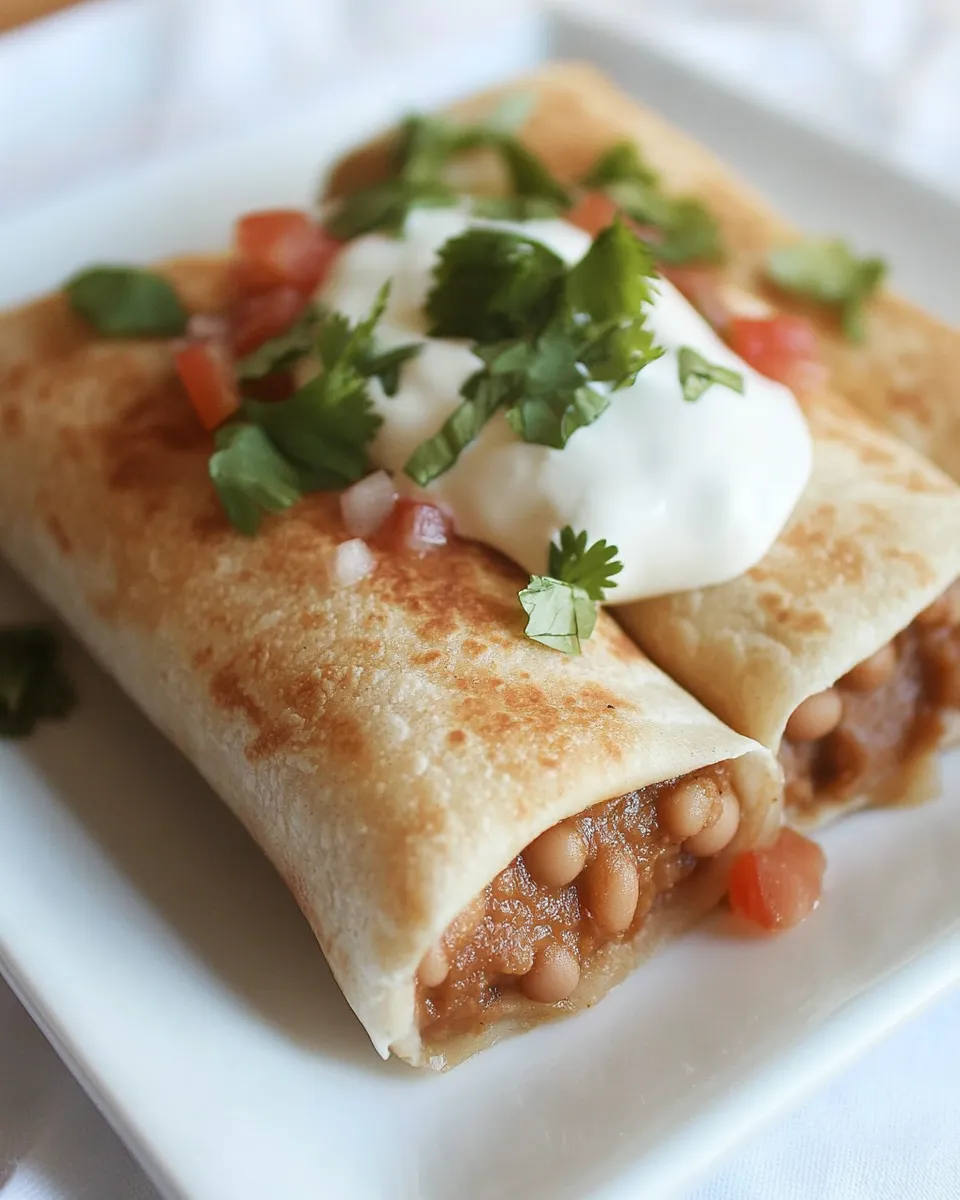
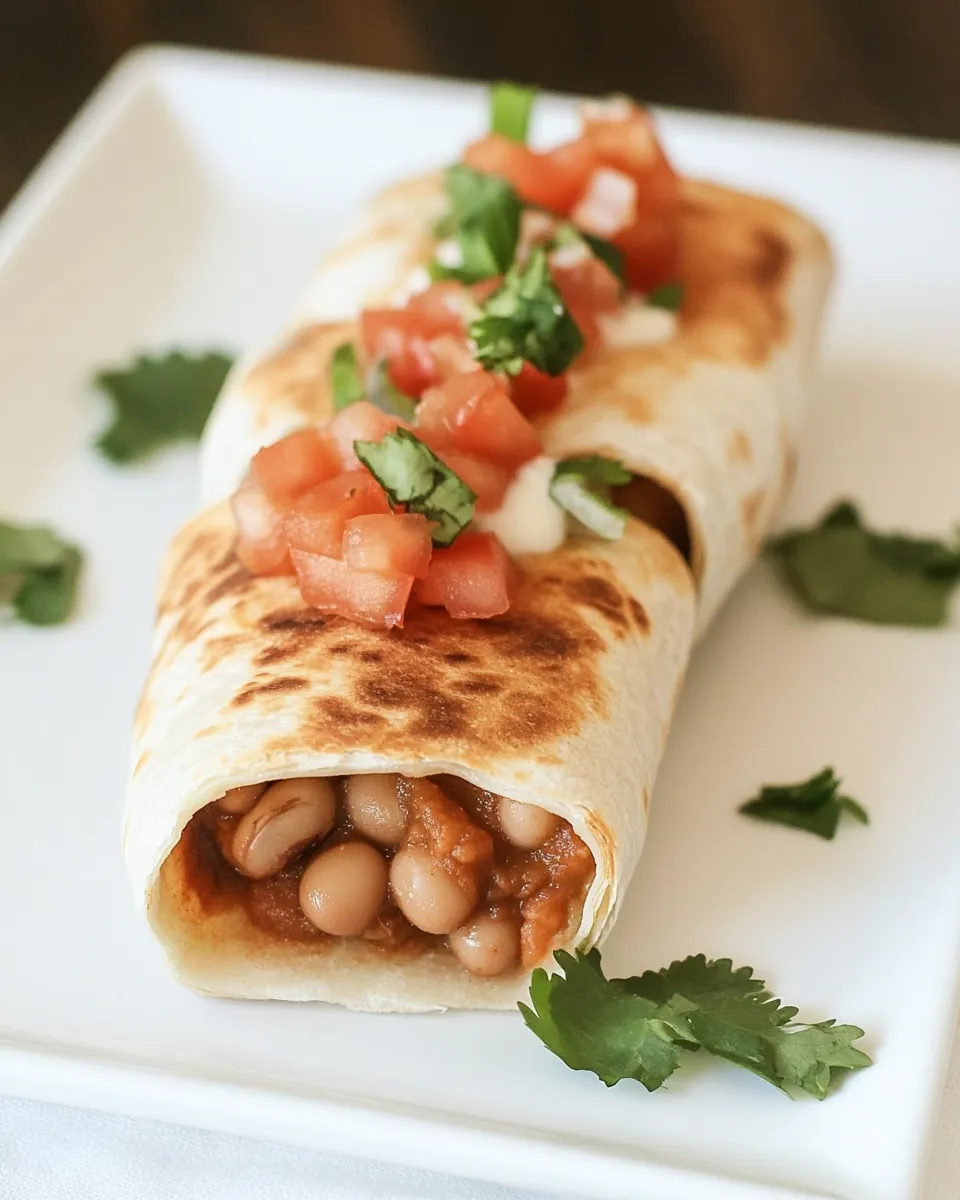
Serve with chopped cilantro, a dollop of sour cream, pico de gallo, or a simple slaw for crunch. These hold up well for casual entertaining, and they travel fine if you need to bring a dish to share. If you try a variation you love, I’d encourage noting the change so it becomes your go-to version next time.

Bean Chimichangas
Ingredients
Ingredients
- 12 tortillas
- 2 egg whites
- 1 canrefried beans
- 8 ozVelveeta®
- 1/2 canRO*TEL® Diced Tomatoes & Chiles
- 2 tbspVegetable OIl
- Monterrey Jack Cheese
Instructions
Instructions
- In a medium pot combine 1 can refried beans, 8 oz Velveeta, and 1/2 can RO*TEL. Heat over low–medium, stirring frequently, until the cheese is fully melted and the mixture is smooth. Remove from heat.
- Warm the 12 tortillas so they are pliable (for example, microwave a stack wrapped in a damp cloth for 20–30 seconds or warm each briefly in a dry skillet).
- In a small bowl whisk the 2 egg whites until slightly frothy.
- Divide the bean-and-cheese filling evenly among the 12 warmed tortillas. Place the filling on the lower third of each tortilla.
- Sprinkle Monterrey Jack cheese over the filling on each tortilla.
- Brush or dab a thin edge of each tortilla with egg white to help seal. Fold each tortilla by folding the bottom edge up over the filling, folding both sides inward, then rolling tightly away from you so the seam ends up on the bottom. Use a little more egg white on the final seam if needed to seal.
- Preheat the oven to 350°F.
- Heat the 2 tbsp vegetable oil in a large skillet over medium heat until shimmering.
- Working in batches so you do not crowd the pan, place chimichangas seam-side down in the hot oil and cook until golden, about 1 minute per side, turning as needed to brown all sides.
- Transfer the fried chimichangas seam-side down to a baking sheet or ovenproof pan.
- Bake in the preheated 350°F oven for 12–15 minutes, until heated through and crisp.
- Remove from the oven and let rest briefly before serving.
Equipment
- Medium Pot
- Small Bowl
- Whisk
- Large Skillet
- Baking Sheet
- Oven