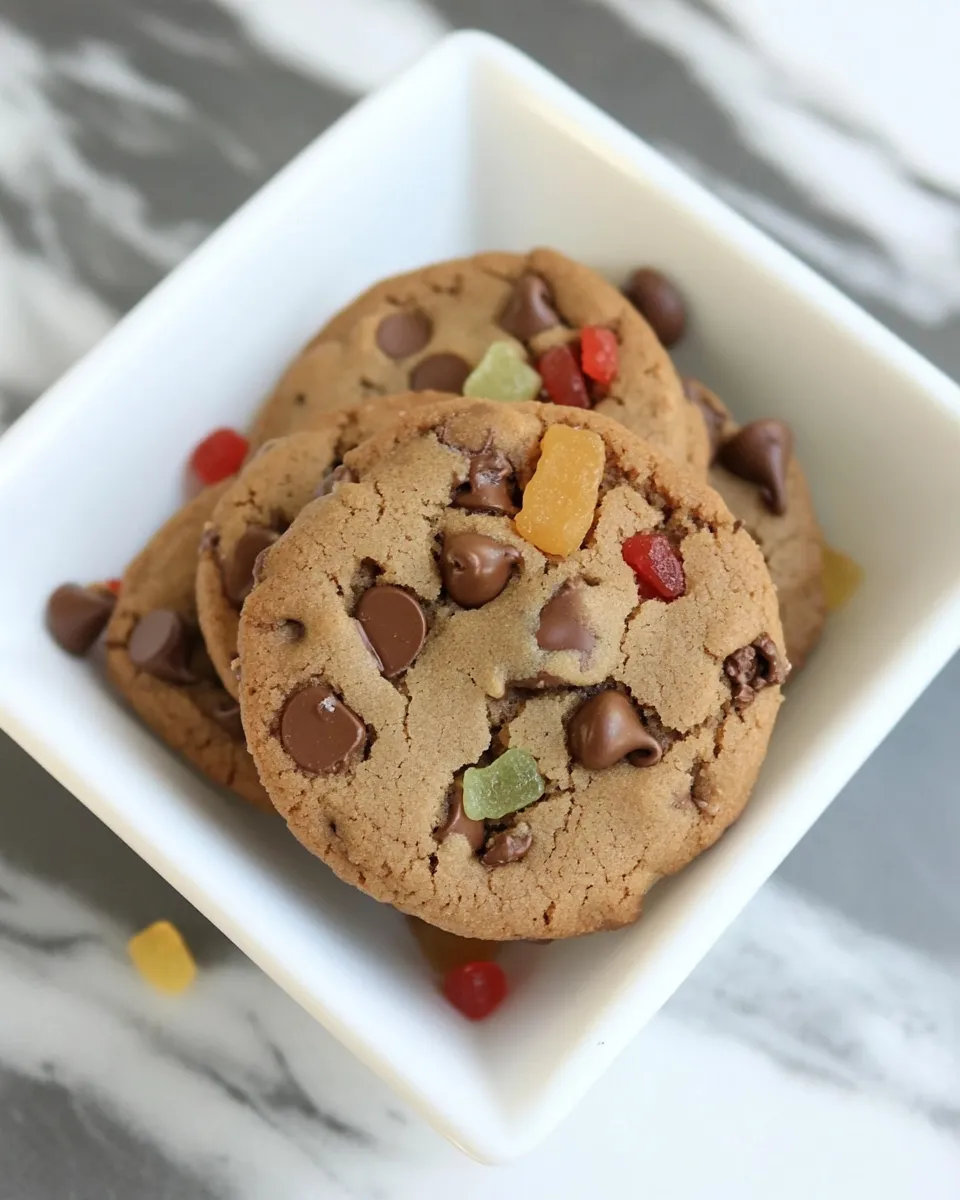
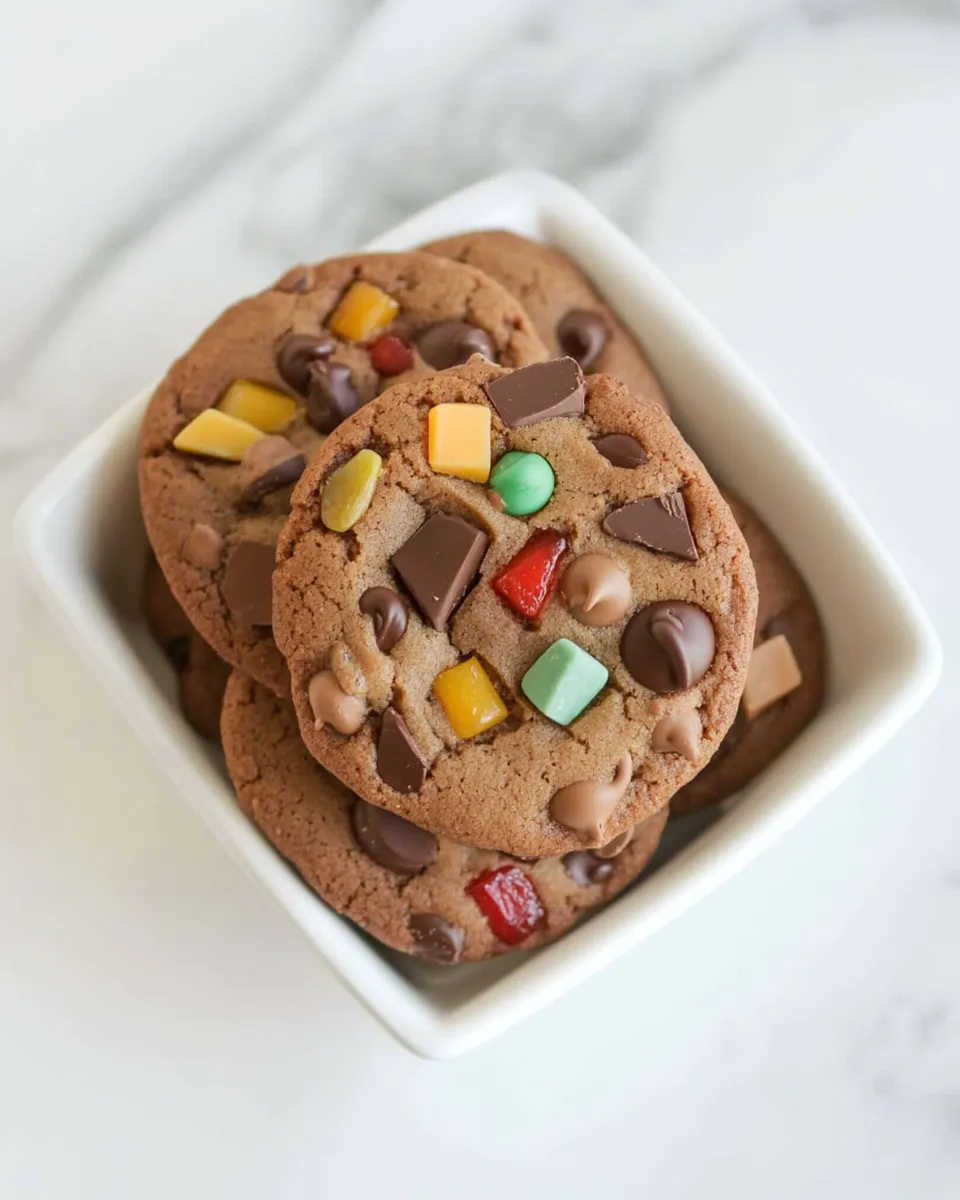
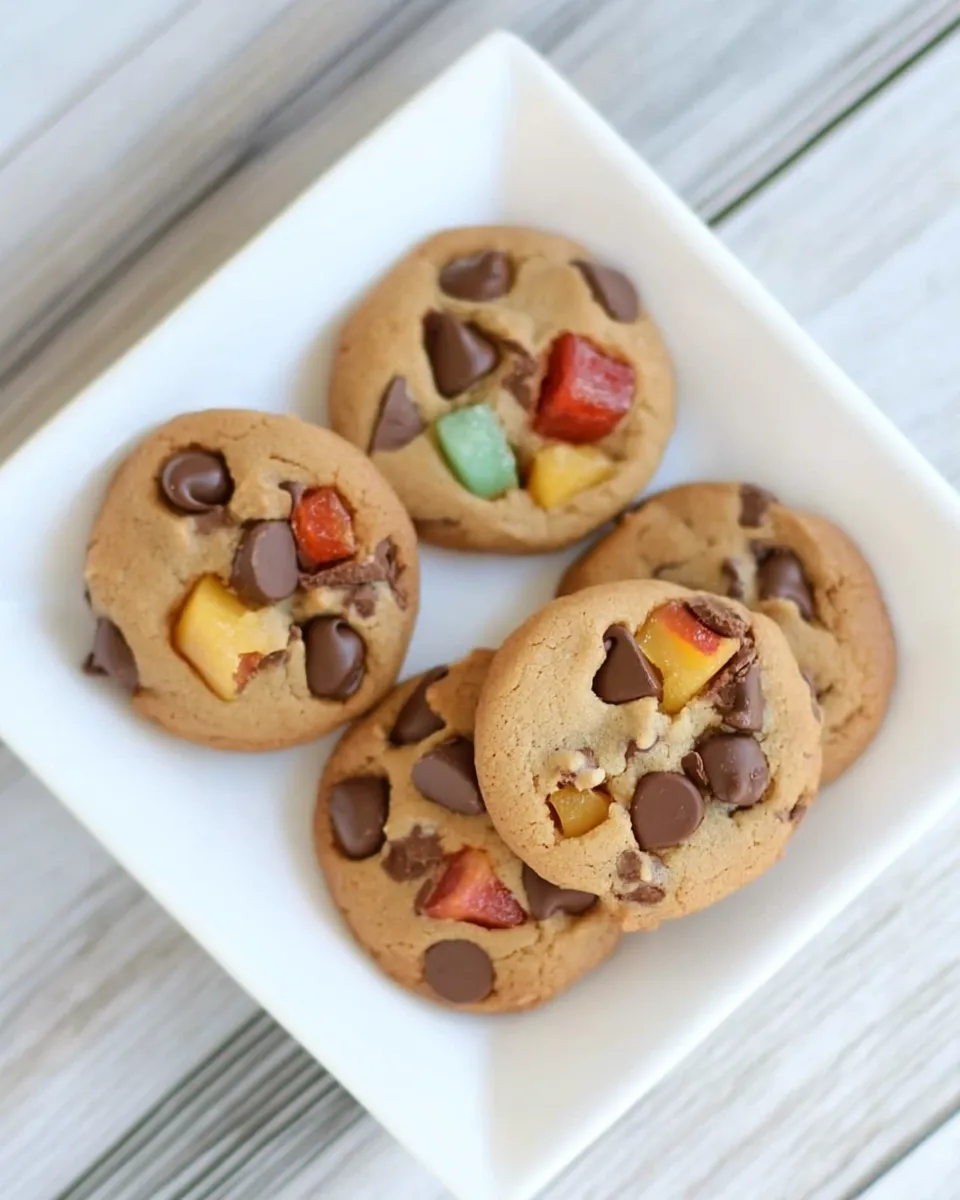
These cookies are the sort I make when I want something familiar with a little surprise: a classic chocolate bite punctuated by bright, chewy candied fruit on top. The dough is straightforward — butter, sugar, egg, vanilla, flour — but there are two chocolate moments: a little melted chocolate folded into the dough for depth and a glossy chocolate-butter topping that holds the candied fruit in place.
I like this recipe because it’s reliable and forgiving. You can prepare the dough ahead, chill it, and bake when you have a pocket of time. The cookies bake quickly and leave you with tender centers and slightly crisp edges. The candied fruit gives a cheerful tang and color that makes them feel special without extra fuss.
Below you’ll find the ingredient list taken exactly from the recipe source, clear step-by-step instructions, troubleshooting, and practical swaps that preserve texture. Read through the tips before you start — a few small choices make a big difference.
What Goes In
Start by gathering everything. The ingredient list below is presented exactly as the recipe source provides; each item includes a short note about its role or a practical tip so you can assemble efficiently.
Ingredients
- 200gbutter — brings richness and structure; soften to room temperature for easy creaming.
- 400gflour — the backbone of the cookie; add in batches and stop when dough is firm but still soft.
- 100gblack chocolate 70% — melted and folded into the dough for deep cocoa flavor; cool to lukewarm before adding.
- 150gsugar — sweetens and helps create a tender crumb; cream well with butter for lightness.
- 1egg — binds and adds moisture; use at room temperature for better incorporation.
- 1pinchof salt — amplifies flavor; even a small pinch matters in balancing sweetness.
- 1tspvanilla extract — rounds flavors; adds aromatic lift.
- 200gblack chocolate — used for the topping when melted with butter; choose a good-quality 70% for contrast.
- 50gbutter — combined with the topping chocolate to make a glossy, spreadable finish.
- candied fruit — for garnish; press onto wet topping so pieces adhere as it sets.
From Start to Finish: Chocolate Chip Cookies with Candied Fruit
- Soften 200 g butter to room temperature if needed. Melt 100 g black chocolate (70%) in a bain-marie, then set aside to cool until lukewarm or room temperature.
- In a mixing bowl, cream the 200 g softened butter with 150 g sugar until smooth and fluffy.
- Add 1 egg, 1 tsp vanilla extract and 1 pinch of salt to the butter-sugar mixture and beat until evenly combined.
- Gradually add the cooled melted 100 g chocolate to the mixture and stir gently until uniform.
- Add 400 g flour in batches, mixing after each addition, until the dough comes together. Stop adding flour when the dough is firm but still soft and not sticky.
- Shape the dough into a disk, wrap in cling film, and refrigerate for 1 hour.
- Preheat the oven to 180°C (350°F). Line a large baking tray with baking paper.
- Remove the chilled dough from the fridge, roll it out to about 0.3 cm (0.12 inch) thickness, and cut out rounds with a cookie cutter. Transfer the rounds to the prepared tray, leaving space between them.
- Bake the cookies 8–10 minutes, then transfer them to a cooling rack and let them cool completely.
- For the topping, melt 200 g black chocolate with 50 g butter in a bain-marie, stirring until smooth. Remove from heat and let the mixture cool slightly until spoonable but still pourable.
- Place a spoonful of the chocolate-butter mixture onto the top of each cooled cookie and spread gently, leaving some of the cookie exposed if desired.
- Immediately sprinkle candied fruit on top of the still-wet chocolate so it adheres. Let the topping set before serving.
Why This Recipe Works
There are a few intentional choices here that give these cookies their win: first, melting some dark chocolate into the dough deepens the chocolate flavor without making the dough excessively dense. Second, the creaming step — butter and sugar beaten until fluffy — introduces air, which helps the cookies rise just enough and keeps the crumb tender.
The dough is chilled into a disk. Chilling firms the butter, which controls spread so you get neat rounds with a thin edge and softer center. Rolling the dough to 0.3 cm and cutting rounds gives uniform cookies that bake evenly. Finally, the separate chocolate-butter glaze sets shiny and holds the candied fruit in place; combining chocolate with butter keeps the topping from becoming brittle and makes it easier to spread.
Texture-Safe Substitutions
If you need to swap something while keeping the cookie texture intact, these are my safest options.
- Butter: If you must, use salted butter but reduce the added pinch of salt; unsalted keeps control over seasoning.
- Flour: All-purpose is assumed here. If swapping to a higher-protein flour, cut the amount back slightly or expect a firmer bite.
- Chocolate: You can use a 60–72% dark chocolate in place of the listed percentages; stay within that range to preserve the balance between bitterness and sweetness.
- Egg: For a small egg allergy workaround, try a commercial egg replacer designed for baking — expect slightly different structure but acceptable results. (Note: I don’t recommend skipping eggs entirely without testing.)
- Candied fruit: Dried fruit pieces (small chopped glacé cherries or chopped dried apricots) will adhere to the topping similarly, but they’ll be drier and chewier.
Essential Tools for Success
- Mixing bowl and hand mixer or stand mixer — for proper creaming of butter and sugar.
- Bain-marie setup (a heatproof bowl over simmering water) — gentle melting keeps chocolate smooth and prevents seizing.
- Rolling pin and cookie cutter — for consistent sizes and even baking.
- Baking tray lined with baking paper — prevents sticking and promotes even browning.
- Cooling rack — cools cookies quickly and prevents soggy bottoms.
- Spoons or small offset spatula — for spreading the topping neatly.
Troubles You Can Avoid
Here are common missteps and how I handle them.
Cookies spread too much
Make sure the butter was chilled briefly if your kitchen is warm, and ensure the dough was refrigerated for the full hour. Over-rolling the dough or using too little flour will also encourage spread; add flour in batches and stop when the dough is firm but not sticky.
Cookies are tough
Overmixing after adding the flour develops gluten. Mix only until the dough comes together. Also, make sure the butter and sugar were properly creamed before adding the egg — that step contributes to tenderness.
Chocolate topping is grainy or seizes
Chocolate can seize if it meets water or is overheated. Melt it gently over a bain-marie and keep steam away from the bowl. If it starts to thicken, remove from heat and stir slowly; a small splash of neutral oil can sometimes rescue a slightly grainy chocolate, but avoid water entirely.
Topping slides off
If the topping is too warm or runny when you spoon it on, it may slide off. Let the melted chocolate-butter cool until it’s spoonable but still pourable, as the recipe suggests. Work on a flat rack so cookies remain level while the topping sets.
Variations by Season
Small seasonal changes keep this cookie interesting throughout the year.
- Winter: Use candied orange peel and a pinch of ground cinnamon in the dough for a warm, festive flavor.
- Spring: Try chopped candied citrus and a touch of lemon zest in the topping for brightness.
- Summer: Keep the glaze thinner and top with small pieces of candied ginger for a zippy contrast to the chocolate.
- Autumn: Add a dusting of flaky sea salt to the set topping and use candied apple pieces for a cozy, fall-forward cookie.
Recipe Notes & Chef’s Commentary
I treat the dough like shortbread with a chocolate lift: minimal handling after adding flour, short chill time, and a careful bake. The double-chocolate approach here is purposeful — melted chocolate in dough for flavor, then a chocolate-butter topping for gloss and adhesion. If you prefer a cleaner look, reduce the amount of topping slightly so the edges remain exposed like in classic biscuits.
Rolling to 0.3 cm thickness makes these cookies tender but sturdy enough to pick up. If you like a chewier cookie, roll slightly thicker and add an extra minute to the bake time, watching carefully. The recipe’s baking window (8–10 minutes) aims for light color — take them out when the centers still look soft; they’ll firm as they cool.
Storage Pro Tips
Once the chocolate topping has set, store the cookies in a single layer or separated with parchment to avoid smudging the tops. At room temperature in an airtight container, they keep well for 3–4 days. For longer storage, you can freeze the plain baked cookies (before applying the topping) for up to a month; thaw, then warm the topping and decorate just before serving to keep the candied fruit bright and fresh.
If you need to transport them, pack in a rigid container layered with parchment and keep chilled until delivery to prevent sliding or melting in warm weather.
Ask & Learn
Common questions I get: “Can I skip chilling?” You technically can, but chilling firms the dough and prevents excessive spread — I don’t recommend skipping. “Can I use milk chocolate for the topping?” Yes, but expect a sweeter, softer set. “What size cookie cutter?” Any size works; just adjust baking time slightly. Smaller rounds will bake faster; larger ones need an extra minute or two.
If something goes wrong, retrace these variables: temperature of ingredients, chill time, oven accuracy, and mixing technique. Fixes are usually a tweak away.
Time to Try It
These cookies are a lovely project when you want something pretty without a complicated technique. Follow the ingredient list and steps as written, and use the troubleshooting tips if anything looks off. Make the dough ahead, keep your workspace calm, and enjoy the moment when you press that bright candied fruit into warm chocolate. I’d love to hear how your batch turned out — which variation you tried, or any adjustments that worked for you.

Chocolate Chip Cookies with Candied Fruit
Ingredients
Ingredients
- 200 gbutter
- 400 gflour
- 100 gblack chocolate 70%
- 150 gsugar
- 1 egg
- 1 pinchof salt
- 1 tspvanilla extract
- 200 gblack chocolate
- 50 gbutter
- candied fruit
Instructions
Instructions
- Soften 200 g butter to room temperature if needed. Melt 100 g black chocolate (70%) in a bain-marie, then set aside to cool until lukewarm or room temperature.
- In a mixing bowl, cream the 200 g softened butter with 150 g sugar until smooth and fluffy.
- Add 1 egg, 1 tsp vanilla extract and 1 pinch of salt to the butter-sugar mixture and beat until evenly combined.
- Gradually add the cooled melted 100 g chocolate to the mixture and stir gently until uniform.
- Add 400 g flour in batches, mixing after each addition, until the dough comes together. Stop adding flour when the dough is firm but still soft and not sticky.
- Shape the dough into a disk, wrap in cling film, and refrigerate for 1 hour.
- Preheat the oven to 180°C (350°F). Line a large baking tray with baking paper.
- Remove the chilled dough from the fridge, roll it out to about 0.3 cm (0.12 inch) thickness, and cut out rounds with a cookie cutter. Transfer the rounds to the prepared tray, leaving space between them.
- Bake the cookies 8–10 minutes, then transfer them to a cooling rack and let them cool completely.
- For the topping, melt 200 g black chocolate with 50 g butter in a bain-marie, stirring until smooth. Remove from heat and let the mixture cool slightly until spoonable but still pourable.
- Place a spoonful of the chocolate-butter mixture onto the top of each cooled cookie and spread gently, leaving some of the cookie exposed if desired.
- Immediately sprinkle candied fruit on top of the still-wet chocolate so it adheres. Let the topping set before serving.
Equipment
- Mixing Bowl
- bain-marie (double boiler)
- Spatula
- cling film
- Rolling Pin
- cookie cutter
- Baking tray
- baking paper
- Oven
- Cooling rack