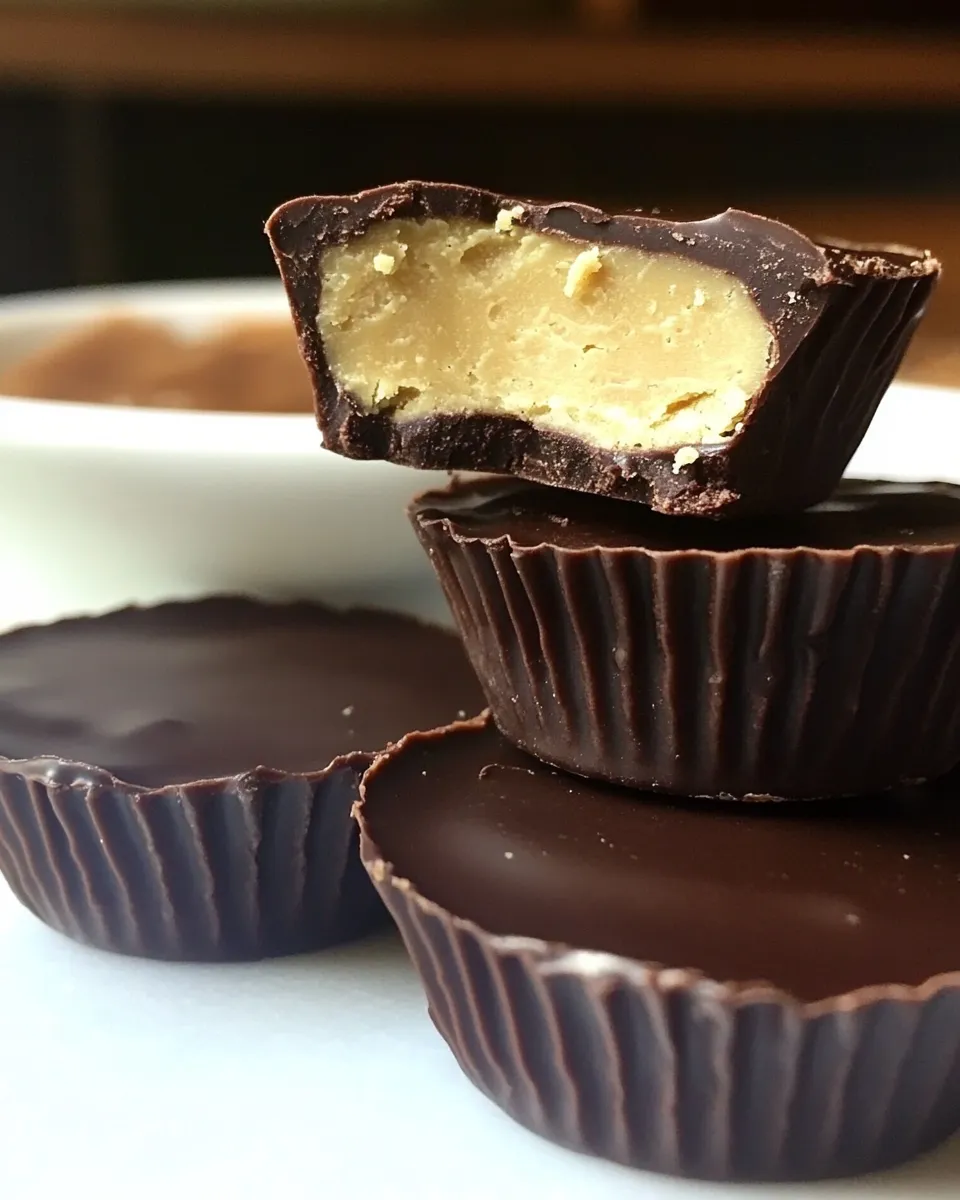
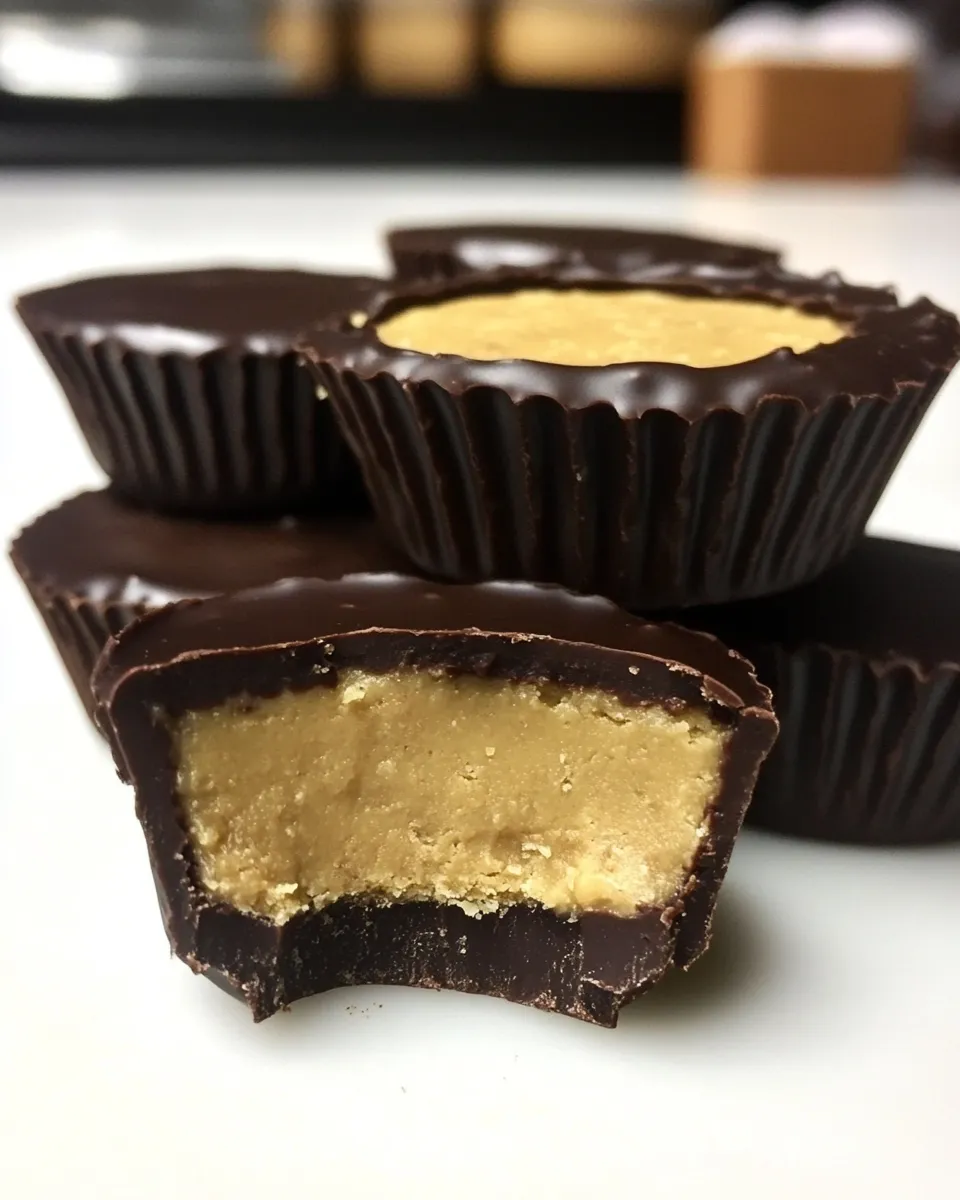
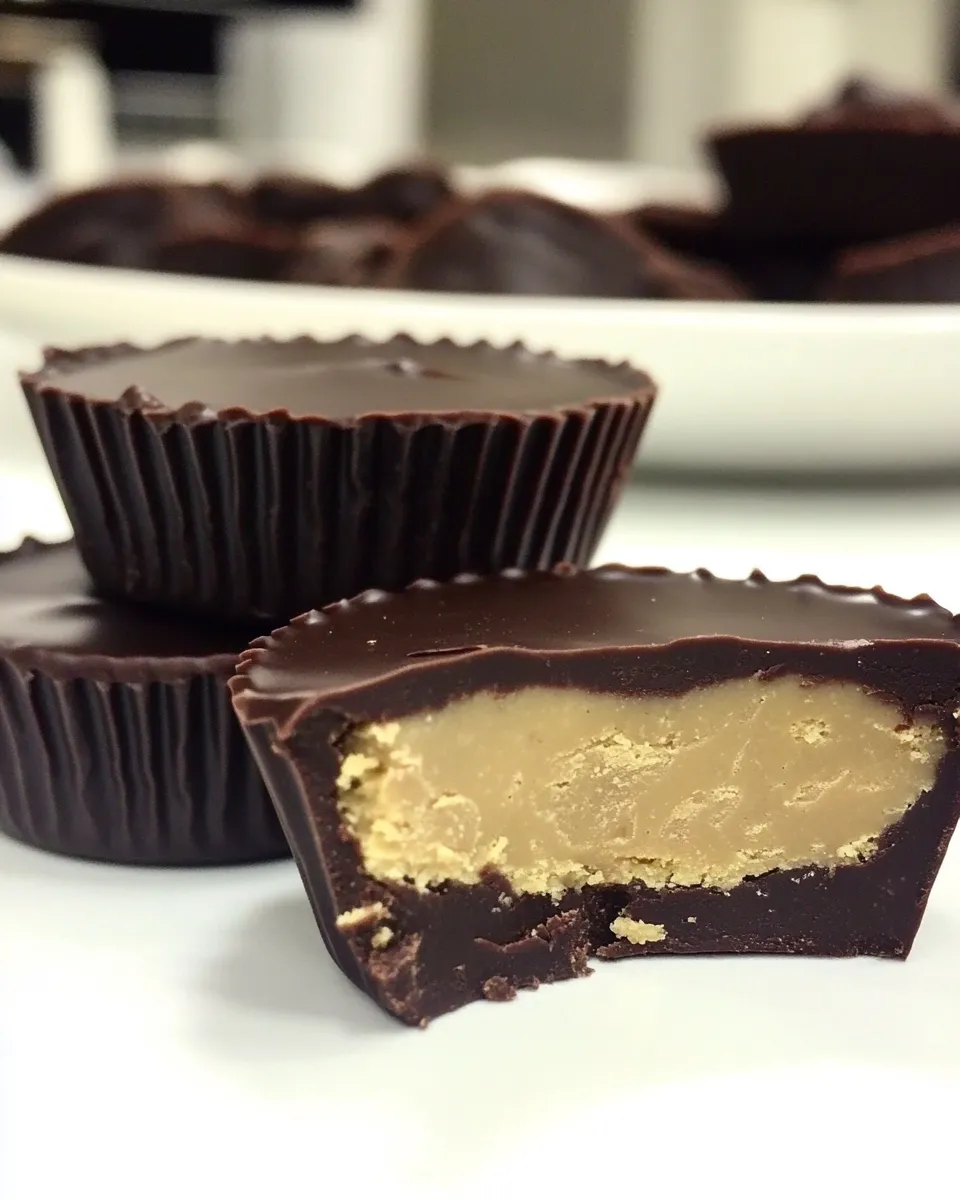
I make these Chocolate Cookie Butter Cups whenever I want something that feels indulgent but comes together faster than a bakery run. They’re a riff on the classic peanut butter cup, swapping in cookie butter and graham cracker crumbs for a softer, spiced filling that pairs beautifully with a milk chocolate shell. The texture contrast — crisp chocolate, tender cookie butter center — is what I reach for when I want a treat that feels special but is genuinely easy.
This recipe is built around a few simple techniques: temper-less chocolate handling, a no-fuss cookie-butter filling that firms up in the freezer, and portioning that keeps everything bite-sized. You don’t need pastry experience. Follow the steps in order and keep an eye on temperatures and textures; they’ll tell you when to move on.
I prefer to make these on a sheet tray so they can move straight into the freezer for quick setting, and I like to use top-quality milk chocolate chips for the smoothest finish. If you love a balance of sweet and slightly spiced cookie flavor, these will become a weeknight favorite — or a thoughtful homemade gift when packed into a little box.
What You’ll Gather
Before you start, gather the ingredients, a baking sheet, and a few small tools. Lay out 30 miniature candy cups so you’re not searching while melting chocolate. Have your microwave-safe bowl and a small saucepan ready. The process moves quickly once the chocolate melts, and having everything at hand keeps the chocolate from seizing or cooling into lumps.
Ingredients
- 2cupsmilk chocolate chips — forms the chocolate shells and the final topping; milk chocolate gives a creamy, sweet contrast to the cookie filling.
- 2tablespoonsCoconut Oil — smooths the melted chocolate and helps it set with a shiny finish; use refined if you want no coconut flavor.
- 1/2cupbutter — combines with cookie butter to create a rich, pliable filling; soften it beforehand for easier melting.
- 1/2cupcookie butter — the star of the filling; provides spiced, buttery cookie flavor and a spreadable texture.
- 1cuppowdered sugar — sweetens and helps the filling hold its shape when chilled; sift if clumpy for a smoother mix.
- 2/3cupfine graham cracker crumbs — adds structure and a slightly grainy, toasty note so the filling isn’t overly soft.
Chocolate Cookie Butter Cups: Step-by-Step Guide
- Arrange 30 miniature candy cups on a baking sheet and set aside.
- Place 2 cups milk chocolate chips and 2 tablespoons coconut oil in a microwave-safe bowl. Heat at 50% power in 30-second intervals, stirring between each interval, until the chocolate is fully melted and smooth.
- Spoon enough melted chocolate into each candy cup to cover the bottom, reserving the remaining chocolate in the bowl for topping.
- Put the baking sheet with the chocolate-lined cups into the freezer until the bottom layer is firm, about 10 minutes.
- While the chocolate chills, combine 1/2 cup butter and 1/2 cup cookie butter in a small saucepan over medium heat. Stir until the mixture is smooth and combined, then remove the pan from the heat.
- Stir 1 cup powdered sugar and 2/3 cup fine graham cracker crumbs into the butter-cookie butter mixture until evenly incorporated. Let the mixture cool until it is cool enough to handle and can be shaped by hand.
- Form the cooled filling into 30 small balls (one per cup). Place one ball into each chocolate-lined cup. If desired, gently press each ball so it sits snugly in the cup.
- If the reserved chocolate has hardened, warm it briefly in the microwave at 50% power in 15–20 second intervals, stirring until pourable. Spoon the remaining chocolate over each filled cup to fully cover the filling and smooth the tops.
- Return the filled cups to the freezer until the chocolate is completely firm, about 30 minutes. Remove from the freezer and let sit a few minutes before serving.
What Sets This Recipe Apart
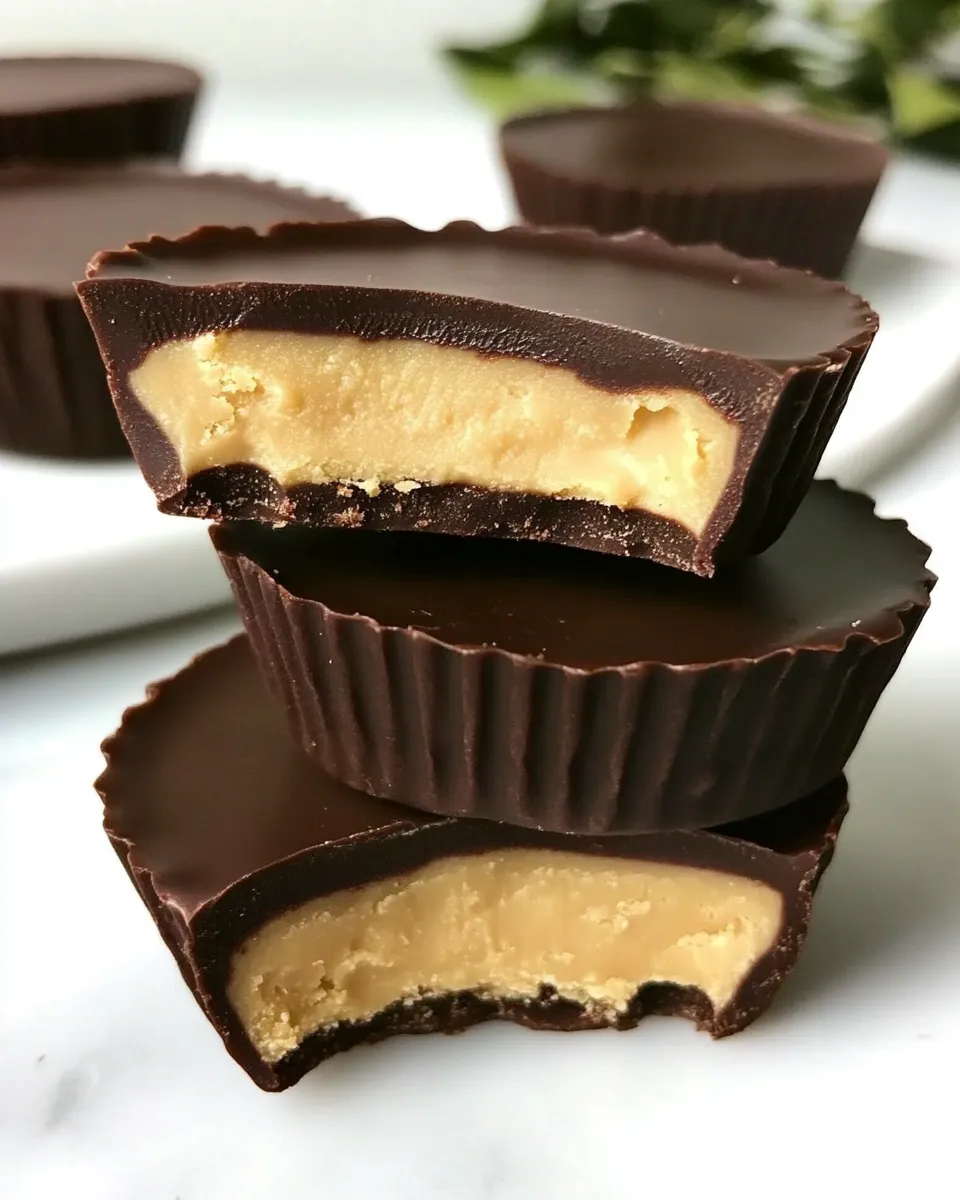
These cups use cookie butter instead of peanut butter, which changes the whole flavor profile: you get warm, speculoos-like spices without any nut flavor. The graham cracker crumbs give the filling structure and a gentle crunch that keeps the texture interesting. The technique is straightforward — no tempering, no double boilers required — yet the finished candies look and taste professional.
Another distinguishing point is the use of coconut oil with the chocolate. That tiny bit of fat makes the melted chocolate silkier and gives a cleaner snap once chilled. Finally, everything fits into 30 mini cups, making portion control effortless and presentation charming.
No-Store Runs Needed
If you keep a modest pantry, you likely already have most items here. Milk chocolate chips and butter are pantry staples. Cookie butter keeps well in the fridge or pantry, and powdered sugar and graham crumbs are common baking items.
If you don’t have miniature candy cups, you can use a silicone minis mold or mini muffin liners on a tray. If you don’t have coconut oil, see the swaps section below; you can still finish the recipe without a special trip to the store.
Toolbox for This Recipe
Keep these on your counter when making the cups:
- Microwave-safe bowl — for melting the chocolate.
- Small saucepan — to warm the butter and cookie butter together.
- Baking sheet — to hold the cups while chilling.
- Spoons or a small cookie scoop — to fill the cups uniformly.
- Plastic wrap or a clean plate — to cover the filling if you must pause.
Steer Clear of These
Avoid these common missteps to keep the texture and finish right:
- Overheating the chocolate — high heat causes chocolate to seize. Melt at medium-low power and stir frequently.
- Rushing the cooling — don’t skip the 10-minute chill for the bottom shell; the filling can leak into warm chocolate and spoil the shape.
- Filling while too hot — if the filling is still warm when you shape it, it will be greasy and won’t firm up properly.
- Using coarse crumbs — if your graham cracker crumbs are too coarse, the filling won’t mold cleanly into neat balls.
Better Choices & Swaps
Small substitutions can adapt these cups to what you have or to dietary needs:
- Chocolate: swap milk chocolate chips for semi-sweet or dark chocolate if you prefer less sweetness. Darker chocolate will change the bite but not the technique.
- Fat: if you don’t have coconut oil, a neutral vegetable oil or a small pat of extra butter can help the chocolate melt smoothly; add sparingly (about the same amount).
- Filling flavor: if you want a nuttier note, a tablespoon of finely ground toasted nuts stirred into the crumbs can work, but this will alter allergy considerations.
Testing Timeline
Follow these checkpoints so you know the recipe is on track:
- After step 2: Chocolate should be glossy and pourable with no lumps. If it becomes grainy, stop heating and stir until smooth.
- After step 4: The chocolate bottom layer should be solid to the touch and not glossy wet. Ten minutes in the freezer usually does the trick.
- After step 6: Filling should be cool and firm enough to shape. If it sticks badly, refrigerate for 5–10 minutes and test again.
- After step 9: Chocolate should be completely firm. Allowing a few minutes at room temperature after the freezer prevents condensation when serving.
Storing, Freezing & Reheating
Store finished cups in an airtight container. They keep well in the refrigerator for up to two weeks. If you prefer them firmer, keep them in the freezer for up to 2–3 months; thaw in the refrigerator for 30–60 minutes before serving so they don’t sweat.
If the chocolate loses sheen in the fridge, let the cups sit at room temperature briefly before serving. Avoid storing at room temperature in hot climates; the filling can soften and the chocolate will bloom if exposed to fluctuating temperatures.
Troubleshooting Q&A
Q: My chocolate seized and is grainy. What do I do?
A: Stop heating. Stir in a small teaspoon of neutral oil or melted coconut oil to smooth it, or add a splash of warm cream if you have it and are okay altering the chocolate slightly. Work slowly at low power in the microwave and stir between short bursts.
Q: The filling is too soft and won’t form into balls.
A: Chill the mixture in the fridge for 10–15 minutes, then try shaping again. If it’s still too soft, add a tablespoon more graham cracker crumbs at a time until it holds.
Q: The chocolate shell separated from the filling after freezing.
A: That usually means the filling was colder than the shell when topped or the chocolate cooled unevenly. Let the frozen finished cups sit at room temperature 3–5 minutes before handling. Next time, bring filling to just-cool-to-the-touch before shaping.
Serve & Enjoy
Bring these out on a small platter at room temperature for the best flavor and texture — they should be firm but yielding at the bite. They’re great as a sweet finish to a casual dinner or tucked into small boxes for gifts. If you want to dress them up, sprinkle a pinch of sea salt on top right after you spoon on the final layer of chocolate, or add a tiny graham crumb for contrast.
These cups are forgiving, shareable, and quick to make once your mise en place is ready. Follow the steps, pay attention to texture, and you’ll have a crowd-pleasing treat that looks like you spent much more time on it than you did.
Chocolate Cookie Butter Cups
Ingredients
Ingredients
- 2 cupsmilk chocolate chips
- 2 tablespoonsCoconut Oil
- 1/2 cupbutter
- 1/2 cupcookie butter
- 1 cuppowdered sugar
- 2/3 cupfine graham cracker crumbs
Instructions
Instructions
- Arrange 30 miniature candy cups on a baking sheet and set aside.
- Place 2 cups milk chocolate chips and 2 tablespoons coconut oil in a microwave-safe bowl. Heat at 50% power in 30-second intervals, stirring between each interval, until the chocolate is fully melted and smooth.
- Spoon enough melted chocolate into each candy cup to cover the bottom, reserving the remaining chocolate in the bowl for topping.
- Put the baking sheet with the chocolate-lined cups into the freezer until the bottom layer is firm, about 10 minutes.
- While the chocolate chills, combine 1/2 cup butter and 1/2 cup cookie butter in a small saucepan over medium heat. Stir until the mixture is smooth and combined, then remove the pan from the heat.
- Stir 1 cup powdered sugar and 2/3 cup fine graham cracker crumbs into the butter-cookie butter mixture until evenly incorporated. Let the mixture cool until it is cool enough to handle and can be shaped by hand.
- Form the cooled filling into 30 small balls (one per cup). Place one ball into each chocolate-lined cup. If desired, gently press each ball so it sits snugly in the cup.
- If the reserved chocolate has hardened, warm it briefly in the microwave at 50% power in 15–20 second intervals, stirring until pourable. Spoon the remaining chocolate over each filled cup to fully cover the filling and smooth the tops.
- Return the filled cups to the freezer until the chocolate is completely firm, about 30 minutes. Remove from the freezer and let sit a few minutes before serving.
Equipment
- Baking Sheet
- freezer
- Microwave-safe Bowl
- Microwave
- Small Saucepan
- Spoon
Notes
Store in the refrigerator!