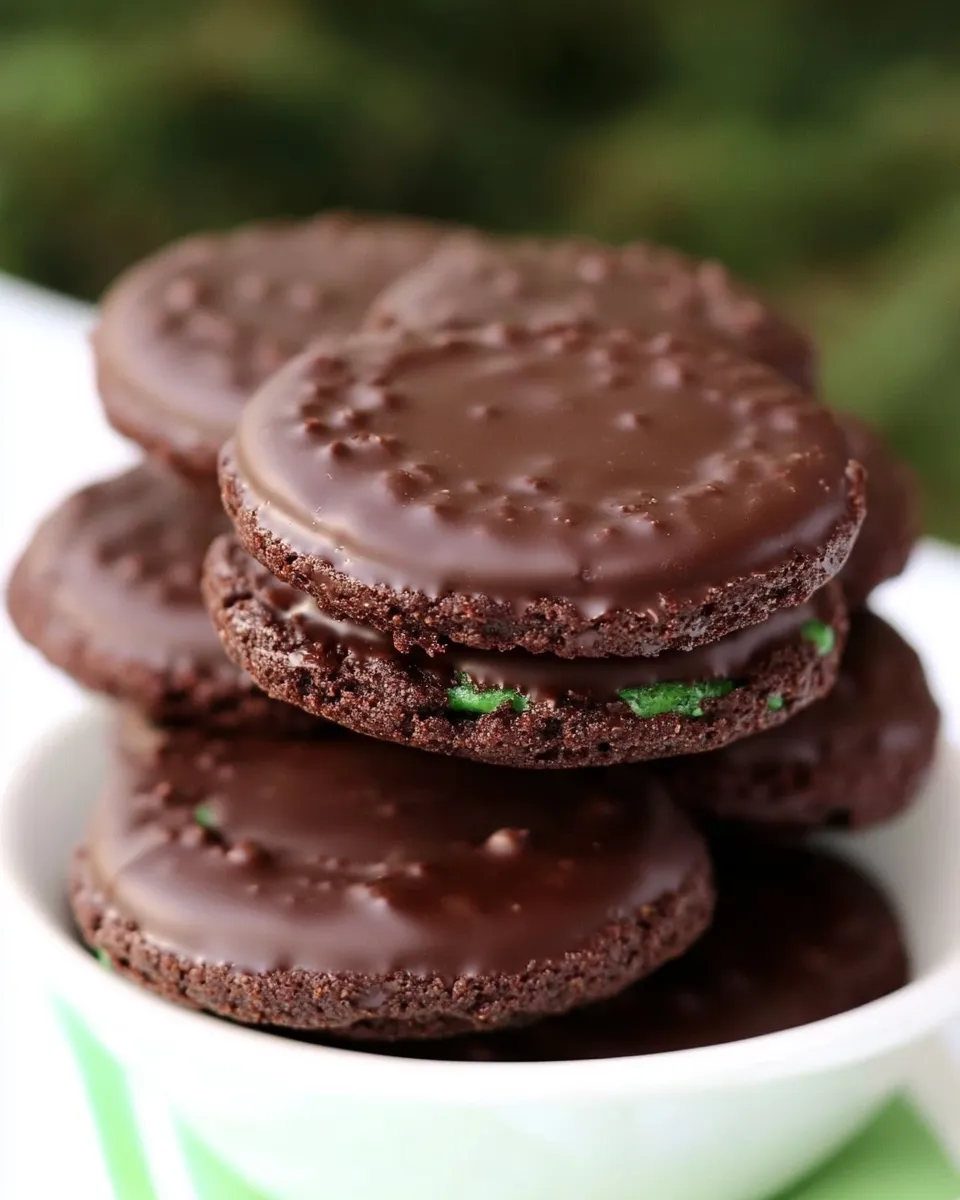
These are the kind of cookies I reach for when I want something that feels special but doesn’t demand an afternoon of work. Crisp, thin rounds of chocolate cookie, chilled after a glossy peppermint-dusted dip — they look bakery-bought and disappear just as fast. The texture is subtle: a tender snap from the thin bake, a cool mint lift from the chocolate coating, and a quiet richness underneath.
What I love about this recipe is the clean list of steps and the forgiving nature of assembly. There’s a precise oven time, yes, but the rest rewards simple technique: don’t overmix the dough, cool the cookies completely, and temper your rhythm when dipping. If you follow the directions here, you’ll have a tray of uniform, shiny cookies with a mint edge that sets perfectly in the fridge.
Below you’ll find a clear shopping list, exact ingredients, the step-by-step method, and practical notes I’ve learned from repeating this recipe. I include troubleshooting tips, storage advice, and small tweaks to make the cookies your own. Let’s get baking.
Ingredients
- 1 cup all-purpose flour — provides structure; measure by spooning into the cup and leveling for accuracy.
- ½ cup unsweetened cocoa powder — gives chocolate flavor and color; sift if lumpy for a smoother dough.
- ¼ teaspoon baking powder — a small lift so the wafers stay slightly tender; measure precisely.
- ¼ teaspoon salt — balances sweetness and enhances chocolate notes.
- 6 tablespoons (¾ stick) unsalted butter, at room temperature — for richness and tender crumb; should be soft but not greasy.
- ½ cup granulated white sugar — adds sweetness and helps create a bit of crisp edge when baked thin.
- 1 large egg — binds the dough and gives a slight chew.
- ½ teaspoon pure vanilla extract — rounds flavors and lifts the chocolate.
- 12 ounces bittersweet chocolate, chopped — used for coating; bittersweet keeps the mint from becoming cloying.
- ¼ teaspoon peppermint extract — the mint signature; a little goes a long way.
- 1/6 teaspoon salt — a pinch for the chocolate coating to deepen flavor.
- sprinkles or nonpareils, for decorating (optional) — adds a festive look; optional and purely decorative.
Shopping List
Everything above is easy to find at a basic supermarket. Here’s a quick run-through so you can grab what you need in one trip:
- All-purpose flour, unsweetened cocoa powder, baking powder, and salt.
- Unsalted butter and granulated sugar.
- Eggs and pure vanilla extract.
- Bittersweet chocolate (choose good-quality bars for chopping) and peppermint extract.
- Optional: sprinkles or nonpareils if you want visual flair.
- Kitchen basics: parchment paper and a baking sheet (or sheets) — more on equipment below.
Method: Chocolate Mint Wafers
Make the dough and bake
- Preheat the oven to 350°F. Line one or more baking sheets with parchment paper.
- In a medium bowl, whisk together 1 cup all-purpose flour, ½ cup unsweetened cocoa powder, ¼ teaspoon baking powder, and ¼ teaspoon salt. Set aside.
- In a large bowl, use an electric mixer to beat 6 tablespoons (¾ stick) unsalted butter (room temperature) and ½ cup granulated sugar until light and fluffy, about 2–3 minutes.
- Beat in 1 large egg and ½ teaspoon pure vanilla extract until incorporated.
- Gradually add the flour mixture to the butter mixture and mix just until combined; do not overmix.
- Using a teaspoon, scoop portions of dough and roll into small balls. Place the balls about 2 inches apart on the prepared parchment-lined baking sheets.
- Dip the bottom of a glass in water and flatten each ball into a 1½-inch round about ¼ inch thick.
- Bake the cookies for 8–10 minutes, rotating the baking sheet halfway through baking. The cookies should be slightly firm to the touch.
- Remove the baking sheets from the oven and let the cookies cool completely on the parchment-lined sheets set on wire racks. Keep the parchment on the baking sheets.
Melt, dip, and finish
- Put 12 ounces chopped bittersweet chocolate, ¼ teaspoon peppermint extract, and 1/6 teaspoon salt in a microwave-safe bowl. Microwave in 30-second intervals, stirring after each interval, until the chocolate is smooth. (Alternatively, melt the chocolate in a heatproof bowl set over a pan of simmering water, stirring until smooth.)
- Working with cooled cookies, set a cookie across the tines of a fork and dip the top into the melted chocolate. Tap the underside of the fork on the side of the bowl to remove excess chocolate and create a smooth top.
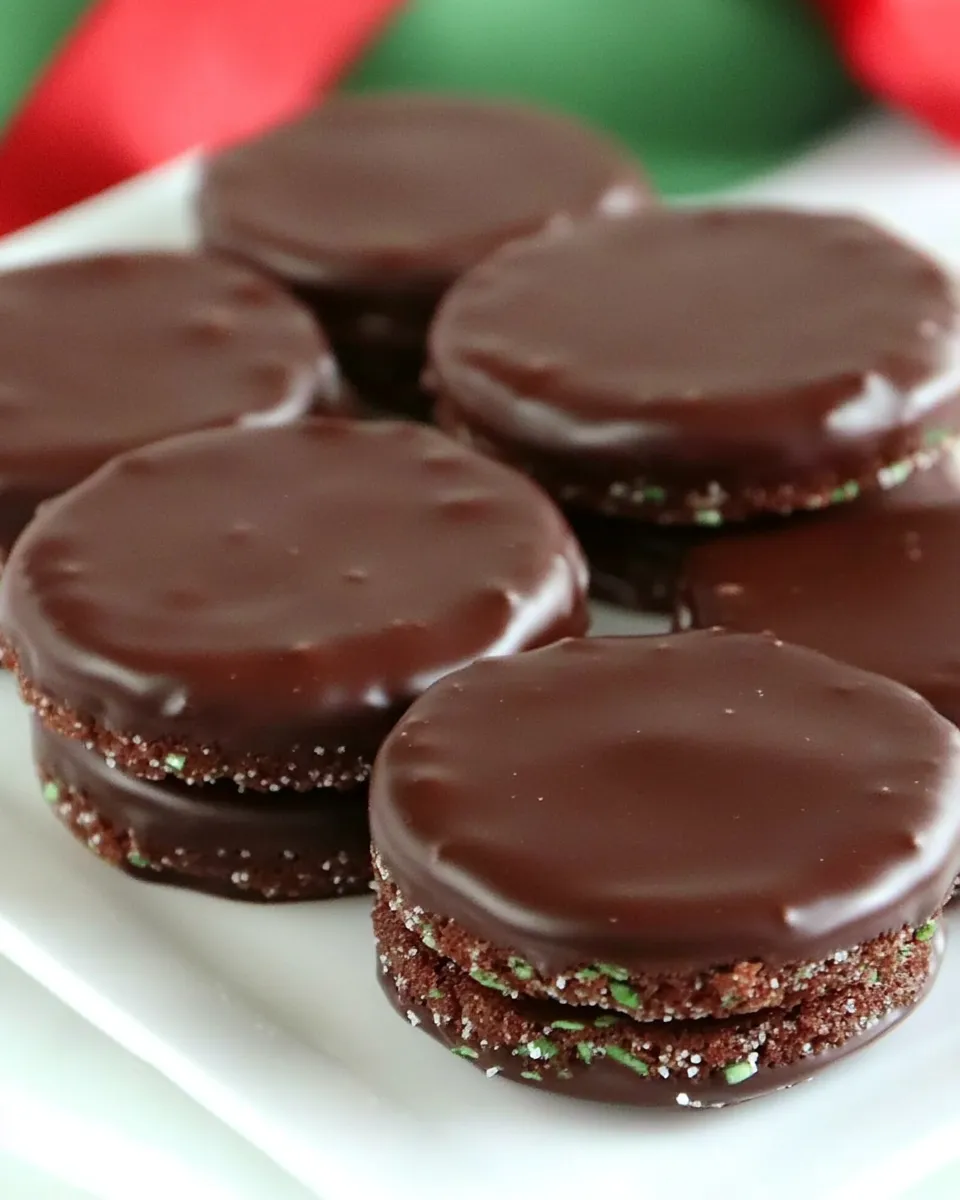
- Gently transfer each dipped cookie back onto the parchment-lined baking sheet. Decorate with sprinkles or nonpareils, if desired.
- Refrigerate the baking sheet until the chocolate is firm, about 30 minutes. Keep the cookies chilled until ready to serve.
Reasons to Love Chocolate Mint Wafers

They’re elegant without being fussy. One bite gives you a thin, crisp cookie and a tempered hit of minty chocolate — the contrast is immediately pleasing. They’re perfect for gift boxes and holiday plates because they look curated and travel well when chilled.
These wafers are also excellent for batch baking. The dough is straightforward and holds together, so you can portion, chill, and bake in stages. The dipping step is meditative rather than technical; you don’t have to temper chocolate professionally to get a shiny finish if you chill properly afterward.
Finally, they’re customizable — you can go heavy on the mint or leave the peppermint subtle, and the decoration is entirely optional. That versatility makes these a go-to when you want an impressive cookie without an intimidating recipe.
Ingredient Swaps & Substitutions
If you need swaps, choose options that preserve texture and balance. Here are practical alternatives to consider:
- Butter: You can use salted butter if that’s what you have; reduce or omit the added salt in the dough. Unsalted gives more control over seasoning.
- Bittersweet chocolate: If you prefer sweeter coating, use semisweet chocolate instead. The peppermint extract is potent, so keep that amount the same unless you want a stronger mint flavor.
- Cocoa powder: Natural unsweetened cocoa is called for; Dutch-process can be used but will alter acidity and may slightly affect rise.
- Sprinkles: Any decorative topping works — crushed peppermint candy, chopped nuts, or sea salt are all valid substitutes for nonpareils.
Equipment & Tools
- Electric mixer — speeds up creaming the butter and sugar and ensures a smooth dough.
- Mixing bowls — at least one medium and one large for wet and dry components.
- Baking sheets and parchment paper — parchment prevents sticking and makes cooling simple; keep parchment on the sheet per the steps.
- Glass or flat-bottomed object for flattening — dipping the bottom in water ensures smooth, even rounds.
- Microwave-safe bowl or double boiler — for melting chocolate safely and stirring to smooth.
- Fork and wire rack — fork for dipping and rack for cooling; the wire rack is optional while cooling on the baking sheet is fine per the recipe.
Missteps & Fixes
Even experienced bakers slip up. Below are common problems and how to handle them fast.
- Cookies spread too thin or become greasy: The butter may have been too soft or warm. Chill the dough briefly before scooping next time and be sure butter is room temperature, not melted.
- Cookies are too hard: You may have baked them past the window. Start checking at 8 minutes — they should be slightly firm, not rock-hard. Reduce time by a minute if your oven runs hot.
- Chocolate seizes or is grainy: If water gets into the chocolate, it can seize. If this happens, add a small amount of warm cream or a teaspoon of neutral oil and stir gently to re-smooth, or start again with a clean, dry bowl.
- Mint flavor too strong or weak: Peppermint extract is concentrated. If it’s too strong in the coating, blend it with a little more melted chocolate to dilute the intensity. If it’s too mild, you can brush a tiny bit of extract diluted with a small amount of melted chocolate onto the cookie tops and refrigerate again.
Make It Your Way
Want variations? Keep technique and proportions roughly the same, and tweak the coating or finishing touches.
- Chocolate-forward: Use a darker bittersweet bar (70% cacao) for a more intense chocolate bite.
- Festive finish: Swap nonpareils for crushed candy cane for holiday crunch and visual contrast.
- Less mint: Reduce peppermint extract slightly in the chocolate to let the cocoa’s complexity shine.
Little Things that Matter

Small details change outcomes. Measure flour carefully; too much flour makes dense wafers. When flattening with the glass, wetting the bottom helps the dough release and keeps edges neat. Keep your workspace tidy: transfer dipped cookies gently and don’t stack them until the chocolate has fully set.
Another detail: keep the parchment on the baking sheet while cooling — it makes the dipping and refrigerating steps cleaner and prevents the cookies from sticking to a direct rack surface. Also, chill the baking sheet after dipping — that short refrigeration is what gives the coating a satisfying snap.
How to Store & Reheat
Store the finished cookies chilled in a single layer or layers separated by parchment in an airtight container. Because the chocolate coating is firm, they travel well when kept cool. If you need to keep them at room temperature, allow them to come to room temperature briefly before serving, but avoid long periods in warm conditions where the lacquered chocolate can soften.
These wafers are best within a week. If you need longer storage, freeze in a single layer on a sheet, then transfer to a freezer-safe container with parchment between layers. Thaw in the refrigerator to prevent condensation on the chocolate, then bring to room temperature for 10–15 minutes before serving.
Reader Q&A
Q: Can I make the dough ahead of time?
A: Yes. You can make the dough and keep it wrapped in the refrigerator for up to 48 hours. Let it soften slightly at room temperature before scooping and flattening. If frozen, allow to thaw in the fridge overnight.
Q: My chocolate looks dull after setting. Why?
A: If chocolate isn’t cooled properly or is exposed to humidity, it can lose sheen. Using a higher-quality chocolate and chilling on a cool, dry sheet helps. Also avoid rapid temperature swings that can cause bloom.
Q: Can I double the recipe?
A: Absolutely. Work in batches for scooping and dipping, and have extra baking sheets and bowls ready. Chocolate quantities should be increased proportionally; melt in a larger bowl or in two batches to keep control over the temperature.
Before You Go
These Chocolate Mint Wafers are proof that simple recipes can look and taste refined. The key steps to remember: measure flour carefully, don’t overmix, cool completely before dipping, and chill the dipped cookies until firm. Keep the peppermint extract modest and choose a quality bittersweet chocolate for best results.
If you make these, I’d love to hear how you decorated them and whether you leaned into mint or let the chocolate play the lead. Pack a few in a tin for a thoughtful neighbor gift or lay them out on a platter at your next gathering — they’re always a welcome treat.

Chocolate Mint Wafers
Ingredients
Ingredients
- 1 cupall purpose flour
- 1/2 cupunsweetened cocoa powder
- 1/4 teaspoonbaking powder
- 1/4 teaspoonsalt
- 6 tablespoons 3/4 stickunsalted butter, at room temperature
- 1/2 cupgranulated white sugar
- 1 largeegg
- 1/2 teaspoonpure vanilla extract
- 12 ouncesbittersweet chocolate chopped
- 1/4 teaspoonpeppermint extract
- ⅙ teaspoonsalt
- sprinkles or nonpareils for decorating (optional)
Instructions
Instructions
- Preheat the oven to 350°F. Line one or more baking sheets with parchment paper.
- In a medium bowl, whisk together 1 cup all-purpose flour, ½ cup unsweetened cocoa powder, ¼ teaspoon baking powder, and ¼ teaspoon salt. Set aside.
- In a large bowl, use an electric mixer to beat 6 tablespoons (¾ stick) unsalted butter (room temperature) and ½ cup granulated sugar until light and fluffy, about 2–3 minutes.
- Beat in 1 large egg and ½ teaspoon pure vanilla extract until incorporated.
- Gradually add the flour mixture to the butter mixture and mix just until combined; do not overmix.
- Using a teaspoon, scoop portions of dough and roll into small balls. Place the balls about 2 inches apart on the prepared parchment-lined baking sheets.
- Dip the bottom of a glass in water and flatten each ball into a 1½-inch round about ¼ inch thick.
- Bake the cookies for 8–10 minutes, rotating the baking sheet halfway through baking. The cookies should be slightly firm to the touch.
- Remove the baking sheets from the oven and let the cookies cool completely on the parchment-lined sheets set on wire racks. Keep the parchment on the baking sheets.
- Put 12 ounces chopped bittersweet chocolate, ¼ teaspoon peppermint extract, and 1⁄6 teaspoon salt in a microwave-safe bowl. Microwave in 30-second intervals, stirring after each interval, until the chocolate is smooth. (Alternatively, melt the chocolate in a heatproof bowl set over a pan of simmering water, stirring until smooth.)
- Working with cooled cookies, set a cookie across the tines of a fork and dip the top into the melted chocolate. Tap the underside of the fork on the side of the bowl to remove excess chocolate and create a smooth top.
- Gently transfer each dipped cookie back onto the parchment-lined baking sheet. Decorate with sprinkles or nonpareils, if desired.
- Refrigerate the baking sheet until the chocolate is firm, about 30 minutes. Keep the cookies chilled until ready to serve.