This is my go-to hummus: straightforward, reliably smooth, and built to please a crowd. I make it when I want something that feels composed but doesn’t require babysitting. The texture is creamy, the lemon brightens, and the garlic gives it personality without overpowering the chickpeas.
You’ll find tips here that save time and help you avoid the two most common issues — grainy texture and under-seasoning. I keep the process flexible: use canned chickpeas for a fast weekday dip or soaked-and-cooked beans when I want extra control over texture.
Read through before you start. The method includes an optional step to skin the chickpeas for a silkier result, and the build steps follow a simple order so flavor and texture develop the way they should.
Ingredient Breakdown
Ingredients
- 3 1/2cupscanned OR soaked and cooked chickpeas/garbanzo beans — the base; provides body, flavor, and protein. Reserve about 15–20 whole chickpeas for garnish as instructed.
- 1tablespoonbaking soda — optional; helps loosen skins for extra-smooth hummus when used in the skin-removal step, then rinsed away.
- 1/3cuptahini paste — adds creaminess, nuttiness, and helps emulsify the dip.
- 8roasted garlic cloves, or more to taste (you may substitute 1–3 fresh garlic cloves if you prefer a stronger sharper flavor) — flavor backbone; roasted garlic is mellow and sweet, fresh is punchier.
- 1/4cupfresh lemon juice, or more to taste — brightens and balances richness; add more if you prefer tang.
- 1tablespoonextra virgin olive oil, plus more for garnish — enriches and rounds mouthfeel; drizzle on top for sheen.
- 3/4teaspooncumin — warm, earthy spice that quietly defines the classic profile.
- 1/2teaspoonsalt, or more to taste — essential for bringing out flavors; always taste and adjust.
- Pinchcayenne pepper — lifts the flavor with gentle heat; optional but traditional in small amounts.
- Paprika and fresh minced parsley for garnishoptional — finishing touches for color and a hint of herb freshness.
Build (Classic Hummus) Step by Step
- If using canned chickpeas, drain and rinse them. If using soaked and cooked chickpeas, drain them after cooking and let them return to room temperature. Set aside about 15–20 whole chickpeas for garnish.
- (Optional — to remove skins for extra-smooth hummus) Place the drained cooked chickpeas (not the reserved garnish chickpeas) in a dry skillet and sprinkle with 1 tablespoon baking soda, stirring to coat evenly. Heat over medium, stirring constantly, for 2–3 minutes until the beans are heated through and the skins begin to separate.
- Immediately transfer the hot chickpeas to a large bowl and immerse them in cold water. Agitate the beans with your hands and change the water 3–4 times; loose skins will float to the surface and can be discarded with each change. When most skins are removed, drain and rinse the chickpeas thoroughly to remove any remaining baking soda. (Alternative skinning method: pinch each chickpea to remove its skin, then discard the skins.)
- Fit a food processor with the blade attachment. Add the drained chickpeas (all except the reserved garnish), 1/3 cup tahini paste, 8 roasted garlic cloves (or substitute 1–3 fresh garlic cloves if you prefer a stronger flavor), 1/4 cup fresh lemon juice, 1 tablespoon extra virgin olive oil, 1/2 teaspoon salt, 3/4 teaspoon cumin, and a pinch of cayenne pepper.
- Process the mixture until smooth and creamy, stopping to scrape down the sides of the bowl as needed.
- Taste and adjust seasoning: add more salt, lemon juice, or garlic to taste, then process again briefly to incorporate any additions.
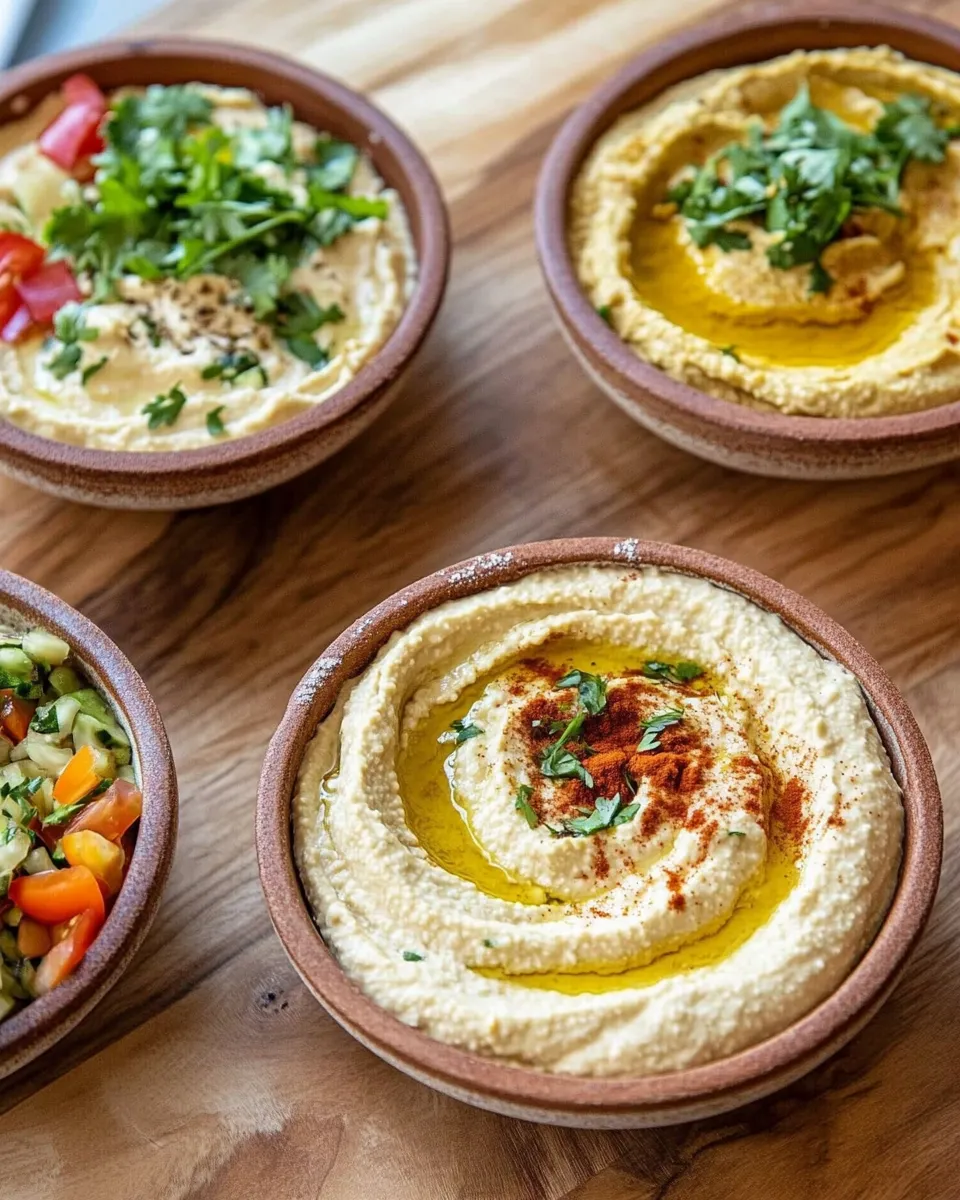
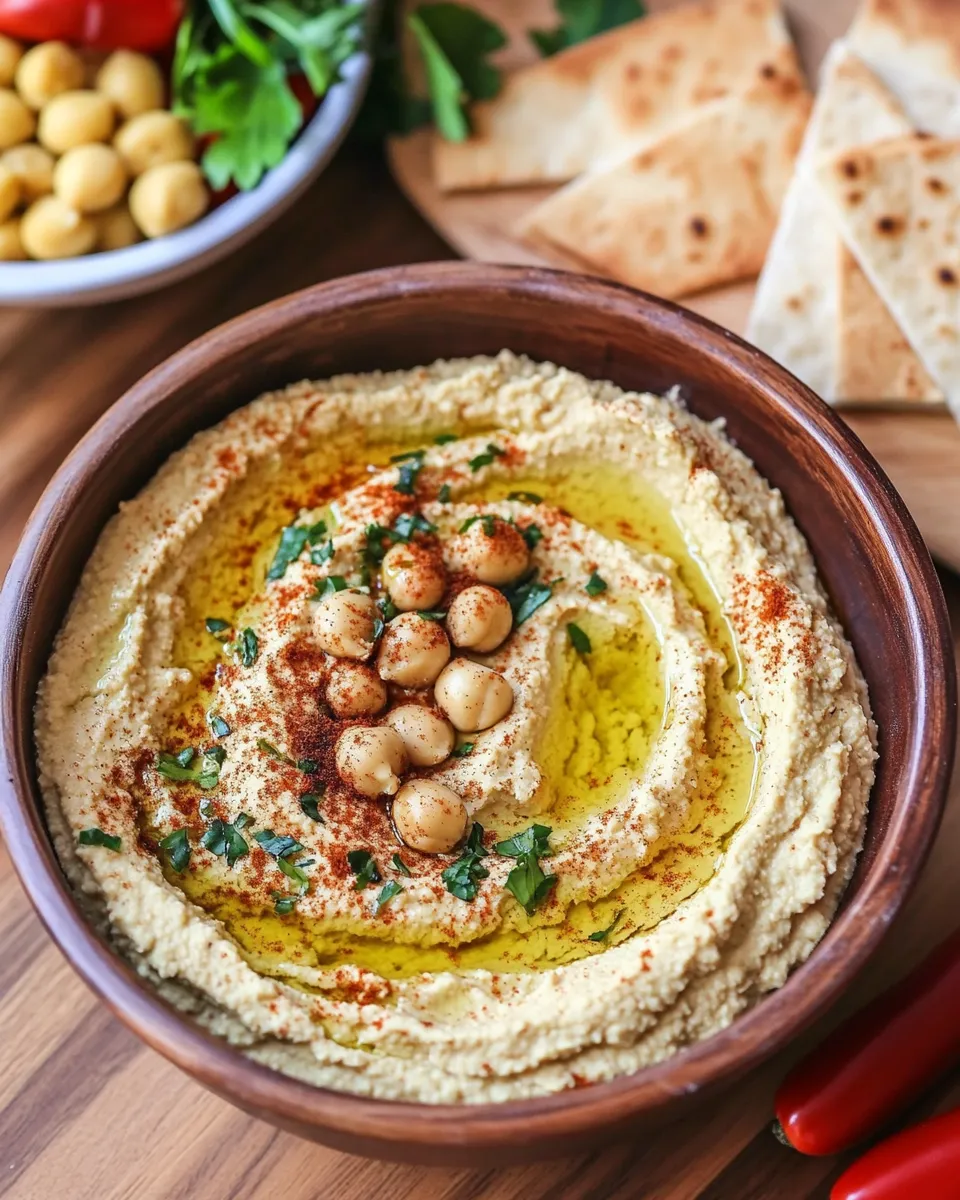
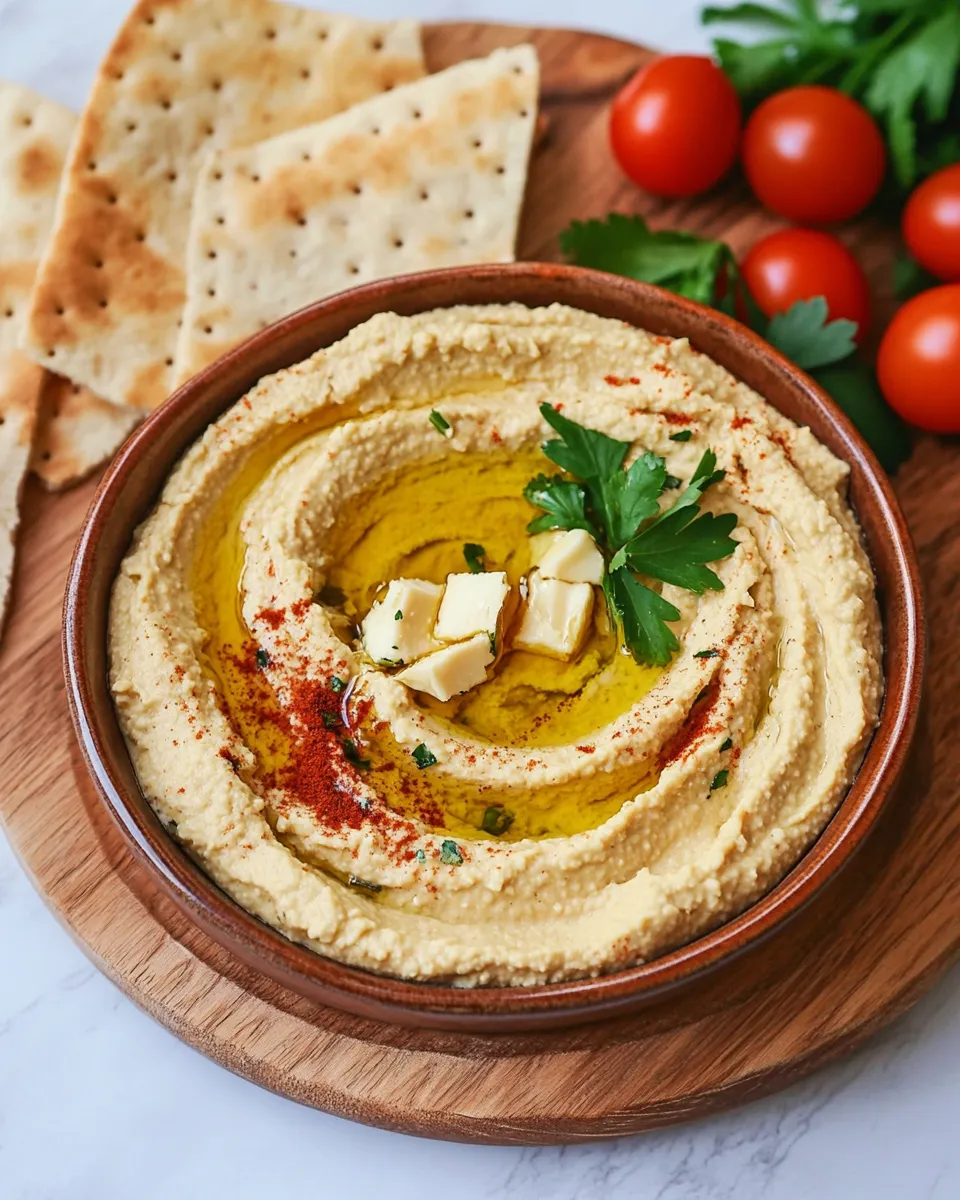
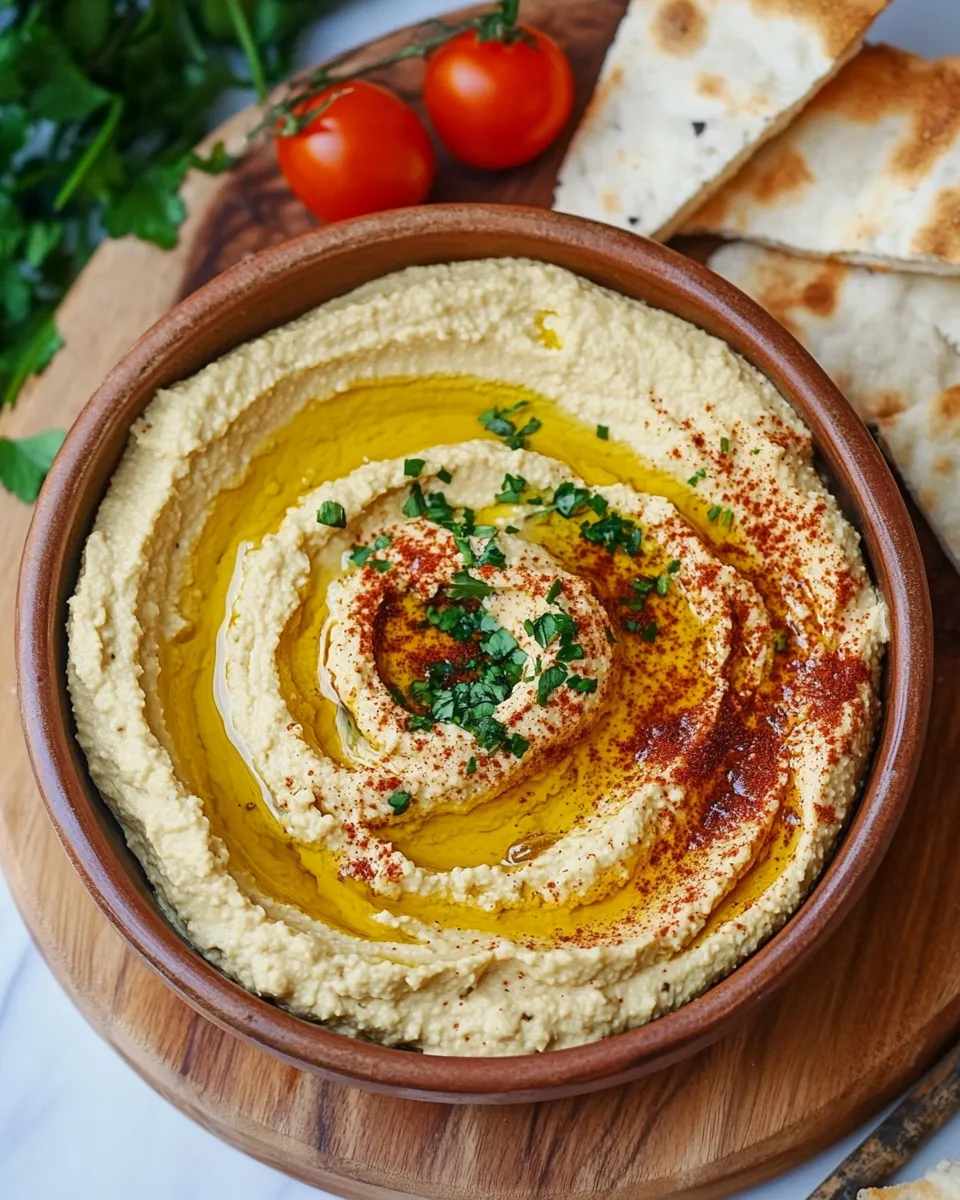
- Transfer the hummus to a shallow serving bowl and use the back of a spoon to create a small well in the center. Garnish with the reserved whole chickpeas, a drizzle of extra virgin olive oil, and a sprinkle of paprika and minced fresh parsley, if desired.
Why It’s Crowd-Pleasing
Hummus sits comfortably between simple and sophisticated. It feeds a lot of people, travels well, and pairs with many other foods so everyone finds something to enjoy. The richness from tahini and olive oil makes it feel indulgent without being heavy. Lemon and garlic provide recognizable, immediate flavor hits.
Texture is also a crowd-pleaser. A properly processed hummus spreads nicely on bread and clings to a chip at the same time. The optional skin-removal step is the difference between good hummus and velvet-smooth hummus — worth doing when you want an impressive bowl.
If You’re Out Of…
If you don’t have roasted garlic, use fresh garlic but reduce the amount and add slowly — fresh garlic is sharper. If you run out of tahini, you can whisk in a little extra olive oil and a small spoonful of plain nut butter as a last resort, but tahini makes the signature flavor and texture, so plan to restock for future batches.
No fresh lemon? Bottled lemon juice works in a pinch, but taste carefully and add less at first. Short on chickpeas? Stretch the batch by serving slightly thinner hummus alongside roasted vegetables or a grain salad so a little goes further.
Gear Checklist
- Food processor with the blade attachment — required for a smooth, even texture.
- Large bowl — for the soaking/skin-removal water changes if you choose that step.
- Dry skillet — used during the baking soda skinning method to heat and separate skins.
- Spoon or spatula — for scraping the processor bowl and creating the serving well.
- Serving bowl — shallow works best so garnishes and oil sit nicely on top.
Troubleshooting Tips
Grainy hummus: under-processed beans or unskinned chickpeas are the usual culprits. Process longer and use the baking-soda skinning method if you want silkiness. Scrape the bowl and process again; patience here pays off.
Too thick: add 1–2 tablespoons of cold water or a little extra lemon juice and process to loosen the texture. Add liquid sparingly and taste as you go.
Too thin: add a small spoonful of tahini or a few extra chickpeas, then process until the texture firms up. Chill briefly — the hummus will set a touch in the fridge.
Holiday-Friendly Variations
For holidays or gatherings where presentation matters, keep the base recipe the same and focus on finishing touches:
- Make a shallow spiral with the back of a spoon and pour a generous ring of olive oil into the center for shine and richness.
- Use paprika and minced parsley as simple, classic garnishes that add color and a fresh note.
- For a subtly festive look, create a layered presentation by spooning hummus into a shallow bowl, sprinkling paprika in a pattern, and topping a central pile of the reserved chickpeas. The visual impact makes it look special without extra work.
Pro Tips & Notes
Texture and timing
Skinned chickpeas plus a long processing time are the keys to ultra-smooth hummus. If you have time, simmer soaked chickpeas until they’re very tender; allow them to cool to room temperature before processing. Hot beans can produce gummy texture in some machines.
Seasoning
Always taste after the first processing. Salt, lemon, and garlic can vary widely in intensity from batch to batch, so adjust carefully. If the hummus tastes flat, it usually needs salt and/or lemon — acidity lifts the flavors dramatically.
Leftovers & Meal Prep
Store hummus in an airtight container in the refrigerator for up to 4–5 days. Press a small piece of plastic wrap directly onto the surface to minimize air exposure and keep the top from developing a dry film. Bring it to room temperature before serving for the best texture and flavor.
Leftover hummus makes a fast sandwich spread, a base for grain bowls, or a protein-rich dip for raw vegetables. It also freezes reasonably well: portion into a freezer-safe container, leave some headspace for expansion, and thaw overnight in the refrigerator. Re-whip with a splash of water or lemon after thawing if it’s separated.
Troubleshooting Q&A
Q: My hummus is bitter. What went wrong?
A: Bitterness can come from old or overly toasted tahini or too much raw garlic. Taste the tahini on its own if possible. If bitterness is mild, increase the lemon juice and salt slightly to balance. If tahini is the problem, reduce its amount next time or try a fresh jar.
Q: The hummus is pasty or gummy. How do I fix it?
A: This usually means the chickpeas were overworked or too hot when processed. Chill and then process again with a spoonful of tahini or a splash of cold water to loosen. Next time, make sure the chickpeas cool to room temperature and process in stages, scraping the bowl between runs.
Q: The flavor is flat. What should I add?
A: Add salt in small increments, then a touch more lemon juice. These two elements boost flavor quickly. If you prefer a sharper bite, add one small fresh garlic clove and pulse to integrate.
Wrap-Up
Classic hummus is as forgiving as it is rewarding. Follow the build steps in order, consider the optional skinning step when you want an upscale texture, and always taste and adjust. Little changes — more lemon, a hair more salt, or roasted vs. fresh garlic — let you customize it to your crowd.
Keep a jar of tahini on hand and a can of chickpeas in the pantry, and you’ll have a reliable, crowd-pleasing dip ready in minutes. Serve it simple or dress it up for holidays; either way, it will disappear fast.

Classic Hummus
Ingredients
Ingredients
- 3 1/2 cupscanned OR soaked and cooked chickpeas/garbanzo beans
- 1 tablespoonbaking soda optional - to help skin the chickpeas, then rinsed away - see instructions below
- 1/3 cuptahini paste
- 8 roasted garlic cloves or more to taste (you may substitute 1-3 fresh garlic cloves if you prefer a stronger sharper flavor)
- 1/4 cupfresh lemon juice or more to taste
- 1 tablespoonextra virgin olive oil plus more for garnish
- 3/4 teaspooncumin
- 1/2 teaspoonsalt or more to taste
- Pinchcayenne pepper
- Paprika and fresh minced parsley for garnishoptional
Instructions
Instructions
- If using canned chickpeas, drain and rinse them. If using soaked and cooked chickpeas, drain them after cooking and let them return to room temperature. Set aside about 15–20 whole chickpeas for garnish.
- (Optional — to remove skins for extra-smooth hummus) Place the drained cooked chickpeas (not the reserved garnish chickpeas) in a dry skillet and sprinkle with 1 tablespoon baking soda, stirring to coat evenly. Heat over medium, stirring constantly, for 2–3 minutes until the beans are heated through and the skins begin to separate.
- Immediately transfer the hot chickpeas to a large bowl and immerse them in cold water. Agitate the beans with your hands and change the water 3–4 times; loose skins will float to the surface and can be discarded with each change. When most skins are removed, drain and rinse the chickpeas thoroughly to remove any remaining baking soda. (Alternative skinning method: pinch each chickpea to remove its skin, then discard the skins.)
- Fit a food processor with the blade attachment. Add the drained chickpeas (all except the reserved garnish), 1/3 cup tahini paste, 8 roasted garlic cloves (or substitute 1–3 fresh garlic cloves if you prefer a stronger flavor), 1/4 cup fresh lemon juice, 1 tablespoon extra virgin olive oil, 1/2 teaspoon salt, 3/4 teaspoon cumin, and a pinch of cayenne pepper.
- Process the mixture until smooth and creamy, stopping to scrape down the sides of the bowl as needed.
- Taste and adjust seasoning: add more salt, lemon juice, or garlic to taste, then process again briefly to incorporate any additions.
- Transfer the hummus to a shallow serving bowl and use the back of a spoon to create a small well in the center. Garnish with the reserved whole chickpeas, a drizzle of extra virgin olive oil, and a sprinkle of paprika and minced fresh parsley, if desired.
Equipment
- Food Processor
- Dry Skillet
- Large Bowl
- Serving bowl
- Spoon
Notes
You will also need: food processor