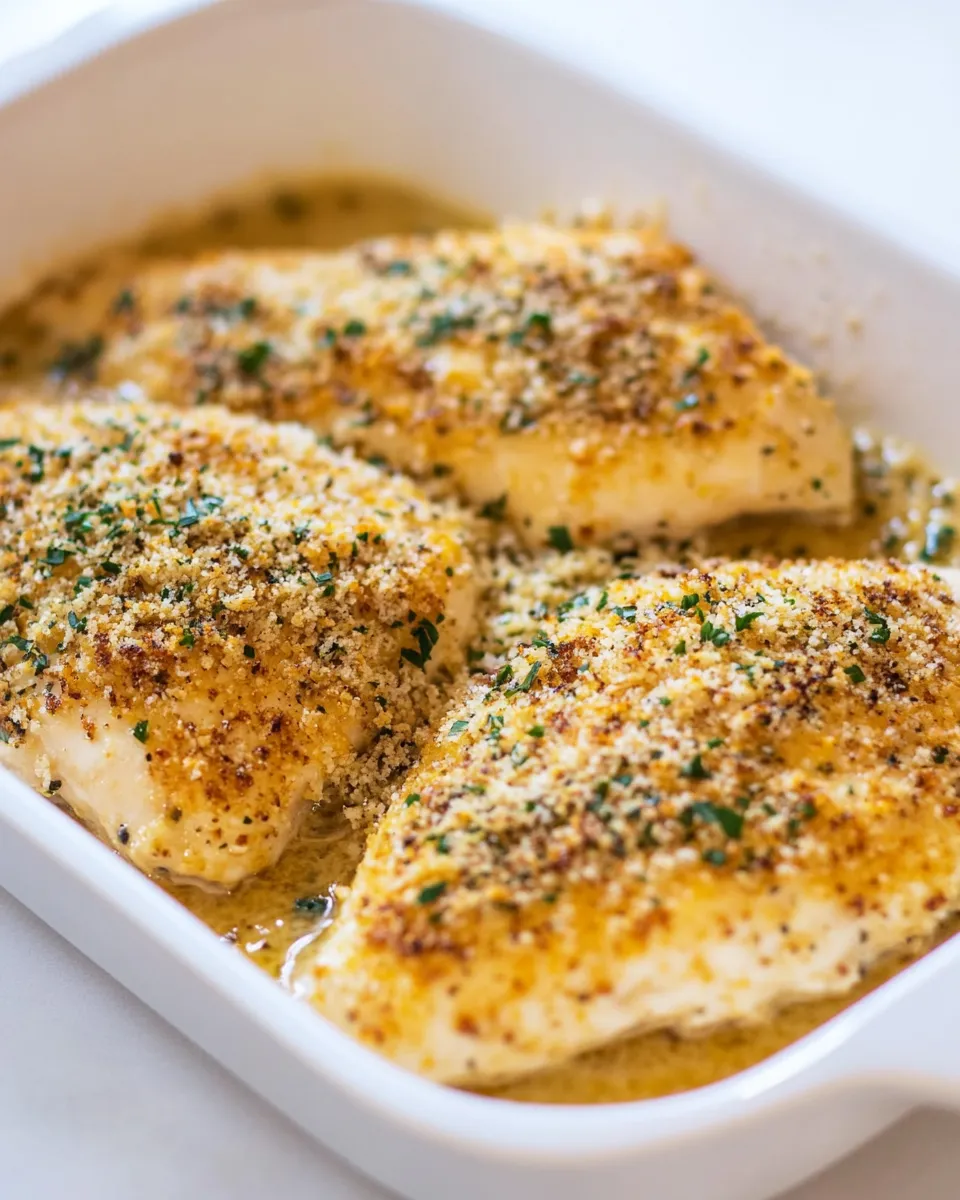
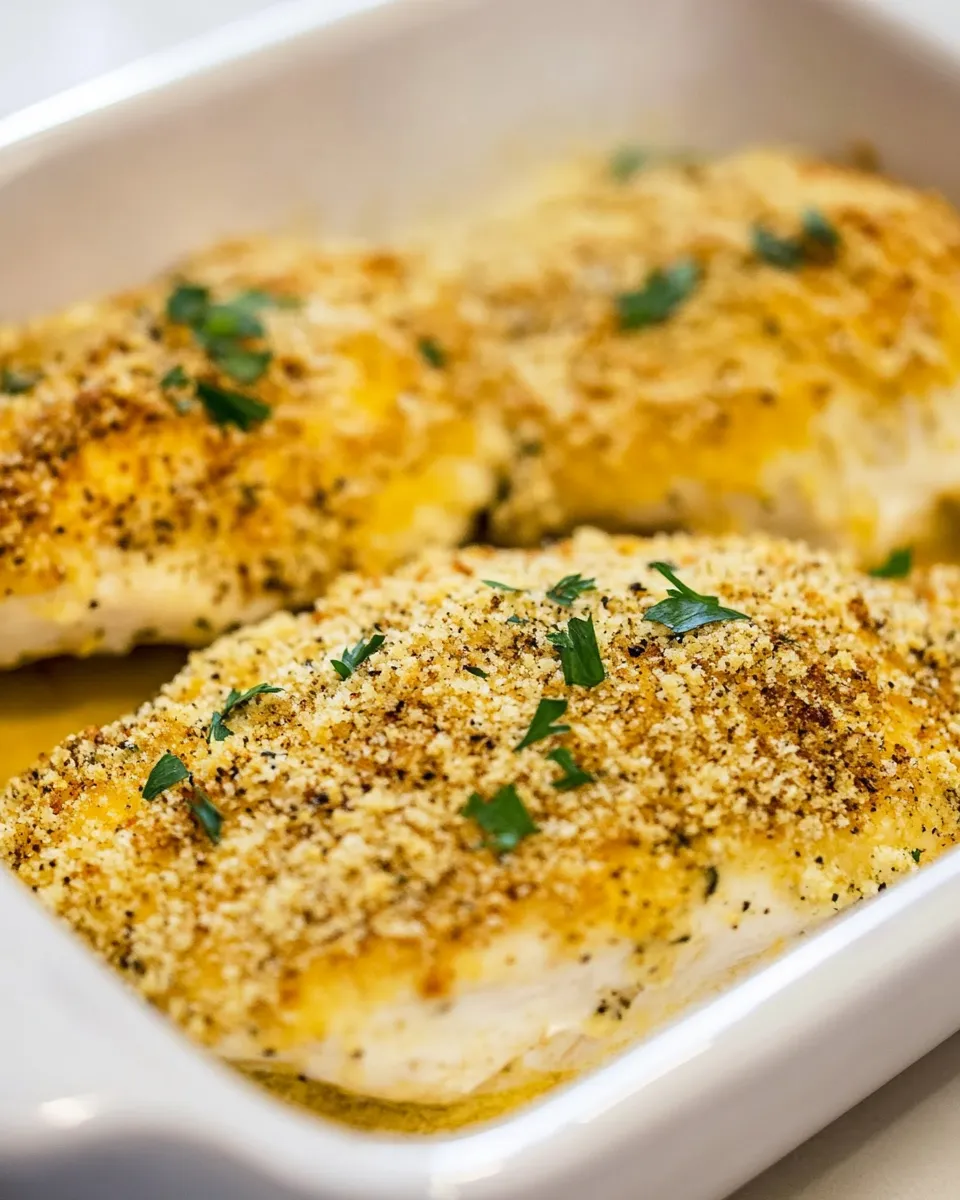
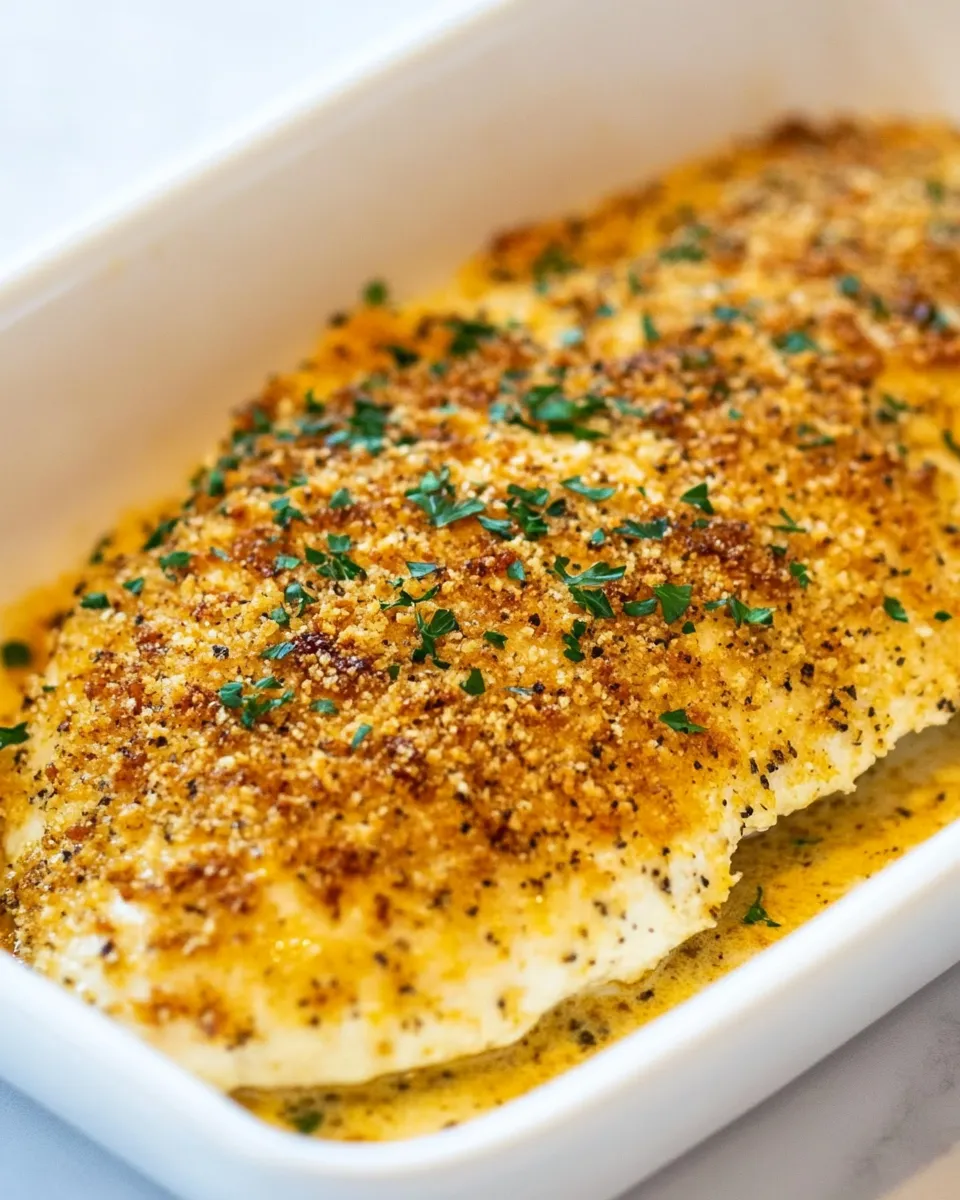
Simple, dependable, and endlessly versatile — that’s how I think of this Parmesan Ranch Chicken. It’s the kind of dinner I turn to when I want something comforting without fuss, a dish that pleases picky eaters and guests alike. The ranch seasoning pulls salty, herby flavor into the panko-Parmesan crust, and the butter helps the coating brown and stick.
I love how forgiving the recipe is: minimal prep, no special techniques, and it finishes in the oven while you get sides ready. It’s also a dish you can scale up easily or tweak for a lighter version when you’re watching calories. I keep the pantry-friendly ingredients on hand most weeks for exactly that reason.
Below you’ll find the exact ingredients and steps to make this happen, plus notes on swaps, storage, troubleshooting, and a few pro tips to make the crust crisp without drying the chicken. Read through, then preheat the oven — dinner is straightforward from here.
What Goes Into Parmesan Ranch Chicken
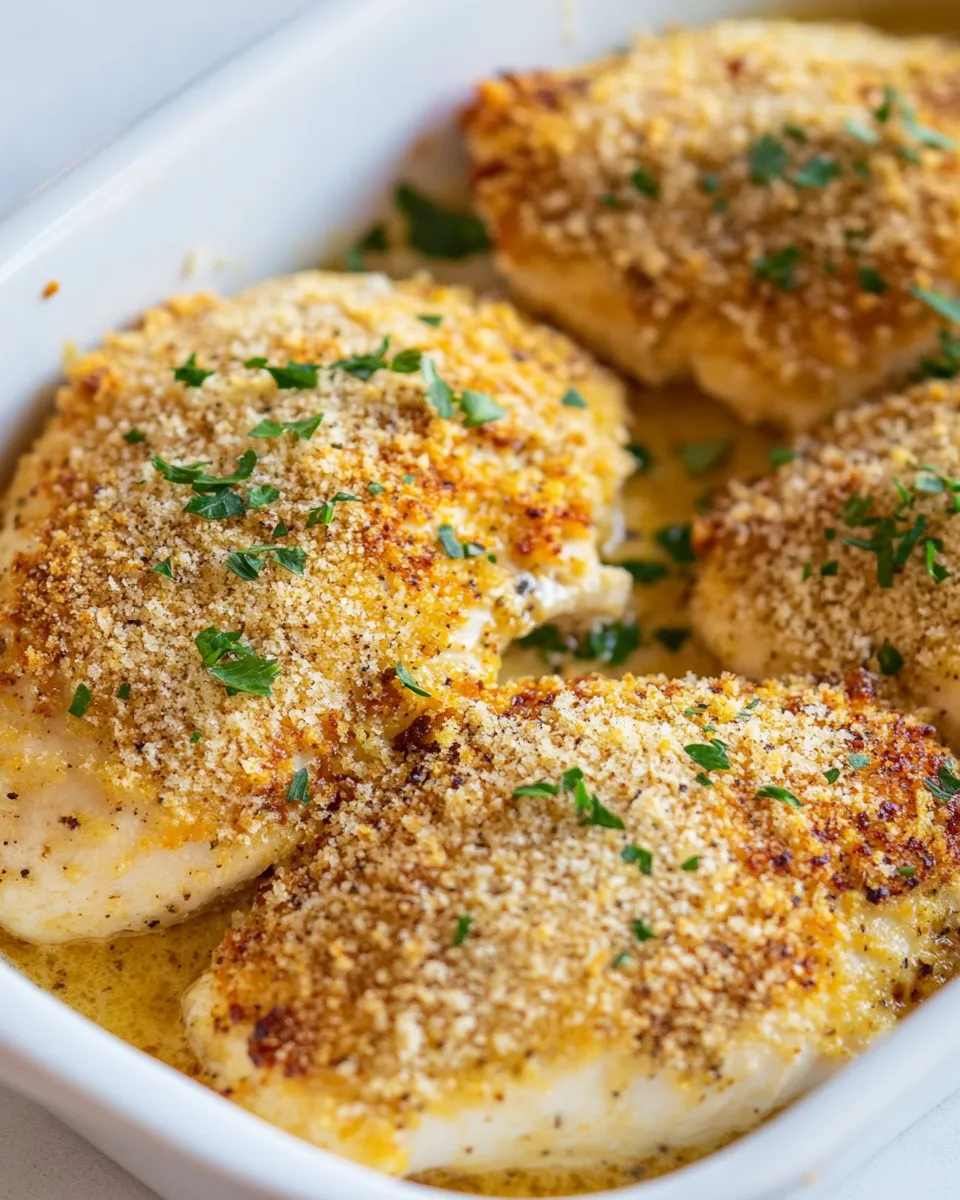
Everything here is about building a crunchy, flavorful crust that keeps the chicken moist underneath. The balance is simple: panko for texture, Parmesan for savory depth, ranch mix for herbs and tang, and butter to bind and brown. Use the specified amounts for the coating — they’re tuned to cover four fairly large chicken breasts.
Ingredients
- 1 cup Panko breadcrumbs — provides the coarse, crunchy texture that makes the crust satisfyingly crisp.
- ½ cup freshly grated Parmesan cheese — adds umami and helps the coating brown; freshly grated melts and binds better than pre-shredded.
- 1 ounce ranch seasoning mix (1 envelope) — the herb-forward seasoning that flavors the crust; use one full envelope for a noticeable ranch profile.
- ½ cup unsalted butter (1 stick, melted) — coats the chicken so the crumbs adhere and promotes even browning in the oven.
- 4 (8-ounce) boneless, skinless chicken breasts — the main protein for this recipe; larger breasts are used here so plan side portions accordingly.
Parmesan Ranch Chicken: From Prep to Plate
- Preheat the oven to 350°F and spray a 9×13-inch baking dish with nonstick spray; set the dish aside.
- In a large shallow bowl combine 1 cup Panko breadcrumbs, ½ cup freshly grated Parmesan cheese, and the 1 ounce (1 envelope) ranch seasoning mix.
- Melt ½ cup unsalted butter (1 stick) and pour the melted butter into a second shallow bowl.
- Working with one chicken breast at a time, dip a chicken breast into the melted butter, coating both top and bottom.
- After buttering, roll the chicken breast in the breadcrumb mixture and press the crumbs onto the surface so the coating adheres; repeat steps 4–5 for all 4 (8-ounce) boneless, skinless chicken breasts.
- Place the coated chicken breasts in the prepared baking dish in a single layer, leaving a little space between each piece.
- Bake uncovered for 40–45 minutes, or until the chicken is cooked through, the juices run clear, and the internal temperature reaches at least 165°F.
- Remove the dish from the oven and let the chicken rest for 3–5 minutes before serving.
Why I Love This Recipe
This is reliably delicious with minimal babysitting. The crust is crunchy and flavorful while the chicken stays tender because it bakes in a shallow dish — the butter protects it just enough. It hits that comfort-food sweet spot without taking much time or requiring special skills.
It also works for weeknight dinners or when you want to impress without stress. Serve it with a simple salad, roasted vegetables, or mashed potatoes and you’re done. The flavors are familiar, so it’s a safe choice for mixed company and picky kids, but the Parmesan and ranch keep it interesting.
Quick Replacement Ideas
If you need to swap ingredients on the fly, here are smart substitutions that keep the spirit of the dish:
- Swap panko for regular breadcrumbs if that’s all you have — texture will be less airy but still fine.
- Use Pecorino Romano in place of Parmesan for a sharper, saltier bite — reduce any extra salt at the table.
- If you don’t have an envelope of ranch, mix dried parsley, dill, garlic powder, onion powder, salt, and pepper to approximate the blend.
- For a lighter option, brush the chicken with olive oil instead of melted butter; it won’t brown the same but still helps crumbs adhere.
- Smaller chicken breasts can be used; adjust the baking time and check for 165°F internal temperature.
Appliances & Accessories
You don’t need fancy gear for this — just a few basics:
- An oven set to 350°F (accurate thermometer recommended).
- A 9×13-inch baking dish sprayed with nonstick spray.
- Two shallow bowls or pie plates — one for the butter, one for the breadcrumb mixture, to make coating quick and tidy.
- A meat thermometer — helps remove guesswork and prevents overcooking.
- Tongs or clean hands for dipping and pressing crumbs onto the chicken.
Problems & Prevention
Even simple recipes can go sideways. Here are common issues and how to fix or avoid them:
- If the crust falls off in the pan: press the crumbs firmly onto the buttered chicken and space the breasts so they’re not touching; avoid flipping during baking.
- If the crust browns unevenly: make sure the chicken pieces are similar thickness and the oven rack is centered. Rotate the pan halfway through if your oven has hot spots.
- If the chicken dries out: check internal temperature early — remove at 165°F and let rest. Very large breasts will take longer; smaller ones will finish earlier.
- If crumbs become soggy: use panko for a crispier finish and avoid pouring excess butter over the top — the melted butter should mainly coat the chicken surface, not soak the crumbs.
Variations for Dietary Needs
With a few swaps, this recipe can accommodate different diets:
- Gluten-free: use gluten-free panko or crushed gluten-free crackers, and check the ranch mix is certified gluten-free.
- Lower fat: brush with a light coating of olive oil and use a reduced-fat Parmesan (keep in mind browning and texture will change).
- Dairy-free: use a dairy-free grated alternative for Parmesan and a dairy-free butter substitute; the flavor profile shifts but the technique stays the same.
- Smaller portions/protein swaps: use thin-sliced chicken cutlets or turkey cutlets and shorten the baking time; they’ll cook faster and stay juicier.
Pro Perspective
Here are a few professional touches that keep this straightforward recipe tasting elevated.
- Flatten thicker breasts slightly for even cooking. A quick pound with a rolling pin between plastic wrap shortens baking time and produces a more uniform crust.
- Toast the panko lightly in a dry skillet before mixing with Parmesan to add a layer of nutty flavor and extra crunch. Don’t overdo it — just golden is enough.
- Press the crumb mixture into the chicken with your palm. Pressing seals the crust to the butter-coated surface and reduces shedding in the dish.
- Rest the chicken after baking. Those few minutes let the juices redistribute so the meat stays moist when you slice it.
Make-Ahead & Storage
Make-ahead options make this dish even more useful for busy lives.
- Assemble through the crumb-coating stage and keep covered in the refrigerator for up to 24 hours. Bake straight from chilled, adding a few extra minutes if needed, until internal temperature reaches 165°F.
- Store leftovers in an airtight container in the refrigerator for up to 3–4 days. Reheat gently in a 350°F oven until warmed through to help re-crisp the crust; a quick blast under the broiler for a minute can help, but watch closely.
- To freeze: place baked, cooled breasts in a single layer on a tray to freeze solid, then transfer to a freezer-safe bag for up to 2 months. Reheat from frozen in a 350°F oven, covered with foil for the first part, then uncovered to crisp.
FAQ
Q: Can I use chicken thighs instead of breasts?
A: Yes. Bone-in thighs will take longer; boneless thighs will work well and stay moist. Adjust cooking time and use a thermometer to reach 165°F.
Q: What if I don’t have ranch seasoning?
A: You can substitute a homemade mix of dried parsley, dill, garlic powder, onion powder, and a little salt and pepper. The flavor won’t be identical but will still be tasty.
Q: How do I prevent the coating from burning?
A: If the top starts to darken too quickly, tent the pan loosely with foil for the remainder of the bake time, checking for doneness with a thermometer.
Q: Can I pan-sear the chicken first for a crispier crust?
A: You can, but because the breasts are large, searing may make it harder to fully cook the interior without overbrowning. If you choose to sear, use medium heat and finish in the oven, keeping a close eye on color and temperature.
Next Steps
Make this Parmesan Ranch Chicken for dinner tonight and keep a note of any little tweaks you make — maybe you prefer more Parmesan or a lighter butter brush. Serve it with quick roasted green beans, a bright salad, or simple mashed potatoes. Leftovers make a great sandwich filler or salad topper, too.
If you try a variation — gluten-free, dairy-free, or pan-seared — come back and leave a comment with what worked for you. I tweak recipes all the time based on reader feedback, and I love hearing the smart shortcuts or swaps that make weeknight cooking easier.
Now go preheat the oven: 350°F, spray that 9×13, and let this straightforward, comforting dish do the heavy lifting for tonight’s meal.
Parmesan Ranch Chicken
Ingredients
Ingredients
- 1 cupPanko breadcrumbs
- 1/2 cupfreshly grated Parmesan cheese *
- 1 ounceranch seasoning mix 1 envelope
- 1/2 cupunsalted butter 1 stick, melted
- 4 8-ounceboneless, skinless chicken breasts(**)
Instructions
Instructions
- Preheat the oven to 350°F and spray a 9×13-inch baking dish with nonstick spray; set the dish aside.
- In a large shallow bowl combine 1 cup Panko breadcrumbs, ½ cup freshly grated Parmesan cheese, and the 1 ounce (1 envelope) ranch seasoning mix.
- Melt ½ cup unsalted butter (1 stick) and pour the melted butter into a second shallow bowl.
- Working with one chicken breast at a time, dip a chicken breast into the melted butter, coating both top and bottom.
- After buttering, roll the chicken breast in the breadcrumb mixture and press the crumbs onto the surface so the coating adheres; repeat steps 4–5 for all 4 (8-ounce) boneless, skinless chicken breasts.
- Place the coated chicken breasts in the prepared baking dish in a single layer, leaving a little space between each piece.
- Bake uncovered for 40–45 minutes, or until the chicken is cooked through, the juices run clear, and the internal temperature reaches at least 165°F.
- Remove the dish from the oven and let the chicken rest for 3–5 minutes before serving.
Equipment
- 9×13 Baking Pan
Notes
Make sure to pat the chicken dry before dredging it in the butter and breadcrumbs to help everything adhere!
Baking time is approximate and will vary based on the size and thickness of your chicken breasts. I always recommend testing with an instant-read thermometer to know when they are done.
Broil your chicken for a minute or two at the end of cooking to get an even crispier crust. Just be sure you keep a close eye on it — you don’t want it to burn.
This yummy crunchy chicken tastes great the next day sliced up on aCaesarorcobb salad.