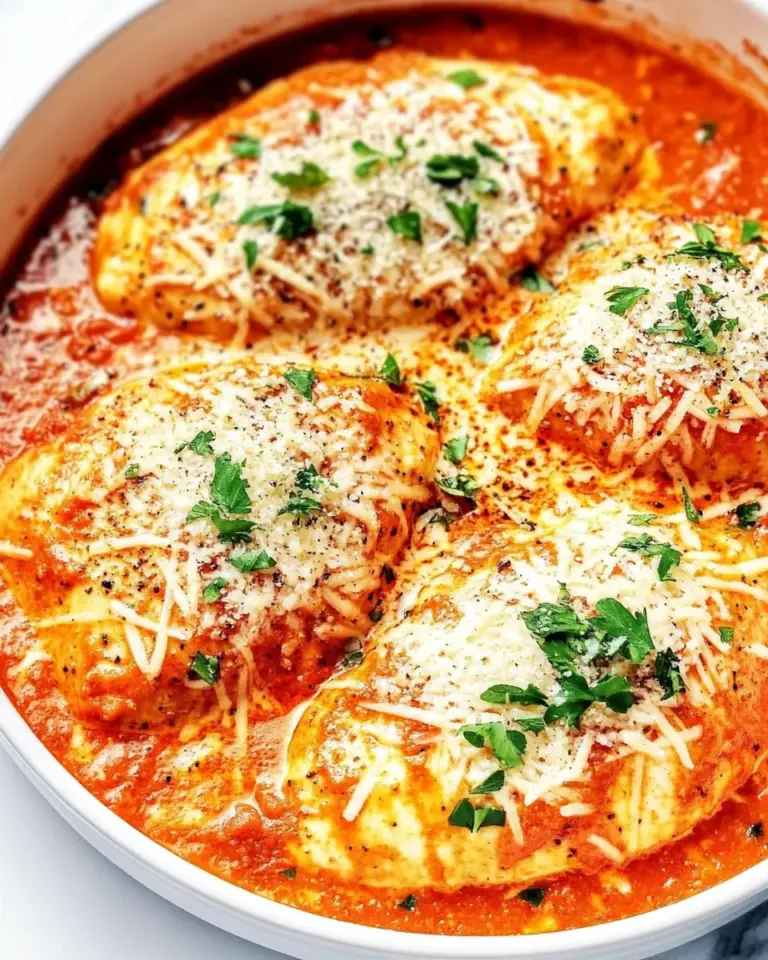
This Skillet Salsa Chicken is one of those weeknight wins that feels thoughtful without demanding hours in the kitchen. It’s simple: seared chicken, a bright jarred salsa reduced with a splash of broth, and a melting blanket of Mexican cheese. The oven finishes everything off so you get juicy chicken and bubbly, golden cheese with very little babysitting.
I reach for this when I want dinner that’s fast, forgiving, and crowd-pleasing. The recipe leans on pantry staples and one jar of salsa, which means you can make it any night of the week. It’s adaptable, too—swap the salsa, swap the cheese, and make it your own in minutes.
Below I break down the ingredients, walk the steps exactly as written, and share tips to avoid the common mistakes I used to make. There’s also storage, substitution ideas for allergies, and quick upgrades by season so the recipe never gets boring.
Ingredient Breakdown

- 2 large boneless skinless chicken breasts — Split into thinner cutlets so they cook quickly and evenly.
- 1/2 teaspoon garlic powder — A straightforward flavor boost; mixes easily into the seasoning for even coverage.
- 1/2 teaspoon chili powder — Adds mild warmth and depth; adjust if you prefer more heat.
- Salt & pepper to taste — Essential for seasoning the chicken before searing; salt helps develop a golden crust.
- Flour for dredging — Lightly dusting the chicken helps create a little crust and thickens the sauce slightly when you deglaze.
- 1 tablespoon butter — Adds flavor and helps with browning; a small amount goes a long way.
- 1 tablespoon olive oil — Raises the smoke point a touch and keeps the butter from burning during searing.
- 1/4 cup chicken broth — Used to deglaze the pan and loosen browned bits for flavor; any neutral broth works.
- 1 (14.5 ounce) jar salsa — use your favorite kind — The star of the sauce; chunky or smooth both work. Choose a salsa you like to eat on chips.
- 1 cup shredded Mexican cheese blend — Melts quickly and gives that classic, slightly tangy finish.
- Fresh cilantro, chopped to taste (optional) — A fresh herb finish that brightens the rich melted cheese and salsa.
Skillet Salsa Chicken Made Stepwise
- Preheat the oven to 400°F and place the rack in the middle position.
- Cut each chicken breast in half lengthwise to make 4 thinner cutlets. Pat the cutlets dry.
- Season both sides of the chicken with the 1/2 teaspoon garlic powder, 1/2 teaspoon chili powder, and salt & pepper to taste. Lightly dredge each piece in flour, shaking off excess.
- Heat an oven-safe skillet over medium-high heat and add the 1 tablespoon butter and 1 tablespoon olive oil. When the pan is hot and the butter has melted, add the chicken. Sear 3–4 minutes per side, until lightly golden.
- Transfer the seared chicken to a plate and set aside. Pour the 1/4 cup chicken broth into the skillet and scrape up any browned bits from the bottom. Stir in the entire 14.5-ounce jar of salsa and bring the sauce to a simmer.
- Return the chicken to the skillet, nestling the pieces into the sauce. Spoon some sauce over each piece and let the sauce bubble for 1–2 minutes.
- Sprinkle the 1 cup shredded Mexican cheese blend evenly over the chicken and sauce.
- Place the skillet in the preheated oven and bake 5–7 minutes, until the chicken is cooked through (165°F internal temperature) and the cheese is melted. If you want more browning, broil for 1–2 minutes—watch carefully to avoid burning.
- Remove from the oven, garnish with chopped fresh cilantro if desired, and season with additional salt & pepper to taste before serving.
What Sets This Recipe Apart
It’s the combination of techniques and practicality. You sear the chicken first to build flavor through browning, then use a small splash of broth to deglaze the pan. That pulls all the fond into the salsa so the sauce tastes concentrated and savory without extra effort. Topping everything with a cheese blend and finishing in the oven gives you that satisfying contrast: crisp edges on the chicken where it met the pan, and a gooey, browned cheese top.
This recipe is also ridiculously forgiving. Because the breasts are halved into cutlets, they cook quickly and predictably. The salsa acts as both flavor and sauce, so there’s no need to make anything complicated on the side. You can have dinner on the table in under 30 minutes once you’re comfortable with the routine.
Allergy-Friendly Substitutes

- Gluten-free: Use a gluten-free all-purpose flour or rice flour for dredging. The thin coating is mostly for browning, so any light gluten-free flour works.
- Dairy-free: Swap the butter for an extra tablespoon of olive oil and use a dairy-free shredded cheese or omit the cheese and finish with sliced avocado for creaminess.
- Low-sodium: Choose a low-sodium chicken broth and a low-sodium or no-salt-added salsa. Taste before adding extra salt at the end.
- Vegetarian: Replace chicken with thick slices of cauliflower steaks or halved portobello mushrooms; sear and then follow the same steps but shorten oven time—vegetables cook faster.
Toolbox for This Recipe

- Oven-safe skillet (10–12-inch) — Preferably cast iron or heavy stainless; you need to move from stovetop to oven.
- Sharp knife and cutting board — For halving the breasts into even cutlets.
- Tongs — For turning and moving the chicken without tearing it.
- Meat thermometer — Useful to ensure chicken reaches 165°F without overcooking.
- Measuring spoons and cups — For precise seasoning and sauce ratios.
- Spatula or wooden spoon — To scrape up the browned bits when deglazing with broth.
Common Errors (and Fixes)
- Pale chicken after searing: The pan wasn’t hot enough. Let the pan heat longer and ensure the butter has melted and is sizzling before adding chicken. Dry the cutlets well; excess moisture prevents browning.
- Soggy coating from too much flour: Shake off excess flour. A light dusting helps browning without creating a heavy paste in the sauce.
- Cheese doesn’t melt evenly: Make sure pieces are single-layered and the oven is preheated. If you skip the oven and try to melt the cheese on the stovetop, it can separate—bake briefly for even melting.
- Burning under the cheese when broiling: Broil with the skillet on the middle rack or move the pan down one rack before broiling. Watch closely; broilers brown fast.
- Underseasoned sauce: Taste the salsa you used first. Some jarred salsas are very mild; season the sauce lightly before returning chicken if needed, but remember the cheese and any finishing salt will also add flavor.
Season-by-Season Upgrades
- Spring: Finish with a spoonful of fresh pico de gallo and a squeeze of lime to brighten the plate. Add thinly sliced radishes for crunch.
- Summer: Use a fresh tomato-based salsa or roasted corn salsa. Serve with grilled corn or a quick cucumber salad on the side.
- Fall: Try a roasted poblano or chipotle salsa for smoky, warming flavors. Top with pickled red onions to balance the richness.
- Winter: Use heartier salsas with added beans or roasted vegetables and pair the dish with warm rice or mashed sweet potatoes. Cilantro or green onions finish it nicely.
Cook’s Notes
Thickness matters. Cutting the breasts in half lengthwise creates four similar-sized cutlets so they cook in the recommended 5–7 minute oven finish. If your cutlets are noticeably thicker, allow a few extra minutes; always check with a thermometer to reach 165°F.
Don’t overcrowd the skillet when searing. Work in batches if necessary so each piece gets direct contact with the hot surface. Overcrowding lowers the pan temperature and leads to steaming, not searing.
If you like a smoother sauce, pulse the salsa briefly in a blender before adding it to the skillet. For a chunkier texture, choose a chunky salsa and spoon those pieces over the chicken before baking.
Best Ways to Store
- Refrigerating: Cool the skillet for 15–20 minutes, then transfer to an airtight container. Store in the fridge for up to 3 days. Reheat gently in the oven at 350°F until warmed through, or in a skillet over medium-low heat with a splash of broth to loosen the sauce.
- Freezing: I don’t recommend freezing after the cheese has been baked; textures change. If you must, freeze portions without the cheese in airtight containers for up to 2 months. Thaw overnight in the fridge and add fresh cheese before reheating and baking to melt.
- Reheating tips: Use low, even heat to prevent the chicken from drying. A brief oven finish with fresh cheese brings back that just-made quality.
Helpful Q&A
- Q: Can I use chicken thighs instead?
A: Yes. Boneless skinless thighs will work and stay moist. Adjust sear and bake times slightly—thighs may need a minute or two longer in the oven depending on thickness. - Q: Can I make this in advance?
A: You can sear the chicken and refrigerate the components separately for up to a day. When ready to serve, reheat the skillet, combine, top with cheese, and finish in the oven for 8–10 minutes to ensure even reheating and melting. - Q: Is store-bought salsa OK?
A: Absolutely. Choose a salsa you enjoy straight from a jar; that flavor will drive the dish. If it’s very thin, use a slightly thicker salsa or reduce it a minute longer after adding. - Q: How do I get a crispy edge while keeping the center juicy?
A: Sear over medium-high heat just until golden, then finish briefly in the oven. The quick oven time avoids overdrying while ensuring the center reaches safe temperature.
Ready, Set, Cook
Skillet Salsa Chicken is a reliable, fast dinner that still feels special. Follow the simple sear, deglaze, simmer, and bake method exactly as outlined for consistent results. Keep a jar of your favorite salsa handy. Once you try it with a perfectly melted cheese topping and a sprinkle of cilantro, you’ll see why this one keeps showing up on busy-weeknight menus.
Make it tonight, and tweak the salsa and toppings next time until it’s exactly the version your family asks for again and again.

Skillet Salsa Chicken
Ingredients
Ingredients
- 2 largeboneless skinless chicken breasts
- 1/2 teaspoongarlic powder
- 1/2 teaspoonchili powder
- Salt & pepperto taste
- Flourfor dredging
- 1 tablespoonbutter
- 1 tablespoonolive oil
- 1/4 cupchicken broth
- 1 14.5 ounce jarsalsause your favorite kind
- 1 cupshredded Mexican cheese blend
- Fresh cilantro choppedto taste (optional)
Instructions
Instructions
- Preheat the oven to 400°F and place the rack in the middle position.
- Cut each chicken breast in half lengthwise to make 4 thinner cutlets. Pat the cutlets dry.
- Season both sides of the chicken with the 1/2 teaspoon garlic powder, 1/2 teaspoon chili powder, and salt & pepper to taste. Lightly dredge each piece in flour, shaking off excess.
- Heat an oven-safe skillet over medium-high heat and add the 1 tablespoon butter and 1 tablespoon olive oil. When the pan is hot and the butter has melted, add the chicken. Sear 3–4 minutes per side, until lightly golden.
- Transfer the seared chicken to a plate and set aside. Pour the 1/4 cup chicken broth into the skillet and scrape up any browned bits from the bottom. Stir in the entire 14.5-ounce jar of salsa and bring the sauce to a simmer.
- Return the chicken to the skillet, nestling the pieces into the sauce. Spoon some sauce over each piece and let the sauce bubble for 1–2 minutes.
- Sprinkle the 1 cup shredded Mexican cheese blend evenly over the chicken and sauce.
- Place the skillet in the preheated oven and bake 5–7 minutes, until the chicken is cooked through (165°F internal temperature) and the cheese is melted. If you want more browning, broil for 1–2 minutes—watch carefully to avoid burning.
- Remove from the oven, garnish with chopped fresh cilantro if desired, and season with additional salt & pepper to taste before serving.
Equipment
- Oven-safe Skillet
- Oven
Notes
If your chicken breasts are smaller, no need to cut them in half lengthwise, but you will need to increase cooking time. If you’re unsure about whether chicken is cooked, always use a meat thermometer to ensure it’s 165F in the deepest part.