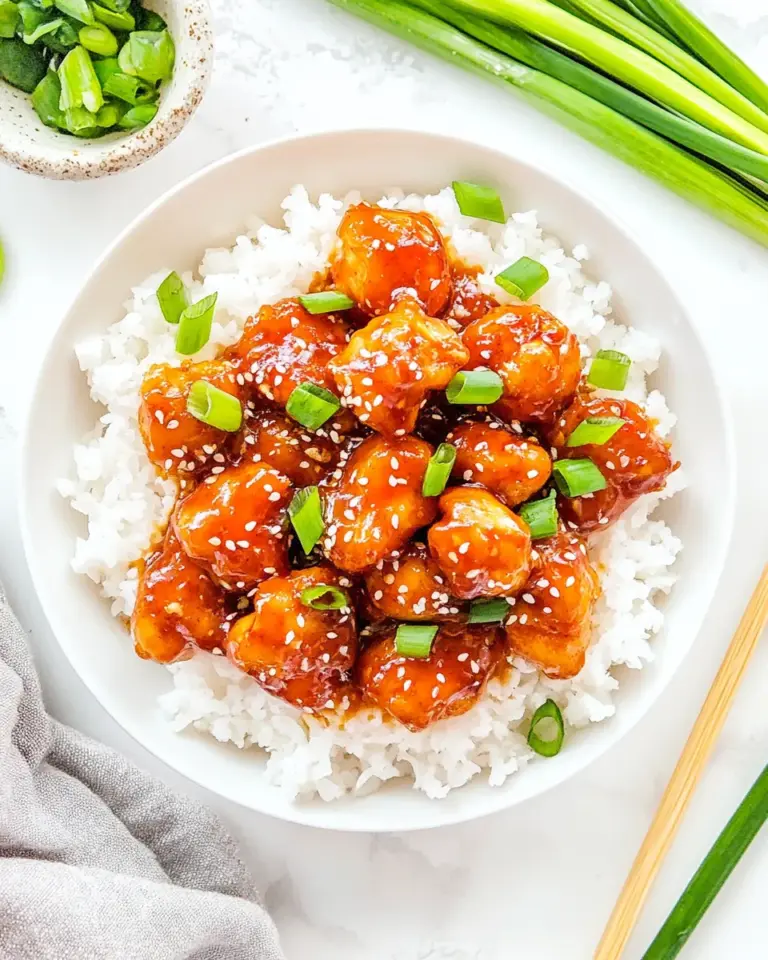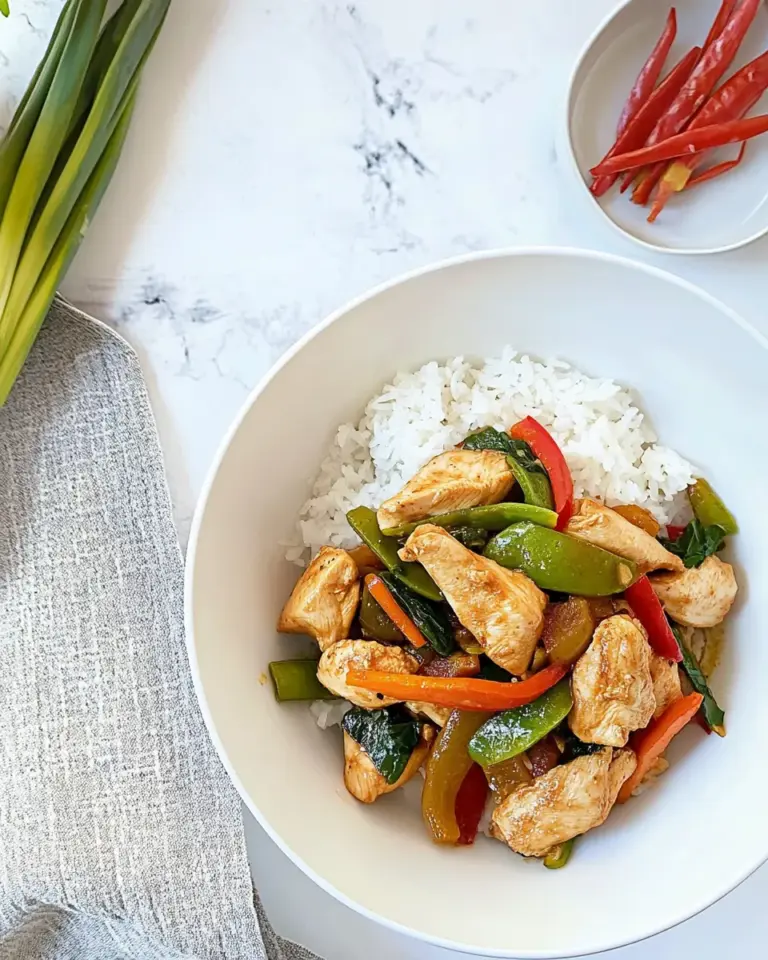
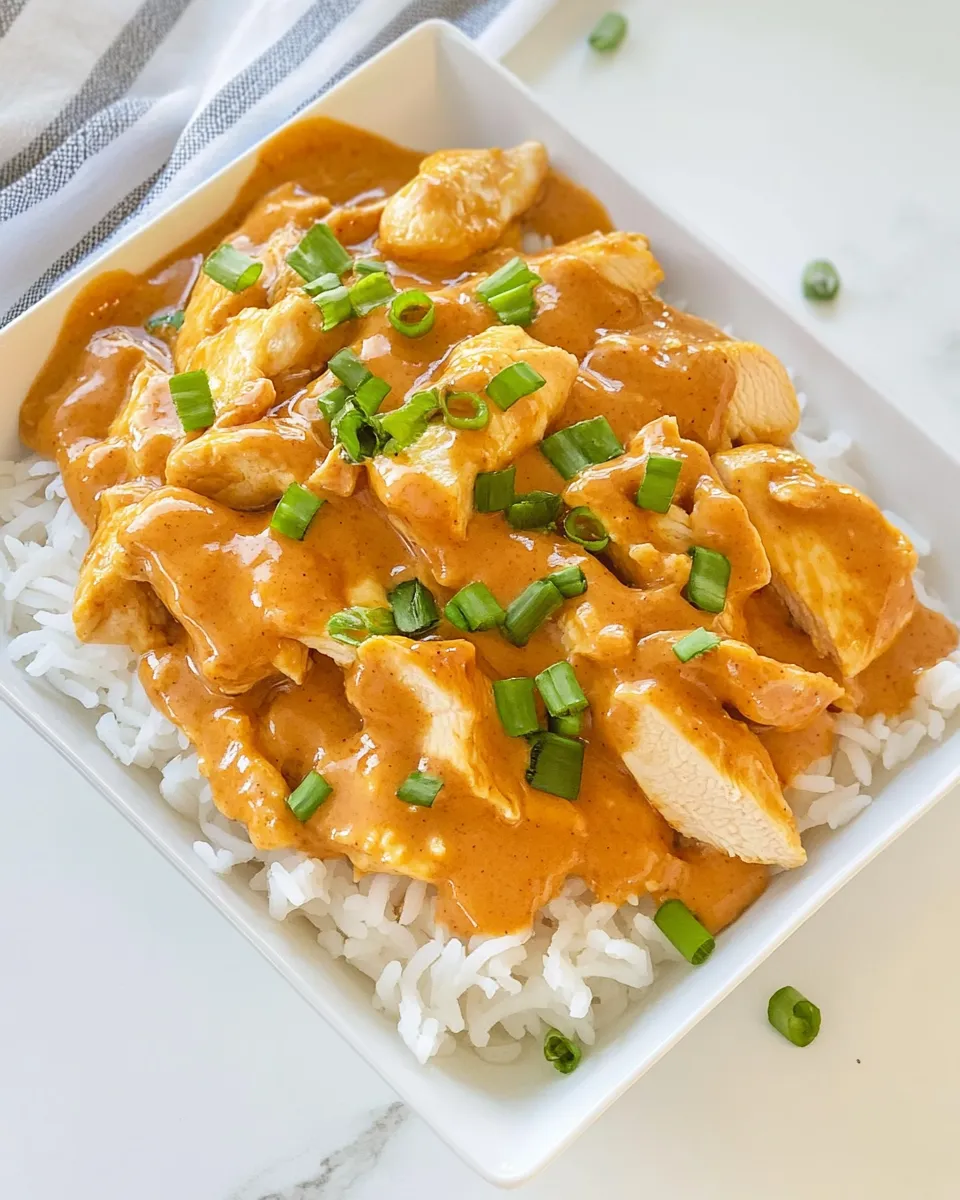
This is the kind of weeknight dinner that shows up like it’s been rehearsed: quick, bold, and the kind of comfort that gets requested again. The sauce is the star — nutty, sweet, and just spicy enough — but the technique is what keeps it from tasting like restaurant leftovers. You’ll move from chopping board to table in under 30 minutes, and the payoff is that glossy, clingy sauce that coats every piece of chicken and onion.
I test this on family and friends until they stop arguing over the last bite. It’s forgiving, fast, and written so you can follow each step without guessing amounts or timing. Takeout is convenient, but once you learn how the sauce comes together and how to keep the chicken tender, you’ll prefer your own version.
Read through the notes before you start: little adjustments in timing or order make a big difference. I’ll explain what each ingredient does, how to switch things safely for texture, and what to avoid so the garlic never burns. Let’s get cooking.
Ingredient Notes
This dish is built on a few clear roles: fat for searing, aromatics for depth, protein for substance, and a compact sauce that’s both the flavor and the finishing glaze. Stick to the ingredient list below — the proportions are tuned so the sauce disperses evenly and becomes glossy without separating.
Peanut powder or peanut butter provides the peanut backbone; toward the end of cooking it heats and sings with soy and sugar to make a sticky coating. Garlic and white onion give savory and sweet aromatics; the timing in the method keeps garlic from burning while allowing onions to soften and release moisture so the chicken cooks evenly. Brown sugar and soy sauce find a balance between sweet and salty; the garlic chili sauce or sriracha introduces heat without interfering with the peanut flavor.
One practical tip: prep everything before you heat the pan. The sauce comes together in a bowl while the chicken cooks; when it’s time to finish, you pour and toss and serve immediately. That quick finish is what makes the sauce glossy instead of dull.
Ingredients
- 2tablespoonscooking oil — for searing the chicken and softening the onion; high heat oil works best.
- 3clovesgarlicminced — provides aromatic depth; add early but don’t let it brown.
- 1medium white onionsliced — softens and releases sweetness to balance the sauce.
- 1poundchicken breastcut into bite-sized pieces — main protein; uniform pieces cook quickly and evenly.
- 3tablespoonspeanut butter powder or 2 tablespoons peanut butter — peanut flavor base; powder makes a lighter sauce, peanut butter makes it richer.
- 1tablespoonwater — thins the peanut component so it blends smoothly into a glossy sauce.
- 2tablespoonsbrown sugar — adds caramel sweetness and helps the sauce glaze.
- 2tablespoonssoy sauce — primary salty/umami element; balances the sugar and peanut.
- 1teaspoongarlic chili sauce or sriracha sauce — provides controlled heat and a garlicky kick.
Method: Thai Chicken with Peanut Sauce
- Prepare ingredients: mince 3 cloves garlic, slice 1 medium white onion, and cut 1 pound chicken breast into bite-sized pieces.
- Heat a large skillet over medium-high heat until hot, then add 2 tablespoons cooking oil and swirl to coat the pan.
- Add the minced garlic to the skillet and cook, stirring, for about 15–30 seconds until fragrant and just starting to color—do not let it brown.
- Immediately add the sliced onion and the chicken pieces to the skillet. Cook, stirring and turning the chicken every 2–3 minutes, until the chicken is cooked through and the onions are softened (about 6–8 minutes total).
- While the chicken cooks, combine the sauce ingredients in a small bowl: either 3 tablespoons peanut butter powder OR 2 tablespoons peanut butter, plus 1 tablespoon water, 2 tablespoons brown sugar, 2 tablespoons soy sauce, and 1 teaspoon garlic chili sauce or sriracha. Whisk or stir until smooth and well blended.
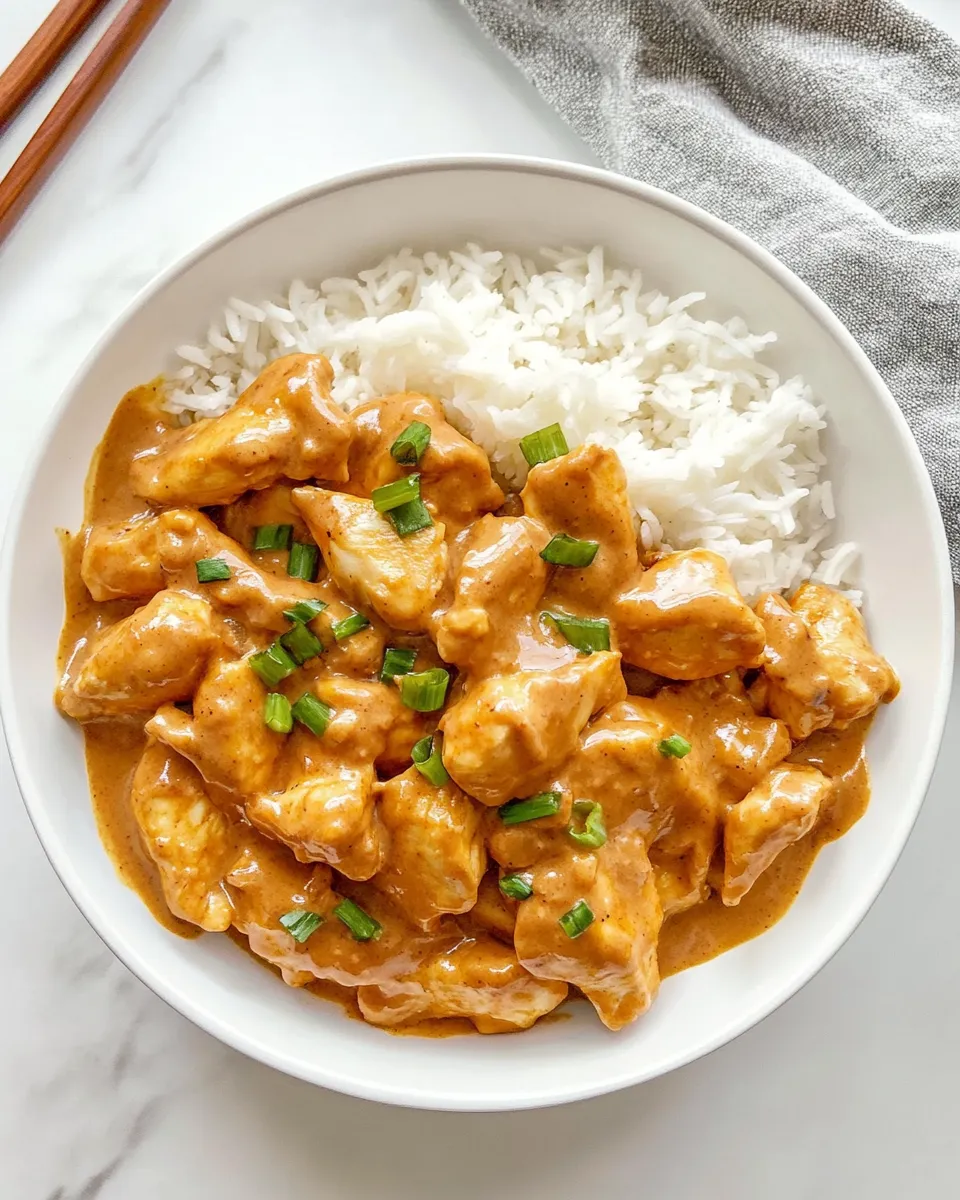
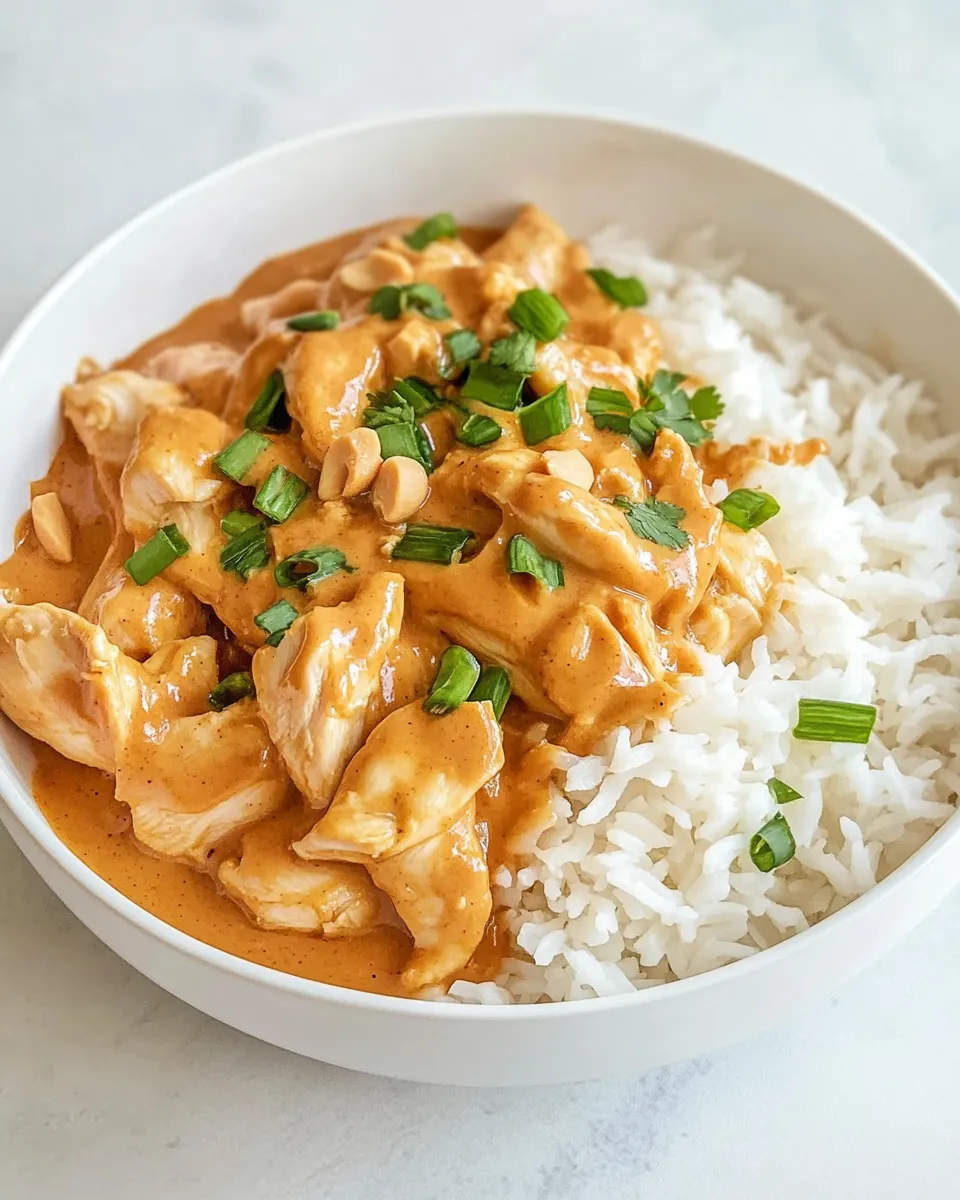
- When the chicken is done, pour the sauce over the chicken and onions in the skillet. Stir or toss to coat and cook for about 1 minute more, until the sauce is heated and glossy.
- Remove from heat and serve immediately with noodles or rice.
Why It’s Crowd-Pleasing
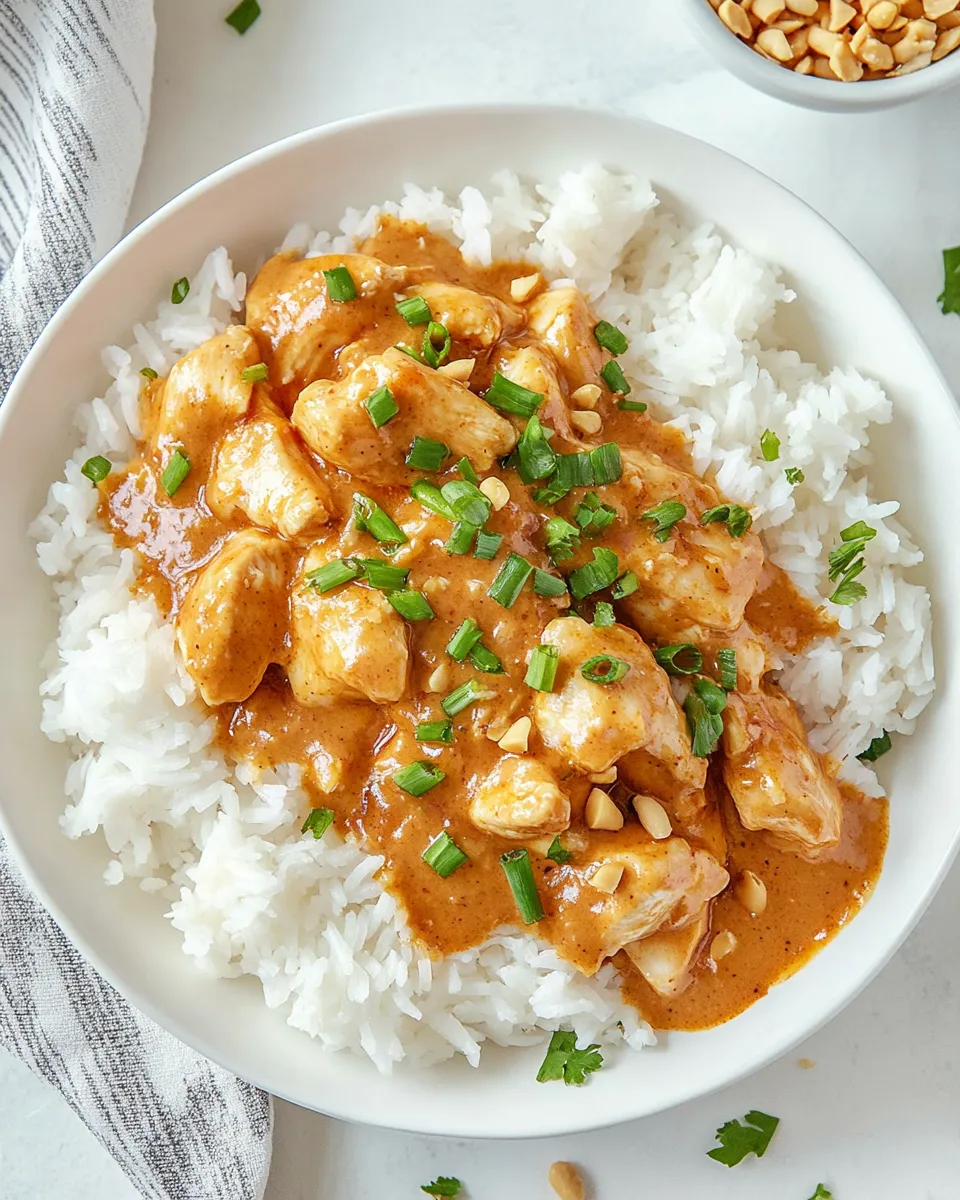
There’s a reason peanut sauces are universally appealing: they combine fat, salt, sweet, and spice in a compact, clingy package. Every bite hits multiple flavor points — the soy sauce gives umami, brown sugar adds caramel warmth, and the chili sauce introduces a clean heat that doesn’t mask the peanut. The onion softens and releases sweetness; the quick-cooked chicken stays tender because it’s cut small and finished with sauce rather than overdried in the pan.
This recipe also scales well for family dinners or small parties. It hits familiar flavor territory without requiring many exotic steps or hard-to-find ingredients. The finish is visually attractive — glossy, sticky, and evenly coated — which makes it feel restaurant-worthy even when it was made in a single skillet.
Texture-Safe Substitutions
Keep texture in mind: the chicken is bite-sized to cook quickly and stay moist. If you want a different mouthfeel without changing ingredients, adjust how you cut the chicken — smaller cubes for more sauce coating, slightly larger for a chewier bite. Slice the onion thinner if you prefer it nearly translucent, or chunk it slightly larger for a firmer vegetable contrast.
For the peanut element, use the option already provided: 3 tablespoons peanut butter powder OR 2 tablespoons peanut butter. Powder will yield a lighter, slightly less rich sauce; peanut butter will make a thicker, creamier glaze. Both are included in the ingredient list, so you’re choosing rather than substituting with something outside the recipe.
Must-Have Equipment
- Large skillet — a wide pan ensures the chicken and onions have room so they sear instead of steaming.
- Knife and cutting board — uniform cutting keeps cooking times consistent.
- Small bowl and whisk or spoon — to blend the peanut powder or peanut butter with the other sauce ingredients before adding to the pan.
Frequent Missteps to Avoid
Burning the garlic is the most common early mistake. Follow the timing: add garlic to hot oil and cook just 15–30 seconds until fragrant and just starting to color, then immediately add the onion and chicken. Garlic can turn bitter if left alone in the pan.
Another misstep is overcrowding the pan. If the chicken pieces are packed too tightly they’ll steam and won’t get that quick surface heat needed to stay juicy. Use a large skillet and leave a little space so you can stir and turn the pieces every 2–3 minutes as instructed.
Finally, don’t add the sauce too early. The sauce is designed to be poured over fully cooked chicken and onions so it can heat and glaze — pouring it before the chicken is done dilutes the searing effect and can prevent the sauce from becoming glossy.
Health-Conscious Tweaks
If you’re watching sodium or sugar, you can adjust elements that are already in the ingredient list. Reduce the amount of brown sugar incrementally (for example, use a touch less than 2 tablespoons) and taste as you go; the formula still works because soy sauce and peanut components provide savory balance. For sodium, use a low-sodium soy sauce in the 2 tablespoons called for; that keeps the same liquid volume and savory backbone while lowering salt.
Choose the peanut option that fits your preference: peanut butter powder tends to have fewer added oils and can reduce the overall fat impact while still delivering peanut flavor. The listed 1 tablespoon water thins the peanut portion so you’re not adding extra oils to loosen the sauce.
Flavor Logic
Every ingredient has a clear role. The cooking oil transfers high heat to the chicken and onions for rapid searing. Garlic and onion provide layered aromatics — garlic is quick and pungent, onions slow and sweet. Peanut powder or peanut butter delivers the central nutty character and texture. Brown sugar caramelizes slightly when heated against the pan and with the sauce, bringing depth and gloss. Soy sauce supplies salt and umami to anchor the sweetness, and the garlic chili sauce or sriracha brings measured heat and an extra garlic note that complements the fresh garlic in the pan.
Combining the sauce ingredients first ensures even distribution; adding the blended sauce to fully cooked chicken lets the flavors cling to the meat instead of running off into the pan. The one-minute finish is crucial: it warms and thickens the sauce enough to become glossy without breaking down the peanut texture or overcooking the chicken.
Prep Ahead & Store
Do the prep — mince garlic, slice onion, and cut chicken — up to a day in advance and store each item separately in airtight containers in the refrigerator. The sauce can be mixed and held in the fridge for a day as well; if the peanut component stiffens, stir in a teaspoon of warm water before using to loosen it.
Leftovers keep well refrigerated for 3–4 days in a covered container. Reheat gently in a skillet over medium-low heat until warmed through; avoid high heat which can dry the chicken or separate the sauce. Microwaving works for convenience; stir halfway through to promote even reheating.
Questions People Ask
Can I use peanut butter instead of the powder? Yes — the recipe explicitly offers both options: either 3 tablespoons peanut butter powder OR 2 tablespoons peanut butter. Powder gives a lighter finish; peanut butter makes the sauce richer.
How spicy is this? The heat level comes from 1 teaspoon garlic chili sauce or sriracha. If you prefer less heat, use slightly less and taste; if you prefer more, add in small increments after the sauce is mixed and warmed so you don’t overpower the peanut flavor.
Is the sauce thick or runny? With the listed proportions, the sauce should be a glossy, clingy coating once it hits the hot chicken. The 1 tablespoon water is just enough to bring the peanut component and soy/brown sugar together without making it soupy.
In Closing
This recipe gives you a reliable weeknight favorite: quick to cook, easy to prep, and packed with the peanut-forward flavor that makes takeout so tempting. Follow the sequence — aromatics first, then chicken, then sauce — and you’ll get glossy, clinging sauce and tender pieces of chicken every time. Make the sauce while the chicken finishes cooking, pour, toss, and serve. It’s simple, forgiving, and better than ordering in.
Thai Chicken with Peanut Sauce: Better Than Takeout
Ingredients
Ingredients
- 2 tablespoonscooking oil
- 3 clovesgarlicminced
- 1 medium white onionsliced
- 1 poundchicken breastcut into bite-sized pieces
- 3 tablespoonspeanut butter powder or 2 tablespoons peanut butter
- 1 tablespoonwater
- 2 tablespoonsbrown sugar
- 2 tablespoonssoy sauce
- 1 teaspoongarlic chili sauce or sriracha sauce
Instructions
Instructions
- Prepare ingredients: mince 3 cloves garlic, slice 1 medium white onion, and cut 1 pound chicken breast into bite-sized pieces.
- Heat a large skillet over medium-high heat until hot, then add 2 tablespoons cooking oil and swirl to coat the pan.
- Add the minced garlic to the skillet and cook, stirring, for about 15–30 seconds until fragrant and just starting to color—do not let it brown.
- Immediately add the sliced onion and the chicken pieces to the skillet. Cook, stirring and turning the chicken every 2–3 minutes, until the chicken is cooked through and the onions are softened (about 6–8 minutes total).
- While the chicken cooks, combine the sauce ingredients in a small bowl: either 3 tablespoons peanut butter powder OR 2 tablespoons peanut butter, plus 1 tablespoon water, 2 tablespoons brown sugar, 2 tablespoons soy sauce, and 1 teaspoon garlic chili sauce or sriracha. Whisk or stir until smooth and well blended.
- When the chicken is done, pour the sauce over the chicken and onions in the skillet. Stir or toss to coat and cook for about 1 minute more, until the sauce is heated and glossy.
- Remove from heat and serve immediately with noodles or rice.
Equipment
- Large Skillet
- Small Bowl
- Whisk
Notes
Prep everything first: Once cooking starts, this dish moves quickly, so have all ingredients measured and ready
Don’t crowd the pan: Cook in batches if needed to maintain high heat and proper browning
The garlic technique: Infusing the oil with garlic flavor then removing it prevents burning while maintaining flavor
Sauce consistency: The sauce will thicken as it cools, so remove from heat when it seems slightly thinner than desired
Slice against the grain: For the most tender chicken, cut perpendicular to the muscle fibers
Taste and adjust: Everyone’s preference for sweet-savory-spicy balance is different, so taste and adjust before serving