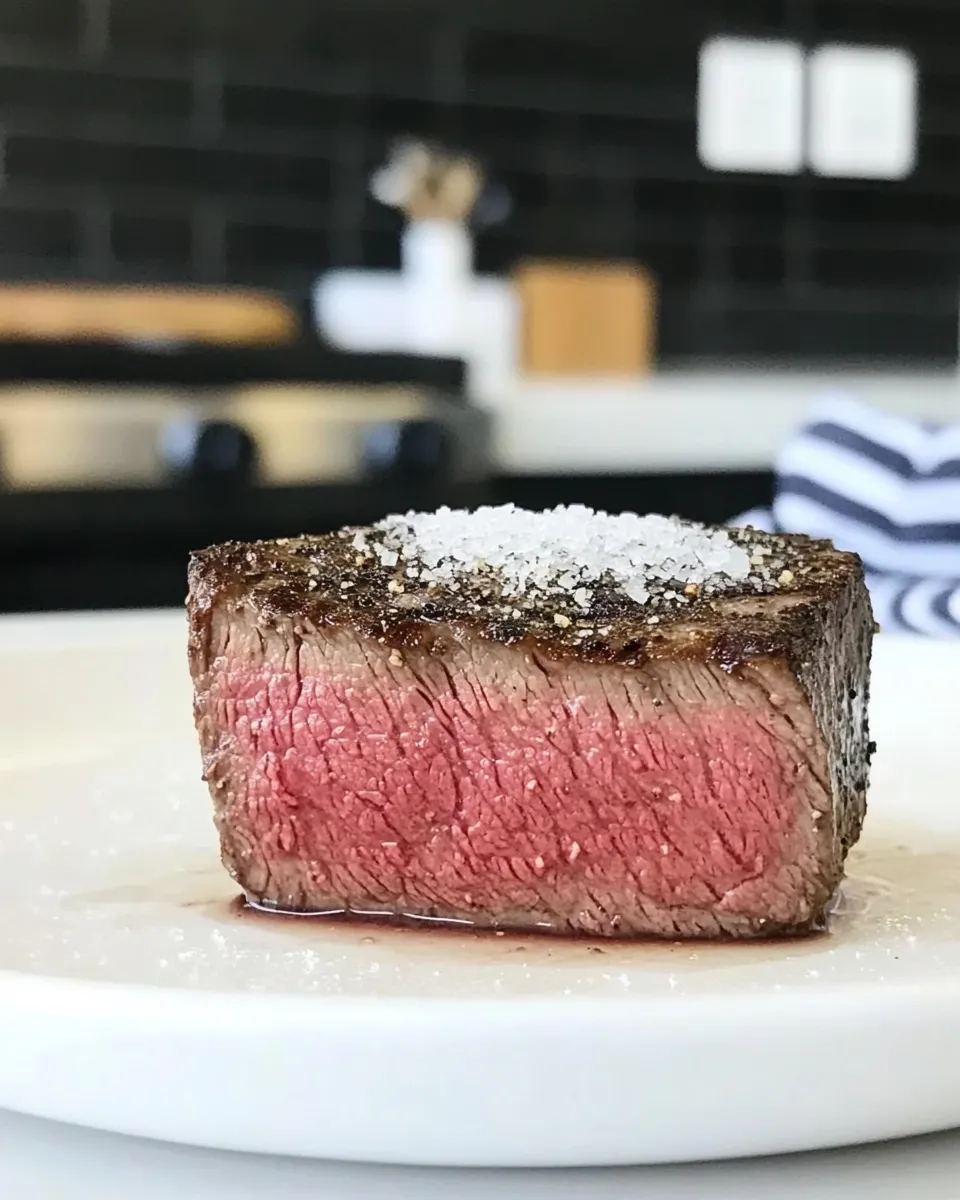
This is the dry brine method I reach for when I want a reliably flavorful, well-seared steak without complicated prep or last-minute salting. It’s a small adjustment in technique with a big payoff: deeper seasoning, drier surface for a better crust, and more even internal doneness. If you like a steak with a clean salty backbone and a pronounced sear, this is for you.
I’ll walk you through the exact steps I use, why they work, and the common mistakes I see at home. The method is forgiving, but a few details—like the thickness of the steak and how long you leave it in the refrigerator—make a real difference.
Short on time? You can still get most of the benefit with a four-hour chill. Want the absolute best crust and flavor? Plan for an overnight (or longer) dry brine. Either way, the routine is simple and repeatable.
Ingredient Notes

Before you start, a quick note about the meat and seasoning. A thick, well-marbled steak gives the best results: the fat renders and carries flavor while the dry brine seasons through. Coarse salt and freshly cracked pepper are all you truly need. If you prefer a rub, pick one without too many sugars—those tend to darken quickly during searing.
Ingredients
- 2 12-16 ounce New York Strip Steaks at least 1 ½ inches thick — thickness matters: 1½ inches or thicker gives room for a good crust while keeping a juicy interior.
- coarse salt and freshly cracked pepper to taste, or your favorite steak rub — coarse salt helps extract moisture and season evenly; pepper or a rub adds aromatic complexity at the end.
Dry Brine Steak: How It’s Done
- Pat the steaks dry on all sides with paper towels.
- Place the steaks on a wire rack set over a sheet tray. Generously season both sides with coarse salt or your favorite steak rub (you can use about 1/2 to 3/4 teaspoon per side as a guideline).
- Put the sheet tray with the steaks, uncovered, in the refrigerator for 4 to 24 hours. This allows the salt to penetrate and helps dry the surface for better searing.
- Remove the steaks from the refrigerator and season both sides with freshly cracked black pepper to taste.
- Let the steaks sit at room temperature for 10 minutes to take the chill off before cooking.
- Cook the steaks using your preferred method until they reach your desired doneness.
Why It Works Every Time
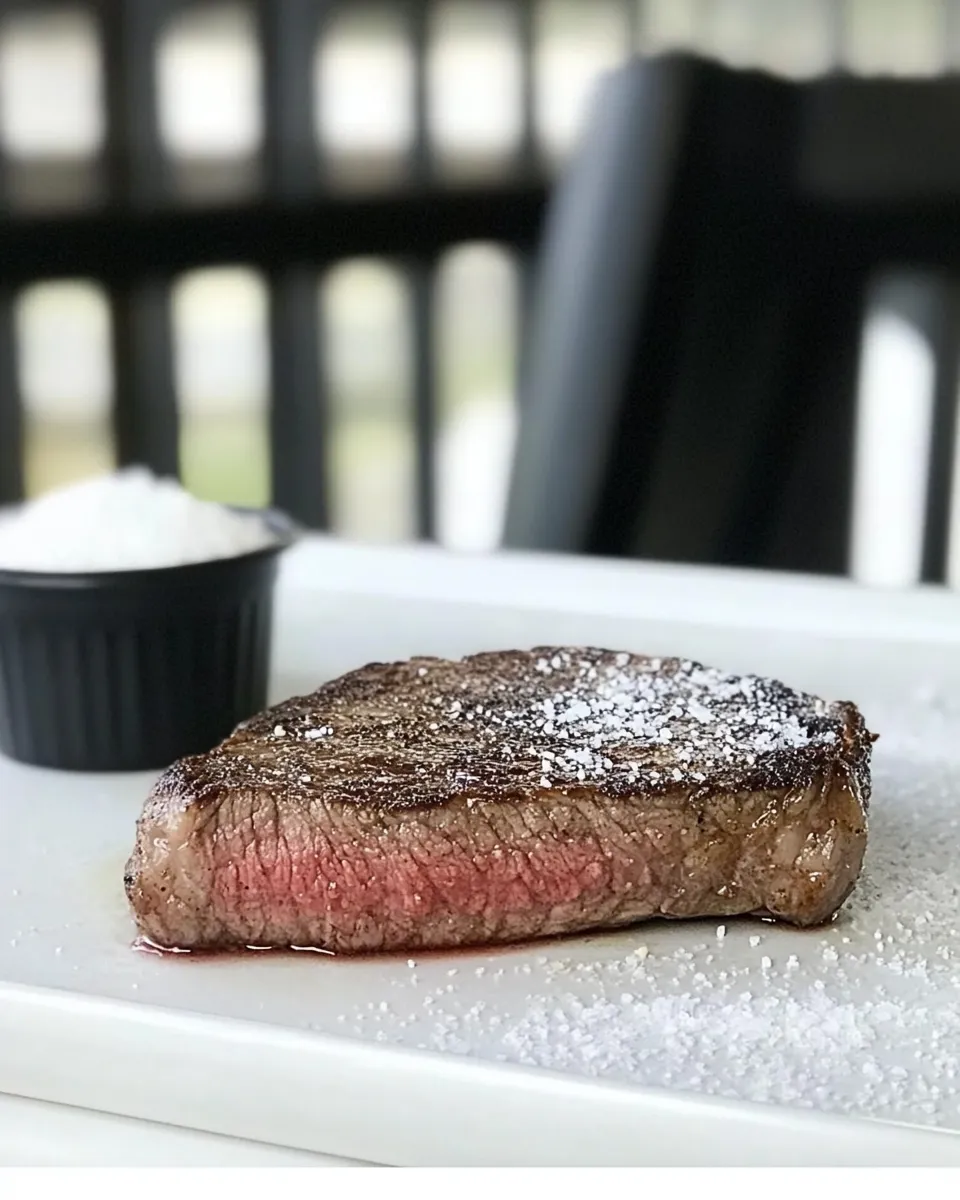
Dry brining does two things reliably: it seasons more deeply and it dries the surface so you get a better Maillard reaction when searing. When you salt the surface and let the steaks rest, the salt initially draws moisture out. Over several hours that moisture reabsorbs into the meat, carrying dissolved salt with it. The result is seasoning that reaches beyond just the surface.
At the same time, the uncovered chill in the refrigerator evaporates surface moisture. A drier surface browns faster and more evenly. That crust means flavor and texture—the edge between the char and the juicy center is where the best bites live.
Finally, giving the steaks a short rest at room temperature just before cooking reduces the temperature shock between fridge-cold meat and a hot pan or grill. That promotes more even cooking from edge to center.
Easy Ingredient Swaps
- Different cut — If you prefer Ribeye or Sirloin, the method is the same. Ribeyes will be richer; sirloins will be leaner. Adjust cooking time for thickness and fat content.
- Salt type — Use kosher salt or coarse sea salt. If you use a finer table salt, reduce the amount slightly because it’s denser.
- Pepper alternatives — Use cracked mixed peppercorns or a sprinkle of smoked paprika for a flavor shift. Add these after the brine stage to avoid burning during sear.
- Steak rubs — A rub without a lot of sugar is safest. Apply rub at the brining step if you want the rubbed flavor to penetrate; if it contains sugar, press it on after brining to avoid burning while searing.
Cook’s Kit
- Wire rack and sheet tray — Elevates steaks so air circulates and the surface dries.
- Paper towels — For patting steaks fully dry before salting.
- Heavy skillet (cast iron preferred) — Gives an even, high-heat surface for a strong sear.
- Tongs — For confident flipping without piercing the meat.
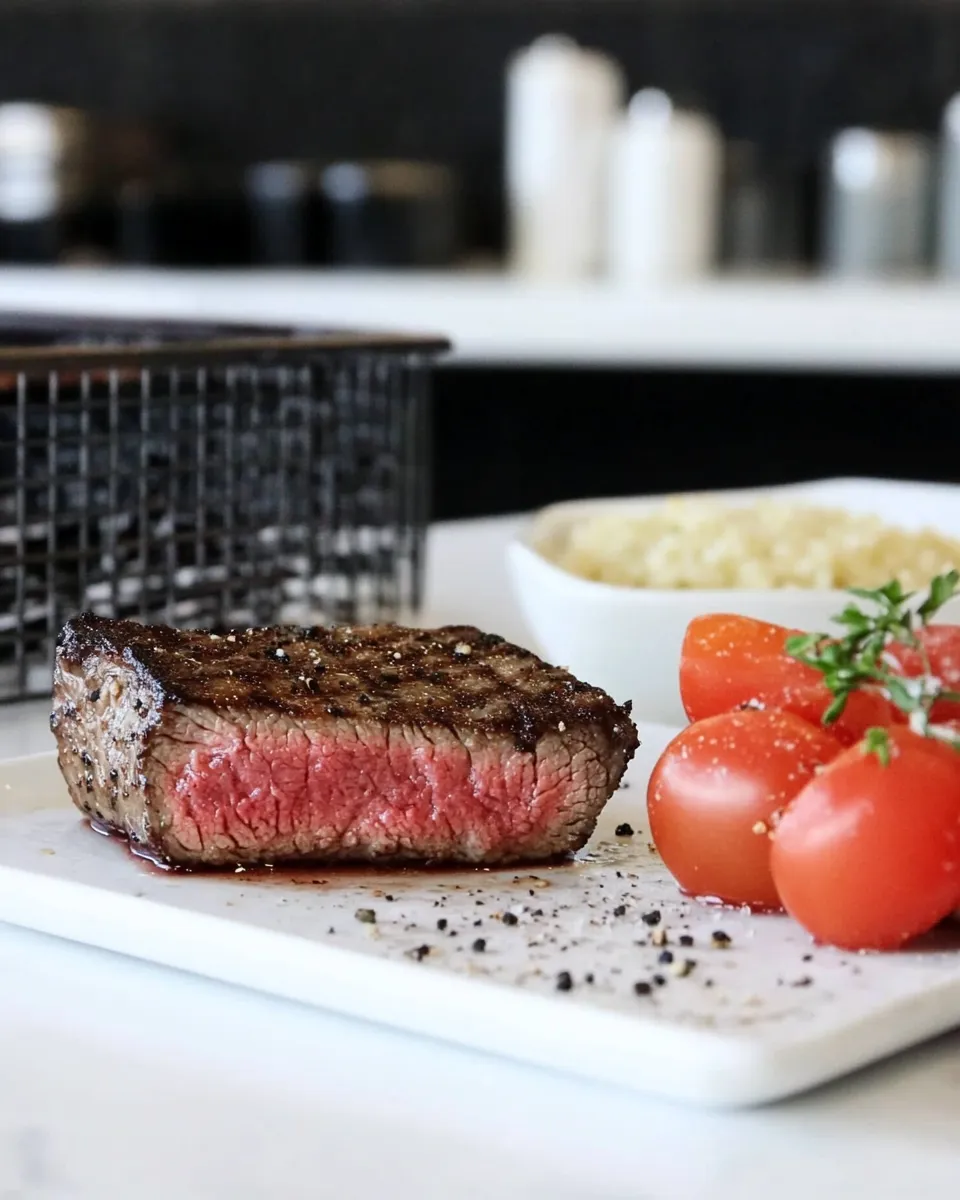
- Instant-read thermometer — The single best tool for perfect doneness. Aim for about 125°F for medium-rare pull (carryover will raise it a few degrees).
- Sheet tray space in refrigerator — You need room to leave steaks uncovered so air can circulate.
Common Errors (and Fixes)
- Too thin a steak — Problem: thin cuts overcook before developing a good crust. Fix: use steaks at least 1½ inches thick or reduce heat to a medium-high and watch closely.
- Salting too late — Problem: if you salt just before searing, the surface stays wet and you can’t form a good crust. Fix: salt and chill for at least 4 hours, or salt and wait 40–60 minutes for a shorter prep.
- Over-salting — Problem: using coarse salt but applying like table salt can lead to overly salty meat. Fix: measure roughly 1/2 to 3/4 teaspoon per side for 12–16 oz steaks as a guideline; adjust by salt granule size.
- Not drying the steak — Problem: leaves excess surface moisture, steam forms and blocks browning. Fix: pat steaks dry thoroughly with paper towels before seasoning and again just before cooking if needed.
- Skipping the rest — Problem: slicing immediately after cooking lets juices run out. Fix: rest steaks 5–10 minutes tented loosely in foil to let juices redistribute.
Smart Substitutions
- Kosher salt for coarse sea salt — Kosher is easy to pinch and forgiving. If using finer salt, cut the amount.
- Oven finish instead of stovetop — For very thick steaks, start in a hot skillet for crust, then move to a 400°F oven to finish through without burning the exterior.
- Butter and aromatics — Finish with a pat of butter, smashed garlic, and thyme or rosemary for a classic basted finish. Add these in the last 1–2 minutes of cooking.
- Grill method — Dry-brined steaks do exceptionally well on a hot grill. Use two-zone fire: sear on the hot side, then move to the cooler side if you need to finish to temperature.
What I Learned Testing
I tested multiple fridge times—4, 8, 12, and 24 hours—on identical New York strips. Four hours gave a clear improvement over salting minutes before cooking: the exterior dried and the seasoning tasted more integrated. At 12 to 24 hours, the crust formed even faster and the center tasted more evenly seasoned. There was diminishing return after 24 hours for this particular cut, but if you like a slightly firmer exterior, 24 hours is great.
Using a wire rack mattered. Steaks left directly on a tray developed a wetter bottom and a less even crust. The rack allows air to move under the meat and helps the whole surface dry.
I also learned to pepper only after the chill. Fresh-cracked pepper exposed to hours in the fridge can darken and taste slightly bitter when seared; apply it just before cooking for the best aroma.
Store, Freeze & Reheat
Leftover cooked steak keeps well in the refrigerator for 3–4 days in an airtight container. To reheat without losing too much juiciness, slice the steak thinly and warm briefly in a hot skillet with a small splash of oil, 30–60 seconds per side for thin slices, or gently reheat covered in a 250°F oven until just warm (check with a thermometer).
If you want to freeze raw steaks that you’ve dry-brined, pat them dry and wrap tightly in plastic, then place in a freezer bag. Label with the brine time and freeze up to 3 months. Thaw in the refrigerator overnight before bringing to room temperature and cooking as directed.
Dry Brine Steak Q&A
Q: How long is too long to dry-brine?
A: For most New York strip steaks 1½ inches or thicker, 4–24 hours is ideal. Past 24–48 hours you can start to notice textural changes as proteins tighten; if you plan to brine longer than 24 hours, monitor texture and flavor and consider reducing salt a touch.
Q: Can I use the method on a thinner steak?
A: You can, but the brine time should be shorter—about 40 minutes to 2 hours—to avoid over-salting and a noticeably firmer texture.
Q: Should I rinse the salt off before cooking?
A: No. The dry brine is meant to be absorbed back into the steak. Rinsing defeats the purpose and adds moisture to the surface, which hinders browning.
Q: Can I add a marinade after dry brining?
A: You can, but the benefit of the dry brine (a dry surface for browning) is best preserved if you avoid wet marinades. If you want extra flavor, brush on an oil-based or low-sugar glaze just before searing or during the final minute of cooking.
Final Thoughts
Dry brining is a small habit that consistently upgrades steak. It adds depth of seasoning without masking the meat’s flavor, speeds up crust formation, and makes your cooking more predictable. The method requires minimal ingredients and a little planning, but no fussy steps or special equipment.
Keep a note on your preferred salt amount and brine time for the cuts you cook most often. With practice, you’ll hit your preferred doneness and crust every time. Enjoy the steadier, tastier results—steak night just got reliably better.

Dry Brine Steak Recipe
Ingredients
Ingredients
- 2 12-16 ounceNew York Strip Steaks at least 1 1/2 inches thick
- coarse salt and freshly cracked pepper to taste or your favorite steak rub
Instructions
Instructions
- Pat the steaks dry on all sides with paper towels.
- Place the steaks on a wire rack set over a sheet tray. Generously season both sides with coarse salt or your favorite steak rub (you can use about 1/2 to 3/4 teaspoon per side as a guideline).
- Put the sheet tray with the steaks, uncovered, in the refrigerator for 4 to 24 hours. This allows the salt to penetrate and helps dry the surface for better searing.
- Remove the steaks from the refrigerator and season both sides with freshly cracked black pepper to taste.
- Let the steaks sit at room temperature for 10 minutes to take the chill off before cooking.
- Cook the steaks using your preferred method until they reach your desired doneness.
Equipment
- Paper Towels
- Wire Rack
- sheet tray
- Refrigerator
Notes
Make-Ahead:
You can season the steaks with salt up to 24 hours ahead.
How to Store:
It is best to leave the steak uncovered and in the refrigerator for up to 24 hours.
If you
let the steak sit seasoned for more than 24 hours, it causes it to begin drying out.
Place the
steak on a rack so that air can circulate over the bottom part of the steak, helping to dry out the surface, which is optimal for searing.
You can
do this process with larger cuts of meat for up to 72 hours.
Maillard reaction,
also known as the browning reaction, is an interaction between sugar and amino acids in the steak when heated to 285°and 350° over high heat, browning the meat to enhance the flavor and add more crispness. This is not the same as caramelizing.