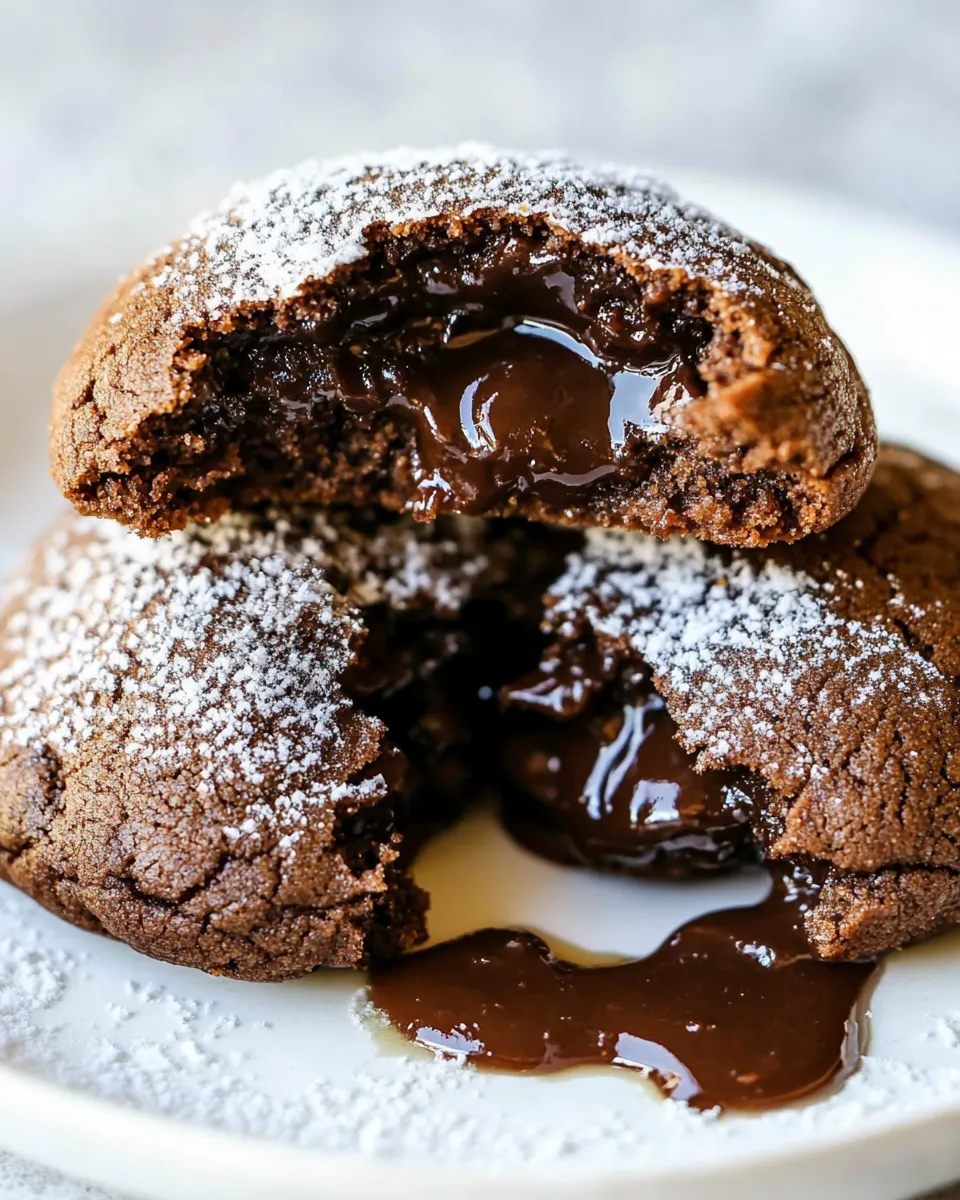
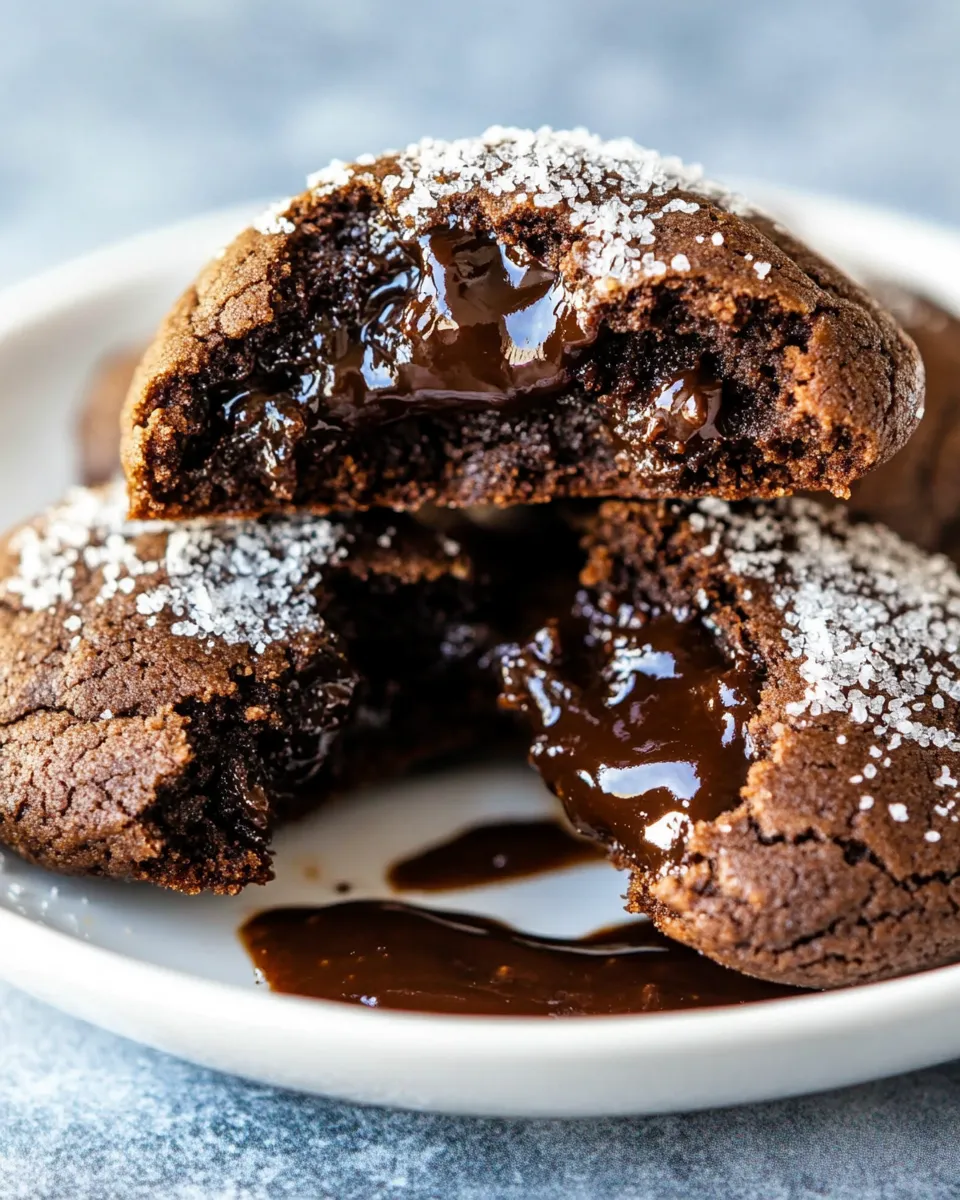
These cookies give you everything I want from a chocolate cookie: tender, slightly cakey edges and a molten, fudgy center that oozes warm hot fudge when you bite in. They take a little planning—mostly chilling the dough and the jar of hot fudge—but the steps are straightforward. If you’re comfortable creaming butter and sugar, you’re already halfway there.
I test desserts so you don’t have to guess whether the texture will hold up. Here, the structure comes from the brown sugar and eggs and a small lift from baking soda and powder; the shock of warm hot fudge inside is the star. I’ll walk you through exact steps and troubleshooting so your centers stay gooey without flattening the cookie.
Read through the notes and swaps before you begin. A couple of small choices—temperature of the hot fudge, how tightly you seal the seam, and the timing in the oven—determine whether every cookie is molten in the center or disappointingly dry. Let’s get into it and make tonight’s dessert effortless and impressive.
The Essentials
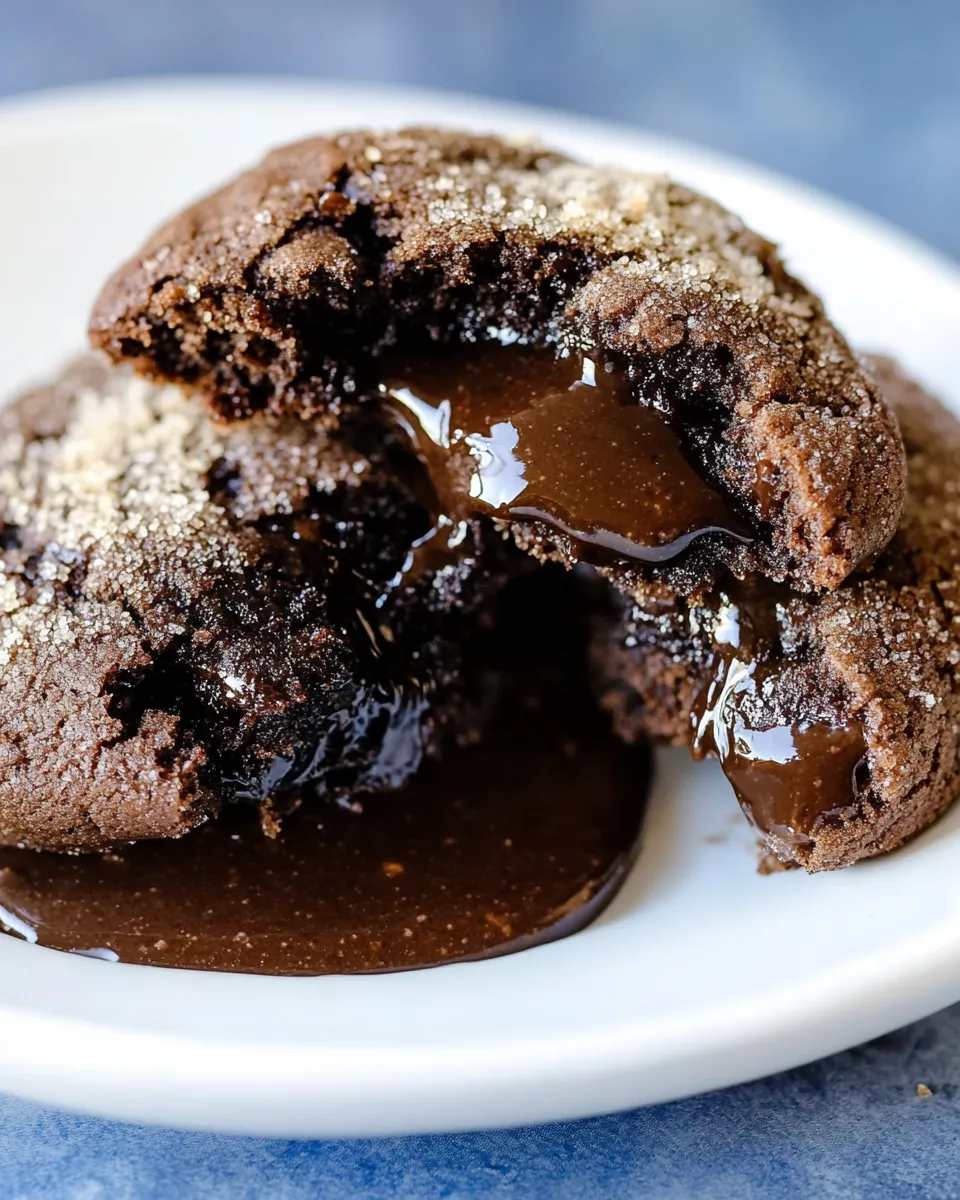
Molten Lava Cookies are chocolate cookies filled with chilled hot fudge sundae topping so the center stays liquid even after baking. You cream butter and sugars, add eggs and vanilla, fold in cocoa and flour with leaveners, chill the dough, portion, stuff with chilled hot fudge, roll in granulated sugar, and bake until edges set but centers remain soft.
Key technique points: chill the hot fudge so it’s scoopable; chill the dough so it’s workable and won’t spread too much; and bake only until the edges are set. Those three things keep the filling enclosed and molten at serving.
Ingredients
- 3/4 (1 1/2 sticks) cup unsalted butter, softened — provides richness and structure; soften so it creams smoothly with sugar.
- 1 cup light brown sugar — adds moisture and a deep, caramelized flavor that keeps cookies tender.
- 1/2 cup granulated sugar, (you will need more for rolling later) — helps with spread and gives a nice exterior crunch when coated.
- 2 large eggs — bind and contribute to the cookie’s tender crumb.
- 1 teaspoon vanilla extract — enhances the chocolate and brown-sugar flavors.
- 2 cups all-purpose flour, plus more as needed ((see note)) — the base; add a bit more only if the dough is excessively sticky.
- 1/2 cup unsweetened cocoa powder — gives the chocolate backbone; use natural or Dutch as you prefer, but flavor will differ slightly.
- 1 teaspoon baking soda — lightens texture and helps the cookie spread enough to set around the filling.
- 1/2 teaspoon baking powder — gives a bit of extra lift for a tender edge.
- 1 teaspoon salt — balances sweetness and rounds out chocolate flavor.
- 1 12 ounce jar hot fudge sundae topping ((chill in the fridge for easier scooping)) — the molten filling; chilling makes it scoopable and safer to enclose in dough.
Molten Lava Cookies: How It’s Done
- If you haven’t already, chill the jar of hot fudge sundae topping in the refrigerator for easier scooping.
- In the bowl of a stand mixer fitted with the paddle attachment (or a large bowl with a hand mixer), cream together 3/4 cup (1 1/2 sticks) unsalted butter (softened), 1 cup light brown sugar, and 1/2 cup granulated sugar until light and fluffy, about 2–3 minutes.
- Add 2 large eggs, one at a time, beating briefly after each addition. Add 1 teaspoon vanilla extract and beat just until combined.
- In a separate bowl, whisk together 2 cups all-purpose flour, 1/2 cup unsweetened cocoa powder, 1 teaspoon baking soda, 1/2 teaspoon baking powder, and 1 teaspoon salt.
- Gradually add the dry ingredients to the butter mixture and mix on low speed (or stir by hand) until just combined. Do not overmix. If the dough is excessively sticky, add additional all-purpose flour as needed so the dough is manageable (see ingredient note).
- Flatten the dough into a disk, wrap it tightly in plastic wrap, and chill in the refrigerator for 2 hours.
- When the dough has finished chilling, preheat the oven to 350°F. Line baking sheets with parchment paper.
- Prepare a small bowl with additional granulated sugar for rolling (use enough to coat the cookie dough balls).
- Remove the chilled dough. Using a spoon or cookie scoop, portion about 2 tablespoons of dough for each cookie. Flatten each portion into a small disk with your fingers.
- Place about 1 teaspoon of the chilled hot fudge topping in the center of each dough disk. Fold the dough up and around the filling, pinching and smoothing the seams to form a tight ball so the filling is fully enclosed.
- Roll each filled dough ball in the prepared granulated sugar to coat, then place the balls on the prepared baking sheets about 2 inches apart.
- Bake in the preheated oven for 10–11 minutes, until the edges are set. The centers may still look slightly soft — that is normal for a molten center.
- Let the cookies cool on the baking sheet until they are firm enough to transfer to a cooling rack. If served immediately, the centers will be very gooey; they will firm up a bit as they cool.
What Makes This Recipe Special
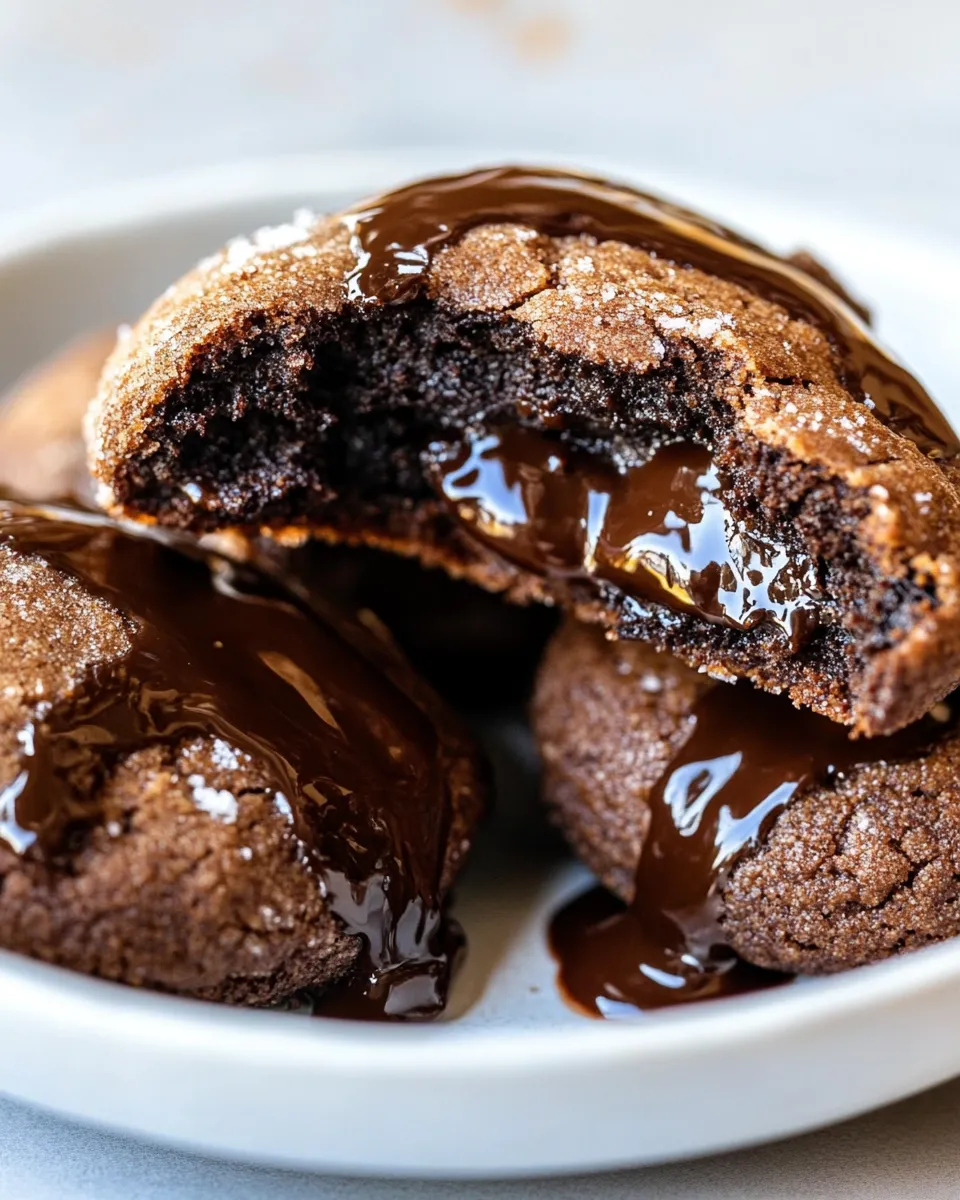
This recipe hinges on contrast: a slightly set exterior and a flowing, warm center. The chilled hot fudge keeps its shape while you form the cookie, then melts during baking, creating the molten effect. Using both baking soda and a little baking powder gives the cookie a controlled rise that sets a rim while the center stays soft.
Light brown sugar brings moisture and a subtle toffee note that plays beautifully with the concentrated chocolate of the cocoa powder and the rich, sugary shock of the hot fudge. The dough is intentionally chilled to prevent over-spread and to permit a tight seal around the filling—seal it well and you’ll avoid leaks in the oven.
Swap Guide
- Butter — you can use salted butter but reduce added salt to avoid over-seasoning; stick with unsalted for predictable results.
- Hot fudge topping — a thick chocolate caramel or ganache works if it’s spoonable after chilling; avoid runny syrups that won’t hold shape when scooped.
- Flour — all-purpose is the right balance here; if you try a whole-wheat swap, expect denser cookies and adjust by adding a tablespoon or two of extra liquid or fat.
- Cocoa — swapping Dutch for natural cocoa will slightly change acidity and flavor; you don’t need to adjust leaveners for a small cocoa swap.
What You’ll Need (Gear)
- Stand mixer with paddle attachment — fastest and most consistent for creaming, though a hand mixer and a sturdy bowl will also work.
- Mixing bowls — at least two: one for wet and one for dry ingredients.
- Plastic wrap — to chill the dough disk tightly.
- Baking sheets and parchment paper — parchment prevents sticking and helps even baking.
- Cookie scoop or tablespoon and spoon — for consistent portions.
- Small bowl for granulated sugar — for rolling the dough balls.
- Cooling rack — essential so bottoms don’t steam and soften after baking.
Learn from These Mistakes
- Filling leaks — usually from an unsealed seam or over-soft hot fudge. Chill the topping and press seams tightly; if seams are thin, patch with a little extra dough.
- Cookies spread too much — dough not cold enough or butter too soft. Chill the dough the full 2 hours and make sure the butter was just softened, not greasy.
- Centers too firm — likely underfilled or overbaked. Use the full teaspoon of hot fudge and remove the cookies once edges are set but centers still look soft.
- Dry crumb — overmixing the dough or adding too much extra flour. Mix only to combine and add flour sparingly if absolutely needed.
Seasonal Flavor Boosts
A small add-on can change the profile without altering the structure. Try one of these ideas sparingly so you don’t overpower the molten center:
- Orange zest — fold 1/2 to 1 teaspoon into dough for a bright, winter-citrus note that pairs with chocolate.
- Cayenne or chili powder — a tiny pinch in the dough accentuates chocolate for a subtle spicy finish.
- Toasted nuts — finely chopped and folded in (a tablespoon or two) adds texture; keep pieces small so they don’t pierce the filling.
Recipe Notes & Chef’s Commentary
Measure flour by spooning it into your measuring cup and leveling off; packing flour will lead to dry, cakey cookies that won’t hug the hot fudge properly. When the recipe says “softened” butter, it means soft enough to make an indent when pressed but not melty—think room temperature, not warm.
When enclosing the hot fudge, aim to create a smooth, sealed ball. This avoids leaks and keeps the molten center in place. If a cookie oozes during baking, pull the rest and use an oven thermometer to check your actual temperature; some ovens run hot and shorten the window between set edges and over-baked centers.
How to Store & Reheat
Store cooled cookies in an airtight container at room temperature for up to 3 days. For longer storage, freeze unbaked filled dough balls on a sheet until solid, then transfer to a freezer bag; bake from frozen, adding a minute or two to the bake time.
To reheat and revive a gooey center, warm cookies in a 300°F oven for 5–7 minutes or microwave for 10–15 seconds on medium—watch closely so you warm the center without drying the edges. If frozen, bake straight from the freezer at 350°F and add 1–2 minutes to the listed bake time.
Ask & Learn
Q: Can I make the dough ahead?
A: Yes. Chill the dough up to 48 hours; bring back to firm chill before portioning. You can also freeze portioned, filled dough balls and bake later.
Q: What if my hot fudge is too thin?
A: Chill it until it firms enough to scoop. If it never firms, mix in a small amount of melted chocolate and chill to thicken, but only if you’re comfortable adjusting the filling consistency.
Q: Can I make larger or smaller cookies?
A: Yes, but adjust bake time. Smaller cookies may need less time and will set quicker; larger ones require more time and careful monitoring so the center remains molten.
Make It Tonight
Timeline (approximate)
- 0–15 minutes — soften butter, measure ingredients, chill the hot fudge in the fridge if not already chilled.
- 15–25 minutes — cream butter and sugars, add eggs and vanilla, whisk dry ingredients, combine.
- 25–30 minutes — shape dough into a disk, wrap, and place in fridge for 2 hours.
- After chilling — preheat oven, portion, fill, roll in sugar, and bake 10–11 minutes.
Finish & Serve
Serve warm or slightly cooled so the center is molten but not scalding. Pair with ice cream or a simple dusting of powdered sugar if you like. These cookies travel well to a neighbor’s house if transported after cooling, but to preserve the molten center, warm them briefly before serving.
Make these the next time you want a small-showstopper dessert: manageable steps, reliable technique, and a flowingly chocolate center that grabs attention without complicated equipment. Enjoy—these are simple enough for a weeknight dessert and indulgent enough for guests.

Molten Lava Cookies
Ingredients
Ingredients
- 3/4 1 1/2 stickscup unsalted butter, softened
- 1 cuplight brown sugar
- 1/2 cupgranulated sugar (you will need more for rolling later)
- 2 large eggs
- 1 teaspoonvanilla extract
- 2 cupsall-purpose flour plus more as needed ((see note))
- 1/2 cupunsweetened cocoa powder
- 1 teaspoonbaking soda
- 1/2 teaspoonbaking powder
- 1 teaspoonsalt
- 112 ounce jar hot fudge sundae topping (chill in the fridge for easier scooping)
Instructions
Instructions
- If you haven’t already, chill the jar of hot fudge sundae topping in the refrigerator for easier scooping.
- In the bowl of a stand mixer fitted with the paddle attachment (or a large bowl with a hand mixer), cream together 3/4 cup (1 1/2 sticks) unsalted butter (softened), 1 cup light brown sugar, and 1/2 cup granulated sugar until light and fluffy, about 2–3 minutes.
- Add 2 large eggs, one at a time, beating briefly after each addition. Add 1 teaspoon vanilla extract and beat just until combined.
- In a separate bowl, whisk together 2 cups all-purpose flour, 1/2 cup unsweetened cocoa powder, 1 teaspoon baking soda, 1/2 teaspoon baking powder, and 1 teaspoon salt.
- Gradually add the dry ingredients to the butter mixture and mix on low speed (or stir by hand) until just combined. Do not overmix. If the dough is excessively sticky, add additional all-purpose flour as needed so the dough is manageable (see ingredient note).
- Flatten the dough into a disk, wrap it tightly in plastic wrap, and chill in the refrigerator for 2 hours.
- When the dough has finished chilling, preheat the oven to 350°F. Line baking sheets with parchment paper.
- Prepare a small bowl with additional granulated sugar for rolling (use enough to coat the cookie dough balls).
- Remove the chilled dough. Using a spoon or cookie scoop, portion about 2 tablespoons of dough for each cookie. Flatten each portion into a small disk with your fingers.
- Place about 1 teaspoon of the chilled hot fudge topping in the center of each dough disk. Fold the dough up and around the filling, pinching and smoothing the seams to form a tight ball so the filling is fully enclosed.
- Roll each filled dough ball in the prepared granulated sugar to coat, then place the balls on the prepared baking sheets about 2 inches apart.
- Bake in the preheated oven for 10–11 minutes, until the edges are set. The centers may still look slightly soft — that is normal for a molten center.
- Let the cookies cool on the baking sheet until they are firm enough to transfer to a cooling rack. If served immediately, the centers will be very gooey; they will firm up a bit as they cool.
Equipment
- Stand mixer with paddle attachment (or large bowl and hand mixer)
- Mixing Bowl
- Measuring cups and spoons
- Plastic Wrap
- Refrigerator
- Baking Sheets
- Parchment Paper
- Small Bowl
- Cookie scoop or spoon
- Cooling rack
- Oven
Notes
Start with 2 cups of flour and add 2 tablespoons at a time if the dough is too soft. The dough will need to be sturdy enough to be handled. Source:
Cookie Remix
by
Pip and Ebby (
Megan Porta), Page Street Publishing Co. 2018; printed with permission from the author